# Boot, Kernel, Recovery, and Tunables
# Linux Boot Process
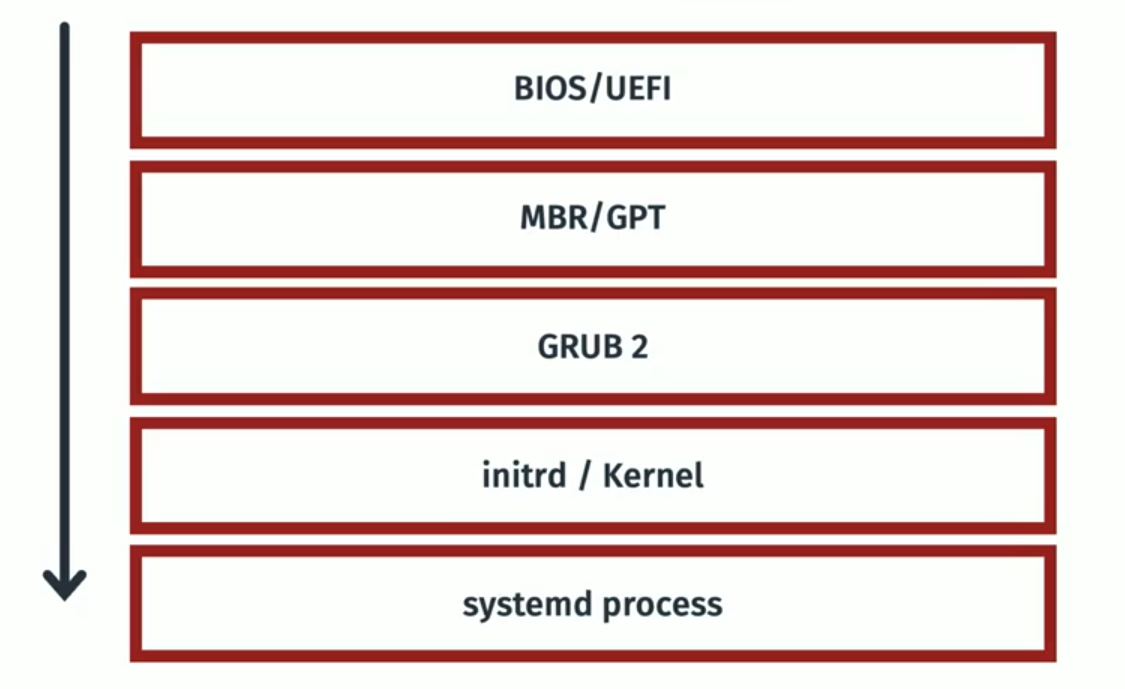
The below image outlines the typical flow of a Linux system boot.
[](https://bookstack.b4sed.xyz/uploads/images/gallery/2024-06/1ZOimage.png)
====================================================================================
#### BIOS (Basic Input/Output System) & UEFI (Unified Extensible Firmware Interface)
BIOS (Basic Input/Output System) and UEFI (Unified Extensible Firmware Interface) are both firmware interfaces that provide a critical layer between your hardware and operating system during the startup process. However, they differ significantly in their functionality and capabilities.
**Similarities:**
- Both BIOS and UEFI are pre-installed on your motherboard and activate when you turn on your computer.
- They perform essential tasks like initializing hardware components, performing power-on self-tests (POST), and loading the operating system from a storage device.
====================================================================================
#### MBR - master boot record & GPT - GUID partition table
MBR (Master Boot Record) and GPT (GUID Partition Table) are both partition table formats used on hard disk drives (HDDs) and solid-state drives (SSDs) to define how the storage space is organized. However, they have some key differences:
**Similarities:**
- Both MBR and GPT are located at the beginning of a storage device and define how the storage space is divided into partitions.
- They both store information about each partition, such as its size, file system type, and location on the disk.
- Both allow you to create multiple partitions on a single storage device, enabling you to manage different operating systems or data types more efficiently.
- Identification of boot loader (typically at beginning of disk) - Once identified, the boot process is handled by the boot loader - most commonly GRUB2.
Note; MBR is an older standard of partitioning, most systems will now use GUID.
====================================================================================
#### GRUB2 (Grand Unified Boot Loader)
GRUB2 is a software program, specifically a bootloader. Its primary function is to take control during the computer startup process after the firmware (BIOS or UEFI) has initialized the hardware. Here's a breakdown of its role:
- Loading the Operating System Kernel**:** GRUB2 locates the kernel (the core program) of your operating system on the storage device. It then loads this kernel into memory.
- starts kernel and systemd.
====================================================================================
#### Initrd & Kernel
\------------------------------------------------------------------------------------------------------------------------------------------------
#### What is initrd?
initrd (initialisation RAM disk) is essentially a set of instructions used to load the kernel. initrd is stored temporarily in system memory whilst the kernel is loaded.
\------------------------------------------------------------------------------------------------------------------------------------------------
#### What is a Linux Kernel?
The Linux kernel is the core software that acts as an interface between the hardware and various software applications running on your system.
====================================================================================
#### Systemd
Systemd is the first process that starts on a booting OS. Systemd is a foundational software suite for Linux operating systems. It acts as a **system and service manager**, handling tasks like booting up the system and managing services that run in the background.
\------------------------------------------------------------------------------------------------------------------------------------------------
# Troubleshooting Boot Issues & System Recovery
====================================================================================
### System boot logs
The below log files are most relevant to viewing boot logs and errors
`dmesg` - Contains all boot data
`syslog/journal/messges` - Logging post boot
====================================================================================
### Recovery Options
\------------------------------------------------------------------------------------------------------------------------------------------------
#### Alternative Kernel
Firstly, it's worth ruling out a bad kernel file. When attempting to boot the system, enter grub and set an old kernel version to be booted from.
\------------------------------------------------------------------------------------------------------------------------------------------------
#### Live CD Boot
Booting from a live CD essentially means that an external device is connected to the server containing a live CD image. This can be used to launch the operating system (from the external device) with a fresh (temporary) Linux installation.
The process for attaching the live CD varies depending on the tools available. If you're dealing with a physical server that you have physical access to, we can connect a USB drive or CD containing the live CD image.
Since we have access to DRAC, we can actually attach the image from there:
DRAC > Attach Media
Once attached, you'll need to boot the system an
Once you're booted into the OS (live CD), we'll be able to mount the original server disks (still containing the old OS) within the new OS. From here we can troubleshoot the issues we're seeing.
\------------------------------------------------------------------------------------------------------------------------------------------------
##### Example Scenario; GRUB Broken
In this scenario, there's a problem with GRUB (boot loader) on the server OS. One way we could look to resolve this is by reconfiguring/reinstalling GRUB.
Luckily, our live CD will contain a fully working version of GRUB that we can use to fix our broken system.
In this scenario, I've attached and booted from a live CD. I've then mounted the original server disks (/dev/sdb1 mounted to /mnt/sdb1).
```
sudo grub-install --root-directory=/mnt/sdb1 /dev/sdb
```
Once done, reboot into the original OS and see if it's fixed.
\------------------------------------------------------------------------------------------------------------------------------------------------
##### Example scenario; Slow Boot
For troubleshooting slow server boots, we can use the below command:
```
systemd-analyze blame
```
This command will list the amount of time that each service has taken to start at boot.
====================================================================================
# GRUB - Grand Unified Boot Loader
====================================================================================
#### GRUBs responsibility in the boot process
====================================================================================
#### GRUB Configuration Options
There are 2 directories to note when talking about GRUB;
`/etc/grub - This directory stores configuration scripts that define boot entries for GRUB2.`
`/boot/grub - This directory stores the actual GRUB2 configuration files used during boot.`
There are also 2 commands to note for GRUB configuration:
**`grubby`**
- **Function:** `grubby` is a command-line tool that allows you to directly manipulate individual GRUB2 menu entries on your system. It provides functionalities for:
- Setting the default boot entry
- Adding, removing, or modifying existing entries
- Changing boot order
- Viewing information about current entries
- **Focus:** `grubby` operates on individual boot entries within the existing GRUB2 configuration.
**`grub2-mkconfig`**
- **Function:** `grub2-mkconfig` (or sometimes shortened to `update-grub` on some systems) is a utility used to regenerate the GRUB2 configuration file (`grub.cfg`) located in `/boot/grub`. It reads configuration scripts from the `/etc/grub.d` directory.
- **Focus:** `grub2-mkconfig` focuses on rebuilding the entire GRUB2 configuration file based on the defined scripts. This ensures the `grub.cfg` file reflects any changes made to the configuration scripts in `/etc/grub.d`.
====================================================================================
# Kernel, Modules, Tunables & initrd (Initialisation RAM Disk)
### Kernel
====================================================================================
#### What is a Linux Kernel?
The Linux kernel is the core software that acts as an interface between the hardware and various software applications running on your system.
\------------------------------------------------------------------------------------------------------------------------------------------------
#### Check kernel version
```
uname -r
```
After installing a new kernel version, a server reboot is required.
\------------------------------------------------------------------------------------------------------------------------------------------------
#### Which file in /boot is the kernel?
Typically, the kernel file itself (located within /boot) is prefaced with 'vmlinuz', for example:
`vmlinuz-5.15.0-106-generic`
Note; is the kernel is prefaced with vmlinuz - this means that the kernel is compressed and must be uncompressed on boot. If the kernel file is prefaced with vmlinux - then it isn't compressed.
Working on Linux systems, you may see systems with various kernels installed.
To check which kernel is currently being treated as the primary one (which will be loaded on boot), you can check the symlinks (in /boot), as below:
`vmlinuz -> vmlinuz-5.15.0-107-generic`
`vmlinuz.old -> vmlinuz-5.15.0-106-generic`
\------------------------------------------------------------------------------------------------------------------------------------------------
#### Kernel Modules
##### What is a kernel module?
A kernel module is essentially a piece of code that can be loaded into the operating system's kernel on demand. Think of it like an extension for the kernel, providing additional functionality without requiring a complete system restart. In other systems, modules are known as drivers.
For clarification; Kernel modules are not the only method that the kernel can be altered. You can also directly edit GRUB to pass additional commands during boot, or alter the kernel manually.
##### Why do we need kernel modules?
The Linux Kernel is 'monolithic', this means that it's a single file containing every aspect of that particular kernel. In order to change this, we would have to alter and recompile the kernel manually - which is lots of work. Alternatively, we can use pre-built kernel modules to add additional functionality to the Linux Kernel.
##### About Kernel Modules
Kernel Modules are typically stored in `/lib/modules`.
Typically, this directory will contain various modules that come pre-installed with the OS, note that these won't all be active.
##### List active kernel modules:
```
lsmod
```
##### Activate an installed kernel module
Firstly, identify the module file path (within /lib/modules). This will have a .ko file extension.
```
sudo insmod /lib/modules/path/to/ko/file
```
##### Disable an installed kernel module
```
sudo rmmod modulename
```
##### Check for module dependencies
This is worth doing if you're adding a new kernel module to a system:
```
sudo modprobe -a modulename
```
\------------------------------------------------------------------------------------------------------------------------------------------------
#### Kernel Tunables
In Linux, a tunable refers to a specific type of configuration setting within the kernel. These tunables allow you to customize the behavior of the kernel while the system is running, offering more fine-grained control over how your system operates.
There are lots of tunables set for the Linux Kernel that dictate how the system will handle a variety of system aspects. As an example, there's a tunable for the maximum number of files that a Linux system can have open at any one time, called 'fs-file-max'
##### View all tunables:
```
sysctl -a
```
##### View specific tunable:
```
sysctl tunable-name
```
##### Change tunable value (doesn't persist reboot):
```
sysctl -w tunable-name=newvalue
```
##### Permanently change tunable value
Specifically where this can be done is OS dependent, a typical location is `/etc/sysctl.d`
Create a new file ie 00-custom-settings.conf
contents:
tunable-name=newvalue
====================================================================================
### initrd
\------------------------------------------------------------------------------------------------------------------------------------------------
#### What is initrd?
initrd (initialisation RAM disk) is essentially a set of instructions used to load the kernel. initrd is stored temporarily in system memory whilst the kernel is loaded.
\-----------------------------------------------------------------------------------------------------------------------------------------------
#### Which file in /boot is initrd?
The initrd file will be prefaced with just that - initrd:
`initrd.img-5.15.0-106-generic`
To check which initrd file is currently being treated as the primary one (which will be loaded on boot), you can check the symlinks (in /boot), as below:
`initrd.img -> initrd.img-5.15.0-107-generic`
`initrd.img.old -> initrd.img-5.15.0-106-generic`
\-----------------------------------------------------------------------------------------------------------------------------------------------
# Single User Mode
====================================================================================
You might need to boot into single user mode in some of the following cases:
Completely locked out of server - no credentials know
root or sudo users inaccessible.
Filesystem corruption
====================================================================================
Reboot server and access console via OOB (DRAC or KVM)
Once you see the kernel selection screen in boot menu, hit 'e' on your keyboard. This will load up the GRUB boot menu.
Once here, you want to instruct GRUB to boot the system into single user mode by appending the following to the line beginning with 'linux' or similar:
```
init=/bin/bash
```
Once you've appended this to the line, press ctrl + x to proceed with the boot up.
You should then be entered into the system at single user mode, you'll know this has worked because you'll be shown the CLI showing:
```
:#
```
From here, we then need to mount the filesystem with rw (read & write) enabled:
(ensure to mount the correct disk)
```
mount -o remount,rw /dev/sda1 /
```
You can then look to reset the password for required accounts, ie ukfastsupport, root, graphiterack:
```
passwd username
```
Once you've reset the required passwords, you then need to remount the filesystem as ro (read only):
(ensure to mount the correct disk)
```
mount -o remount,ro /dev/sda1 /
```
Now we can look to reboot the system via OS:
shutdown -r now, reboot, systemctl reboot etc
You should now be able to access the server via SSH using the newly reset credentials.
# FSCK
====================================================================================
### FSCK (File System Consistency Check)
\------------------------------------------------------------------------------------------------------------------------------------------------
#### What does FSCK do?
`fsck` (file system consistency check) is a system utility used to check and repair filesystems. FSCK is made up of various tools that are made to handle different filesystem types, these are stored within /usr/sbin:
```
lrwxrwxrwx 1 root root 8 Mar 23 2022 dosfsck -> fsck.fat
-rwxr-xr-x 1 root root 360280 Jun 1 2022 e2fsck
-rwxr-xr-x 1 root root 43440 Apr 9 15:32 fsck
-rwxr-xr-x 1 root root 1185 Feb 24 2022 fsck.btrfs
-rwxr-xr-x 1 root root 31168 Apr 9 15:32 fsck.cramfs
lrwxrwxrwx 1 root root 6 Jun 1 2022 fsck.ext2 -> e2fsck
lrwxrwxrwx 1 root root 6 Jun 1 2022 fsck.ext3 -> e2fsck
lrwxrwxrwx 1 root root 6 Jun 1 2022 fsck.ext4 -> e2fsck
-rwxr-xr-x 1 root root 84360 Mar 23 2022 fsck.fat
-rwxr-xr-x 1 root root 55712 Apr 9 15:32 fsck.minix
lrwxrwxrwx 1 root root 8 Mar 23 2022 fsck.msdos -> fsck.fat
lrwxrwxrwx 1 root root 8 Mar 23 2022 fsck.vfat -> fsck.fat
-rwxr-xr-x 1 root root 1968 Feb 9 2022 fsck.xfs
-rwxr-xr-x 1 root root 51592 Nov 1 2022 ntfsclone
-rwxr-xr-x 1 root root 35200 Nov 1 2022 ntfscp
```
#### Purpose of fsck
- Checking Filesystem Integrity: It scans the filesystem for inconsistencies and potential errors, such as corrupted metadata, lost clusters, and bad sectors.
- Repairing Errors: `fsck` can fix detected issues to prevent data loss and improve system stability.
\------------------------------------------------------------------------------------------------------------------------------------------------
You can only run a filesystem check on an unmounted disk.
Scanning a specific disk (optional repair):
```
fsck -t ext4 /dev/sda2
```
Scanning all disks (optional repair)
```
fsck -A
```
##### FSCK Options:
| -A | Check all filesystems. |
| -t \[option\] | Specify filesystem type |
| -y | Automatically attempt to fix any errors without user prompt |
| -n | Do not attempt to repair |
| -f | Forces a check, even if the filesystem appears to be fine |
| -T | Skip mounted filesystems |
| -R | Skip the root filesystem |
\------------------------------------------------------------------------------------------------------------------------------------------------
#### FSCK on boot
FSCK can be configured to run for each filesystem when the server boots. [For more info see here.](https://bookstack.b4sed.xyz/link/160#bkmrk-filesystem%3A-the-bloc)
====================================================================================
# OOB Management - KVM & DRAC
====================================================================================
### KVM
------------------------------------------------------------------------------------------------------------------------------------------
Useful Links:
[KVM KB](https://kb.ukfast.net/Attaching_Spider_Duo_KVM_Switches)
------------------------------------------------------------------------------------------------------------------------------------------
#### What is a KVM?
A KVM is an out-of-band access device which can be attached to servers in order to allow engineers to access them. KVMs are useful to have attached when a server goes down or isn't accessible through DRAC.
------------------------------------------------------------------------------------------------------------------------------------------
#### Attaching a KVM
To have a KVM attached to a server you need to create a task for the relevant data center:
In the task ask them to attach a KVM to the required SID
------------------------------------------------------------------------------------------------------------------------------------------
#### Accessing a KVM
Each KVM has its own SID
Search for the IP of the KVM in a browser – creds to sign in will be in password tab on the SID – search TechDB for KVM IP
Access through Firefox on DRAC Jumpbox
Enter console > download > open with > Java
Java can be funny sometimes, if it won't load, open Java Configure (search start menu) and add the KVM URL to the allow list on security tab
====================================================================================
### DRAC
------------------------------------------------------------------------------------------------------------------------------------------
Useful Links:
[DRAC Link Generator](https://internal-system.ukfast.co.uk/server/drac-eui64-generator.php)
[DRAC KB](https://kb.ukfast.net/Drac)
------------------------------------------------------------------------------------------------------------------------------------------
#### What is DRAC?
DRAC (Dell Remote Access Controller) is an out-of-band management tool which can be used for managing/ controlling servers resources and functions. DRAC essentially allows servers to be controlled when we aren't able to directly connect to the server through SSH or RDP. It has features such as hardware monitoring, reboot/restart controls/ terminal access and more.
------------------------------------------------------------------------------------------------------------------------------------------
# Single User Mode
Boot the server into ['single user mode'](https://bookstack.b4sed.xyz/link/74#bkmrk-page-title)
B. Once in single user mode, we can look to initiate the fsck
We will first need to check the filesystem type being used:
get the device name:
```
root@test:~# df
Filesystem 1K-blocks Used Available Use% Mounted on
tmpfs 400556 1068 399488 1% /run
/dev/mapper/ubuntu--vg-ubuntu--lv 15371208 7497096 7071504 52% /
tmpfs 2002776 0 2002776 0% /dev/shm
tmpfs 5120 0 5120 0% /run/lock
/dev/sda2 1992552 256828 1614484 14% /boot
tmpfs 400552 4 400548 1% /run/user/0
```
In this example, we want to check '/dev/mapper/ubuntu--vg-ubuntu--lv' which is mounted to /.
Check the filesystem type:
```
root@test:~# blkid /dev/mapper/ubuntu--vg-ubuntu--lv
/dev/mapper/ubuntu--vg-ubuntu--lv: UUID="2f1c5c3e-54e0-4edc-9d19-a1f170959479" BLOCK_SIZE="4096" TYPE="ext4"
```
As you can see, in this example the type is ext4.
C. Running the fsck:
The general command structure for running an fsck is as below:
```
##Check for errors (No repair)
fsck.filesystem_type /dev/device_name -o ro
##Check and repair errors
fsck.filesystem_type /dev/device_name
```
In this example, I'm going to run a check and then a repair seperately:
```
##Check for errors (No repair)
fsck.ext4 /dev/mapper/ubuntu--vg-ubuntu--lv -o ro
##Check and repair errors
fsck.ext4 /dev/mapper/ubuntu--vg-ubuntu--lv
```
2\.
3\.