# Containerisation & Automation
Docker, Kubernetes, Ansible
# What is a container?
A container is essentially an isolated (from the rest of the OS) environment that's dedicated to an application or process. Containers will typically have their own allocated resources - ie memory and disk.
Common container virtualisation tools:
Docker
LXC/LXD
Podman
# General Docker Information
====================================================================================
To preface this page; I personally recommend trying out [Portainer](https://www.portainer.io/), which is essentially a web GUI for Docker - it's great. Portainer even lives in a docker container itself.
Regarding images and container management; the contents of this page are great if you're working with a small number of containers that are being installed/setup as a one-off then this is all fine, however, if you're launching containers for applications that need to be updated, changed/customised etc then you're probably best off taking a look at the [Docker Compose page.](https://bookstack.b4sed.xyz/books/linux/page/docker-compose)
====================================================================================
### Installation
Install Docker CE (Community Edition)
```
apt install docker.io
```
====================================================================================
### Commands & Usage
------------------------------------------------------------------------------------------------------------------------------------------------
#### Managing Containers
##### List Docker processes/containers (running and stopped)
```
docker ps -a
```
##### Start a container
```
docker start containername
```
##### stop a container
```
docker stop containername
```
##### Delete a container
```
docker rm containername
```
##### Check container performance metrics
```
docker stats containername
```
------------------------------------------------------------------------------------------------------------------------------------------------
#### Adding new docker images
Docker has their own 'marketplace' of sorts for docker images:
[https://hub.docker.com/](https://hub.docker.com/)
##### To install a new docker image
```
docker pull container-name
```
##### List installed Docker images
```
docker images
```
##### Search locally installed images, and search Docker repository for available images
```
docker search name
```
------------------------------------------------------------------------------------------------------------------------------------------------
#### Launching Containers
====================================================================================
Basic launch for a container based on an image
```
docker run --name containername -it imagename
```
There are lots and lots of options available for the [docker run command](https://docs.docker.com/reference/cli/docker/container/run/):
Starting an instance with this method will push your shell into the container itself. To exit the container (continues running):
```
ctrl+p ctrl+x
```
To connect to a docker image:
```
docker attach containername
```
To connect to a docker image CLI:
```
docker exec -it containername bash
```
====================================================================================
====================================================================================
# Docker Compose
====================================================================================
#### Installation
##### Install Docker Compose (and docker.io if not installed already)
```
apt install docker.io docker-compose
```
====================================================================================
#### YAML (Yet Another Markup Language)
YAML files are just text files that are used by Docker-Compose for definition of image/container setup. YAML files are a very useful feature of Docker as they all for deployment of containers on any system by just using the YAML file.
NOTE; YAML files are VERY picky about their syntax - this includes character positioning.
Basic annotated example;
```
version: '3.7' # Specifies the Docker Compose version used (e.g., 3.7)
services:
portainer: # Defines a service named "portainer"
container_name: container1 # Names the container instance "container1"
image: portainer/portainer-ce # Specifies the Docker image to use (portainer/portainer-ce)
command: -H unix:///var/run/docker.sock # Command to execute when the container starts (grants access to Docker socket)
restart: 'always' # Automatically restarts the container if it crashes or exits
ports: # Defines port mappings between the container and the host machine
- target: '9000' # Maps container port 9000
published: '9000' # to host port 9000 (can be accessed from the host machine)
protocol: tcp # using TCP protocol
- target: '8000' # Maps container port 8000
published: '8000' # to host port 8000 (can be accessed from the host machine)
protocol: tcp # using TCP protocol
volumes: # Defines persistent storage for the container
- type: bind # Mounts a host directory onto a container directory
source: /var/run/docker.sock # Binds the host's Docker socket file
target: /var/run/docker.sock # to the container's Docker socket file (grants access within the container)
- type: bind # Mounts another host directory onto a container directory
source: /srv/portainer # Binds the host's `/srv/portainer` directory
target: /data/ # to the container's `/data/` directory (for persistent data storage)
```
Start the container based on YAML file:
```
docker-compose up --detatch
```
====================================================================================
# Kubernetes (K8s)
### Kubernetes - K8s
Developed by Google, Kubernetes is an enterprise container management system, often used for automating deployments into large scale environments.
example (basic) Kubernetes diagram:
[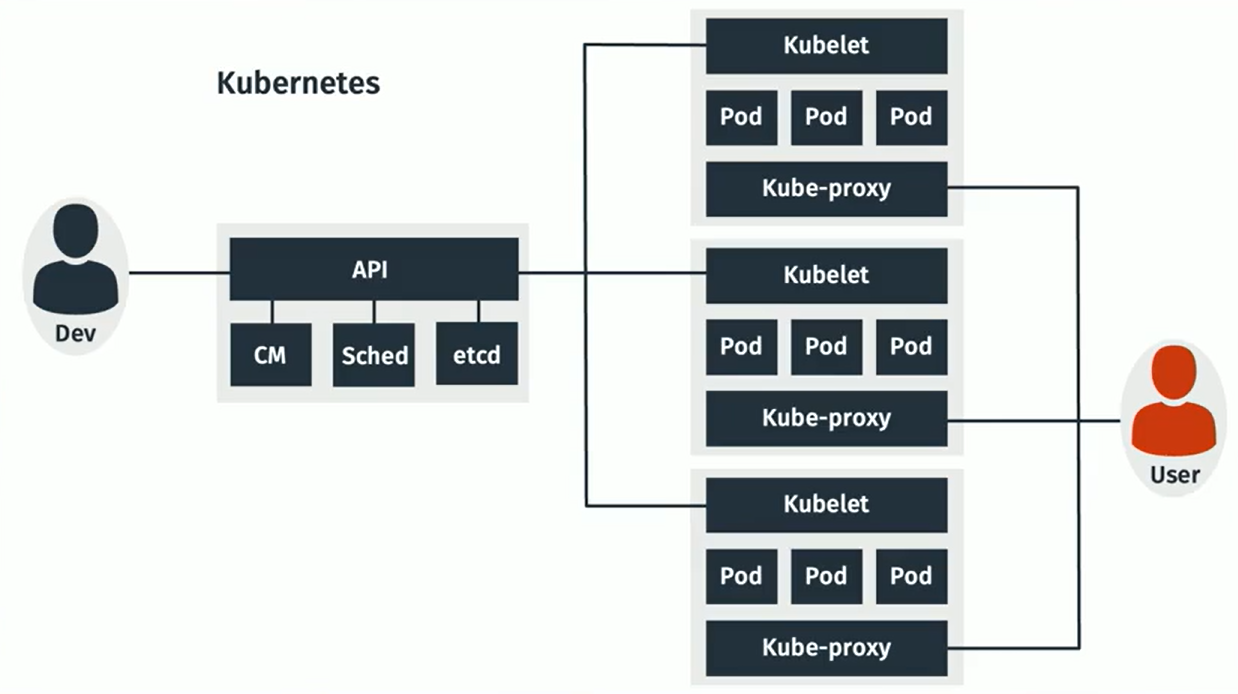](https://bookstack.b4sed.xyz/uploads/images/gallery/2024-06/CO8image.png)
Developers use an API - made up of CM (Configuration Management database), sched (scheduler - scheduled deployment changes), and etcd (database used for managing configuration files across systems).
kubelet - Each kubelet represents a separate device or system.
pod - 1 or more containers. Pods are deployed onto Kubelets.
kube-proxy - balancing clients across pods on a kubelet.
# What is automation?
Automation software is software that can be used to automate tasks - such as server configuration/deployment.
====================================================================================
#### Agent-based automation
Automation that requires an agent (software package specific to the automation system) that is responsible for performing automation tasks.
The typical process for using agent-based automation is to have Linux images saved with the agent pre-installed/configured.
- Typically not as versatile across Linux distros
- Tends to be more reliable in it's execution
- Verbose logging
puppet, chef
====================================================================================
#### Agentless automation
Automation that does not require an agent to be installed. Instead, native system functionality is used to complete automation tasks.
- Typically more complex to configure
- More versatile in its configuration options
Ansible, Puppet: Bolt
# Ansible
### What is Ansible?
Ansible is an agentless automation system developed by RedHat, designed for deploying changes across any number of machines.
\------------------------------------------------------------------------------------------------------------------------------------------------
#### Installing Ansible (Management Server)
The Ansible package only needs to be installed on the server pushing Ansible requests. It does not need to be installed on client/receiving servers.
```
apt install ansible
```
====================================================================================
### Configuring Ansible w/ Basic Examples
To use Ansible, you'll need to create a YAML file for Ansible to read from:
```
vim inventory.yaml
```
Basic YAML file example:
*inventory.yaml*
```yaml
all: # Define a section named "all"
hosts: # Define a section for target hosts within "all"
server_name: ansible_host: IP_IP_IP_IP # Host entry with label "server_name" (replace IP with actual server IP)
server2_name: ansible_host: IP_IP_IP_IP # Another host entry with label "server2_name" (replace IP with actual server2 IP)
vars: # Define a section for variables
ansible_connection: ssh # Specify SSH connection type
ansible_ssh_user: ssh_username # Define username for SSH authentication
ansible_ssh_private_key_file: /path/to/key/on/ansible/server # Define path to private key file for SSH authentication on Ansible
```
This configuration doesn't make any automated changes to hosts, instead, it's just defining what the hosts are, and how to authenticate to them.
##### Usage example A:
Using this configuration, we can run the command below to ping all hosts in the YAML file:
```
ansible -i inventory.yaml all -m ping
```
The `-i` flag, also written as `--inventory`, is used with the `ansible` command to specify the inventory file that defines the target hosts for your Ansible playbooks.
**`-m ping`**: This flag specifies the module to be executed on the target hosts. In this case, `-m ping` (or `--module ping`) tells Ansible to run the "ping" module.
##### Usage example B:
The below example will check the installed kernel version for all hosts defined under 'all' in the inventory.yaml file:
```
ansible -i inventory.yaml all -a "/usr/bin/uname -a"
```
**`-a` or `--module-args`**: This flag specifies arguments to be passed to a module. However, in this case, it's not using a module but directly executing a shell command.
====================================================================================
### Ansible Playbooks
#### What is an Ansible Playbook?
An Ansible playbook is a blueprint or recipe that defines a series of automated tasks to be executed on one or more remote machines.
\------------------------------------------------------------------------------------------------------------------------------------------------
##### Basic example A:
Sticking with the inventory.yaml file created in the above example, I now want to create a 'playbook' for Ansible to run through and ping all defined hosts:
*ping.yaml:*
```yaml
--- # Start of YAML document
- name: Test Ping # Playbook name - describes the purpose
hosts: all # Target all hosts defined in the inventory
tasks: # Define tasks to be executed on target hosts
- action: ping # Execute the "ping" module to check connectivity
```
Now that we have our playbook, we can use this with the inventory file to initiate action against all defined hosts:
```
ansible-playbook -i inventory.yaml ping.yaml
```
- **`ansible-playbook`**: This is the specific command used to run Ansible playbooks.
- **`-i inventory.yaml`**: This flag specifies the inventory file, referencing your `inventory.yaml` file that defines the target hosts. The `-i` flag is also known as `--inventory`.
- **`ping.yaml`**: This is the filename of the Ansible playbook you want to execute. It likely contains instructions for the tasks you want to perform on the target hosts.
\------------------------------------------------------------------------------------------------------------------------------------------------
##### Basic example B:
Whilst still basic, this example is a tad more complex. Here the goal is to install the apache2 and nginx packages on the remote machines using APT.
*install-software.yaml:*
```yaml
- hosts: client_server
become: 'yes' #enabled sudo privileges
tasks:
- name: Install software
apt:
pkg:
- apache2
- nginx
state: present
- hosts: client_server # Target host group named "client_server"
become: 'yes' # Enable sudo privileges for tasks (requires passwordless sudo)
tasks: # Define tasks to be executed on the target host(s)
- name: Install software # Task name - describes the purpose
apt: # Use the apt module for package management (assuming Debian/Ubuntu)
pkg: # Define the package(s) to be installed
- apache2 # Install the apache2 web server package
- nginx # Install the nginx web server package
state: present # Ensure the packages are installed (present)
```
To execute this against the hosts defined in our inventory.yaml file:
```
ansible-playbook -i inventory.yaml install-software.yaml
```
\------------------------------------------------------------------------------------------------------------------------------------------------
##### More advanced example
Myself and Wajahat needed to remove existing software on 2 servers, and install different software versions.
```
- hosts: server_name server2_name
tasks:
- name: Add Elasticsearch GPG key
ansible.builtin.apt_key:
url: https://artifacts.elastic.co/GPG-KEY-elasticsearch
state: present
- name: Add Elasticsearch Repository
ansible.builtin.apt_repository:
repo: 'deb [arch=amd64] https://artifacts.elastic.co/packages/7.x/apt stable main'
state: present
- name: Add MariaDB GPG key
ansible.builtin.apt_key:
url: https://mariadb.org/mariadb_release_signing_key.pgp
state: present
- name: Add MariaDB Repository
ansible.builtin.apt_repository:
repo: 'deb [arch=amd64,arm64,ppc64el] https://deb.mariadb.org/10.4/ubuntu focal main'
state: present
- name: Remove Software
apt:
pkg:
- redis-server
- redis-tools
- elasticsearch
- percona-*
state: absent
purge: yes
- name: Install desired Redis tools version
apt:
pkg:
- redis-tools=6:6.0.20-1rl1~focal1
- redis-server=6:6.0.20-1rl1~focal1
- elasticsearch=7.9.0
- mariadb-server
state: present
install_recommends: yes
```
This adds specific repositories and keys for MariaDB and Elasticsearch, removes any existing installations, and then installs a specific version from the repository.
====================================================================================
# GIT - Version Control
#### What is GIT?
Git is a free and open-source distributed version control system (DVCS) widely used for tracking changes in software development projects. It allows you to:
- **Track Changes:** Git keeps a record of all modifications made to your project files over time. This allows you to see how the project evolved, revert to previous versions if needed, and understand who made specific changes.
- **Collaboration:** Git facilitates teamwork by enabling multiple developers to work on different parts of a project simultaneously. They can then seamlessly merge their changes into a single codebase.
- **Offline Development:** Unlike some centralized version control systems, Git doesn't require a constant internet connection. Each developer has a complete copy of the project repository, allowing them to work offline and synchronize changes later.
- **Branching:** Git allows you to create isolated working directories called branches. This is useful for developers to work on new features or bug fixes without affecting the main codebase. Once changes in a branch are ready, they can be merged back into the main project.
**Important note;**
**You'll be familiar with services such as GitHub, or GitLab - these are not Git. These are simply services that offer git-compatible products.**
====================================================================================
#### Installing GIT
```
apt install git
```
====================================================================================
#### GIT Usage
\------------------------------------------------------------------------------------------------------------------------------------------------
##### Setting GIT user details
```
git config --global user.email "user@provider.com"
git config --global user.name "user.name"
```
##### Clone/download a GIT repository:
```
git clone https://github.com/xyz
```
##### Create a GIT repository:
(current working directory)
```
git init
```
##### Check repository status
```
git status
```
##### Push changes to be committed:
```
git add .
```
(. being all)
##### Commit changes:
```
git commit
```
-m "comment"
##### View git change logs
```
git log
```
====================================================================================
#### Branching
Branching is the term used to describe the usage of multiple Git repositories for development of a single software item.
[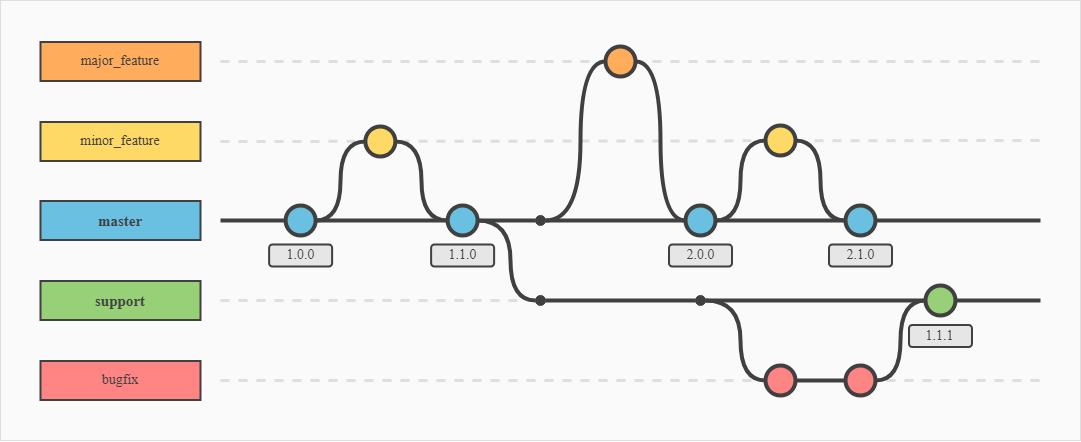](https://bookstack.b4sed.xyz/uploads/images/gallery/2024-06/ETXimage.png)
As you can see above, there is a 'master branch' which would essentially be the release build. The other branches are used for developing and testing features and bug fixes. Once changes have been made, these are committed to the next branch, where they will again need to be committed to the live branch.
##### Show git branches:
```
git branch
```
##### Create a new branch:
```
git checkout -b branchname
```
##### Switch branch
```
git checkout branchname
```
##### Merge branches
```
git merge branchname
```
====================================================================================