Linux Filesystem (FHS), Storage Concepts, LVM, & Disks
Disk and filesystem management
- QUICK GUIDE: Clearing Disk Space
- Quick Guide: Expanding Disks
- STORAGE CONCEPTS
- FHS - Filesystem Hierarchy Standard
- Partitions and Filesystems
- LVM (Logical Volume Manager)
- SWAP
- Archiving and Compression
- fstab
- Disk Performance
QUICK GUIDE: Clearing Disk Space
====================================================================================
Identifying where disk space is being used
NCDU
NCDU is a command line tool that can be used to review disk usage across a filesystem.
ncdu /Note: You can specify a directory other than /. ie if you wanted to review the contents of /var, you would format the command as follows:
ncdu /varFind
We can also use the find command to locate files over a specified size.
find / -type f -size +300M > filelist.txt The above command would search / (and all subdirectories) for any files over 300M in size. There are various options available for size specification:
-
G-> for gibibytes
-
M-> for megabytes
-
K-> for kibibytes
-
b-> for bytes
------------------------------------------------------------------------------------------------------------------------------------------
Quick wins
/var/log/journal - this can be vacuumed to reduce the size:
journalctl --vacuum-size=500M View largest directories in /
du -h --max-depth=1 / 2> /dev/null------------------------------------------------------------------------------------------------------------------------------------------
Disk Reserve
Most linux filesystems (depending on FS type) will have a segment reserved for special processes. The default percentage is 5.
We can use the tune2fs command for ext2/ext3/ext4 filesystems.
Check disk reserve:
tune2fs -l /dev/partitionChanging disk reserve:
tune2fs -m2 /dev/partition
------------------------------------------------------------------------------------------------------------------------------------------
Inodes
Check for inode usage:
du --inodes -d 1 / 2>/dev/nullQuick Guide: Expanding Disks
====================================================================================
Virtual Disk Expansion
 for i in /sys/class/scsi_host/host*/scan; do echo "- - -" > $i; done
 for i in /sys/class/scsi_device/*/device/rescan; do echo "1" > $i; done
2. Check for updated disk size:
lsblkYour output will look something like this:
NAME            MAJ:MIN RM   SIZE RO TYPE MOUNTPOINT
 sda               8:0    0   120G  0 disk
 ├─sda1            8:1    0   512M  0 part /boot
 └─sda2            8:2    0 103.5G  0 part
   ├─eCloud-root 253:0    0 102.5G  0 lvm  /
   └─eCloud-swap 253:1    0     1G  0 lvm  [SWAP]
 sdc               8:32   0   200G  0 disk
 └─sdc1            8:33   0   200G  0 part
 sr0              11:0    1  1024M  0 rom
3. Check partitions using fdisk
fdisk -lOutput will look something like this:
 [root@server ~]# fdisk -l
 Disk /dev/sda: 128.8 GB, 128849018880 bytes, 251658240 sectors
 Units = sectors of 1 * 512 = 512 bytes
 Sector size (logical/physical): 512 bytes / 512 bytes
 I/O size (minimum/optimal): 512 bytes / 512 bytes
 Disk label type: dos
 Disk identifier: 0x000b9cfe
    Device Boot      Start         End      Blocks   Id  System
 /dev/sda1   *        2048     1050623      524288   83  Linux
 /dev/sda2         1050624   218103774   108526575+  8e  Linux LVM
4. Run growpart against the expanded device:
growpart /dev/sda 25. Run pvresize command against the partition:
pvresize /dev/sda26. Resize the logical volume, ensure to replace vg and lv with the appropriate values (these will typically be the same as seen on df -h):
lvresize -rl +100%FREE /dev/mapper/vg/lv7. Check that the space has been applied to the filesystem:
df -h====================================================================================
Physical Disk Expansion (Additional Disk)
 for i in /sys/class/scsi_host/host*/scan; do echo "- - -" > $i; done
 for i in /sys/class/scsi_device/*/device/rescan; do echo "1" > $i; done
2. Check for updated disk size:
lsblkYour output will look something like this:
NAME                MAJ:MIN RM   SIZE RO TYPE MOUNTPOINT
sda                   8:0    0 111.3G  0 disk
├─sda1                8:1    0     1G  0 part /boot
└─sda2                8:2    0 110.3G  0 part
  ├─vg_main-lv_root 253:0    0   105G  0 lvm  /
  └─vg_main-lv_swap 253:1    0     4G  0 lvm  [SWAP]
sdb                   8:16   0 111.8G  0 disk /mnt
sdc                   8:32   0 237.9G  0 disk
In this example, the additional disk is /dev/sdc.
3. Create a new partition on the additional disk:
fdisk /dev/sdc
Once you've run the above command, you'll be entered into the fdisk prompt, the below options are typically suitable:
p - print
n - make new partition
p - primary
w - write
4. Check the physical volume and create a new physical volume on the new partition:
[root@test ~]# pvs
  PV         VG      Fmt  Attr PSize    PFree
  /dev/sda2  vg_main lvm2 a--  <110.25g <1.25g
Create a new physical volume on the new partition:
pvcreate /dev/sdc1
Show new Physical Volume
[root@test ~]# pvs
  PV         VG      Fmt  Attr PSize    PFree
  /dev/sda2  vg_main lvm2 a--  <110.25g  <1.25g
  /dev/sdc1          lvm2 ---   237.87g 237.87g
6: Extend the volume group “vg_main” over the new partition
vgextend vg_main /dev/sdc1
Show volume group
[root@test ~]# vgs
  VG      #PV #LV #SN Attr   VSize    VFree
  vg_main   2   2   0 wz--n- <348.12g <239.12g
7. Resize the logical volume, ensure to replace vg and lv with the appropriate values (these will typically be the same as seen on df -h):
lvresize -rl +100%FREE /dev/mapper/vg/lv8. Check that the space has been applied to the filesystem:
df -hSTORAGE CONCEPTS
====================================================================================
This page details the storage concepts for a linux system.
------------------------------------------------------------------------------------------------------------------------------------------------
FILE
------------------------------------------------------------------------------------------------------------------------------------------------
BLOCK
In a block storage system, you can break the data into independent fixed-size blocks or pieces. Each block is an individual piece of data storage. A complete piece of information, such as a data file, is stored in multiple, nonsequential blocks.
The block storage system does not maintain high-level metadata, such as file type, ownership, and timestamp. Developers must design a data lookup table in the application system to manage the storage of data into respective blocks. The application might store data in different operating environments to increase read/write efficiency.
------------------------------------------------------------------------------------------------------------------------------------------------
OBJECT
Object storage is a technology that stores and manages data in an unstructured format called objects. Each object is tagged with a unique identifier and contains metadata that describes the underlying content. For example, object storage for photos contains metadata regarding the photographer, resolution, format, and creation time.
Developers use object storage to store unstructured data, such as text, video, and images.
------------------------------------------------------------------------------------------------------------------------------------------------
FHS - Filesystem Hierarchy Standard
====================================================================================
FHS as defined by RedHat:
------------------------------------------------------------------------------------------------------------------------------------------------
/boot/
The /boot/ directory contains static files required to boot the system, such as the Linux kernel. These files are essential for the system to boot properly.
------------------------------------------------------------------------------------------------------------------------------------------------
/dev/
The /dev/ directory contains file system entries which represent devices that are attached to the system. These files are essential for the system to function properly.
------------------------------------------------------------------------------------------------------------------------------------------------
/etc/
The /etc/ directory is reserved for configuration files that are local to the machine. No binaries are to be placed in /etc/.
------------------------------------------------------------------------------------------------------------------------------------------------
/lib/
The /lib/ directory should contain only those libraries needed to execute the binaries in /bin/ and /sbin/. These shared library images are particularly important for booting the system and executing commands within the root file system.
------------------------------------------------------------------------------------------------------------------------------------------------
/media
The /media/ directory contains subdirectories used as mount points for removeable media, such as 3.5 diskettes, CD-ROMs, and Zip disks.
------------------------------------------------------------------------------------------------------------------------------------------------
/mnt/
The /mnt/ directory is reserved for temporarily mounted file systems, such as NFS file system mounts. For all removeable media, use the /media/ directory.
------------------------------------------------------------------------------------------------------------------------------------------------
/opt/
/opt/ directory provides storage for large, static application software packages./opt/ directory creates a directory bearing the same name as the package. This directory, in turn, holds files that otherwise would be scattered throughout the file system, giving the system administrator an easy way to determine the role of each file within a particular package.sample is the name of a particular software package located within the /opt/ directory, then all of its files are placed in directories inside the /opt/sample/ directory, such as /opt/sample/bin/ for binaries and /opt/sample/man/ for manual pages.------------------------------------------------------------------------------------------------------------------------------------------------
/proc/
The /proc/ directory contains special files that either extract information from or send information to the kernel.
------------------------------------------------------------------------------------------------------------------------------------------------
/sbin/
The /sbin/ directory stores executables used by the root user. The executables in /sbin/ are only used at boot time and perform system recovery operations. Of this directory, the FHS says:
/sbincontains binaries essential for booting, restoring, recovering, and/or repairing the system in addition to the binaries in/bin. Programs executed after/usr/is known to be mounted (when there are no problems) are generally placed into/usr/sbin. Locally-installed system administration programs should be placed into/usr/local/sbin.
------------------------------------------------------------------------------------------------------------------------------------------------
/srv/
The /srv/ directory contains site-specific data served by your system running Red Hat Enterprise Linux. This directory gives users the location of data files for a particular service, such as FTP, WWW, or CVS. Data that only pertains to a specific user should go in the /home/ directory.
------------------------------------------------------------------------------------------------------------------------------------------------
/sys/
The /sys/ directory utilizes the new sysfs virtual file system specific to the 2.6 kernel. With the increased support for hot plug hardware devices in the 2.6 kernel, the /sys/ directory contains information similarly held in /proc/, but displays a hierarchical view of specific device information in regards to hot plug devices.
------------------------------------------------------------------------------------------------------------------------------------------------
/usr/
The /usr/ directory is for files that can be shared across multiple machines. The /usr/ directory is often on its own partition and is mounted read-only.
/usr/local
The /usr/local hierarchy is for use by the system administrator when installing software locally. It needs to be safe from being overwritten when the system software is updated. It may be used for programs and data that are shareable among a group of hosts, but not found in /usr.
------------------------------------------------------------------------------------------------------------------------------------------------
/var/
Since the FHS requires Linux to mount /usr/ as read-only, any programs that write log files or need spool/ or lock/ directories should write them to the /var/ directory. The FHS states /var/ is for:
...variable data files. This includes spool directories and files, administrative and logging data, and transient and temporary files.
------------------------------------------------------------------------------------------------------------------------------------------------
Partitions and Filesystems
====================================================================================
Partitions
------------------------------------------------------------------------------------------------------------------------------------------------
What is a partition?
Partitions allow you to divide a single physical disk into multiple, isolated sections. Each partition can be managed independently
Partition types in Linux
MBR- Master Boot Record
The Master Boot Record (MBR) is a special type of boot sector at the very beginning of a disk. The MBR contains important information about the disk's partitions and the filesystem, as well as executable code necessary to boot an operating system. MBR permits for up to 4 partitions on a storage device and also has limitations in the size of disks it can partition, as well as the size of partitions that can be created.
TLDR; MBR can partition a drive into 4 partitions. Not ideal for large drives. Old standard that's being phased out in favour of GPT.
GPT - GUID Partition Table
The GUID Partition Table (GPT) is a modern standard for the layout of partition tables on a physical storage device. GPT is part of the Unified Extensible Firmware Interface (UEFI) standard, which is designed to replace the older BIOS firmware interface used by PCs.
Benefits of GPT include:
Larger Disk and Partition Support - GPT allows for a virtually unlimited number of partitions. GPT can support disks larger than 2 terabytes (TB), up to 9.4 zettabytes (ZB).
Redundancy - GPT stores a primary partition table at the beginning of the disk and a backup partition table at the end of the disk.
TLDR; GPT is more modern, handles larger disks & partitions, and also has redundancy features.
------------------------------------------------------------------------------------------------------------------------------------------------
Configuration & management of partitions
------------------------------------------------------------------------------------------------------------------------------------------------
fdisk
fdisk (format disk) is a command-line utility that can be used for making changes to MBR disk partitions.
fdisk is primarily designed for use with MBR partitioned disks. Check the disk partitioning your disk is using before making changes (fdisk -l /dev/devicename). If your disk is GPT, see here.
View current partitions and partitioning standard:
fdisk -l /dev/devicenameTo enter into the fdisk utility to manage partitions:
fdisk /dev/devicename We then have the following options available:
n |
Create a new partition |
d |
Delete a partition |
i |
print current boot record |
Example;
Let's say we have a single drive, and want to create a 10GB partition. This is an MBR drive.
Firstly, enter into the fdisk utility:fdisk /dev/diskname
From there, the following options can be used to add a new partition with a size of 10GB.
Command (m for help): n
Partition type:
p primary
e extended
Select (default p): p
Partition number (4-128, default 4): #left at default value
First sector (34-16777182, default 16775168): #left at default value (typically)
Last sector, +/-sectors or +/-size{K,M,G,T,P} (16775168-16777182, default 16777182): +10G
NOTE: fdisk shouldn't really be used for partitioning GPT drives.
NOTE: Leaving the last sector blank will automatically cause the remainder of space on the drive to be allocated.
------------------------------------------------------------------------------------------------------------------------------------------------
gdisk
gdisk is the GPT equivalent of fdisk, meaning that it's designed specifically for partitioning disks using GPT formatting.
gdisk is primarily designed for use with GPT partitioned disks. Check the disk partitioning your disk is using before making changes (fdisk -l /dev/devicename). If your disk is MBR, see here.
View current partitions and partitioning standard:
gdisk -l /dev/devicenameTo enter into the gdisk utility to manage partitions:
gdisk /dev/devicenameWe then have the following options available:
n |
Create a new partition |
d |
Delete a partition |
i |
print current boot record |
Example;
Let's say we have a single drive, and want to create a 10GB partition. This is a GPT drive.
Firstly, enter into the fdisk utility:gdisk /dev/diskname
From there, the following options can be used to add a new partition with a size of 10GB.
Command (? for help): n
Partition number (5-128, default 5):
First sector (34-2047, default = 34) or {+-}size{KMGTP}:
Last sector (34-2047, default = 2047) or {+-}size{KMGTP}: +5G
Current type is 8300 (Linux filesystem)
Hex code or GUID (L to show codes, Enter = 8300):
NOTE: fdisk shouldn't really be used for partitioning GPT drives.
NOTE: Leaving the last sector blank will automatically cause the remainder of space on the drive to be allocated.
------------------------------------------------------------------------------------------------------------------------------------------------
Parted
Whilst gdisk and fdisk are designed for use with specific partition formatting (GPT or MBR), the parted command can be used to manage partitions on both. Parted is also a mini-CLI tool.
Parted is a more versatile tool, but is also much ore complex to use. Also may not be installed by default on some systems. I would personally advise sticking with fdisk and gdisk.
Enter the parted CLI:
parted /dev/devicenameWe then have the following options:
print |
print current partition configuration |
mkpart |
create new partition |
====================================================================================
Filesystems
What is a filesystem?
a filesystem is a method and data structure that the operating system uses to manage files on a storage device or partition. It provides a way to organize, store, retrieve, and manage data.
Filesystem types in Linux
EXT (Extended Filesystem)
The current newest EXT version is EXT4. EXT standards (2-4) provide backward compatibility. This is to ensure that newer versions of the file system can work seamlessly with older versions. This compatibility provides several important benefits:
- Data Migration and Upgrade
- Mixed Environment Compatibility
- Data Integrity and Recovery
XFS (Extense Filesystem)
Able to track a much higher number of small files. XFS is better for systems handling large files or volumes of data - XFS is able to perform better than EXT in this scenario.
BTRFS (B-tree File System)
A modern file system developed by Oracle Corporation for Linux. It is designed to address various shortcomings of traditional file systems like ext4 and to offer advanced features, scalability, and improved performance.
BTRFS whilst being much more advanced in it's capabilities than the alternatives, also has it's own shortcomings. For example, additional ability means additional complexity, BTRFS is also known to be temperamental.
BTRFS offers features such as:
cross server partitions
SWAP
SWAP is technically a partition type, but it isn't focused on traditional data storage. Rather SWAP is allocated space on a storage device used by a Linux System that allows for the storage device to be used as an alternative to RAM. See this page for more info.
------------------------------------------------------------------------------------------------------------------------------------------------
Configuring filesystems
Once a disk has been partitioned, we can then look to create a filesystem on that disk. You can also create a filesystem on an unpartitioned disk, this will cause the entire disk to be formatted into the specified filesystem type.
Check existing filesystem types:
df -Tor
lsblk -fCreate a filesystem on a device/partition
There are lots of different filesystem types available in Linux. To simplify the process for configuring filesystems, there are symlinks to binaries added in most systems that can be used to specify filesystem types:
root@test:~# ls -l /usr/sbin/mk*
lrwxrwxrwx 1 root root      8 Mar 23  2022 /usr/sbin/mkdosfs -> mkfs.fat
-rwxr-xr-x 1 root root 133752 Jun  1  2022 /usr/sbin/mke2fs
-rwxr-xr-x 1 root root  14720 Apr  9 15:32 /usr/sbin/mkfs
-rwxr-xr-x 1 root root  22912 Apr  9 15:32 /usr/sbin/mkfs.bfs
-rwxr-xr-x 1 root root 482560 Feb 24  2022 /usr/sbin/mkfs.btrfs
-rwxr-xr-x 1 root root  35144 Apr  9 15:32 /usr/sbin/mkfs.cramfs
lrwxrwxrwx 1 root root      6 Jun  1  2022 /usr/sbin/mkfs.ext2 -> mke2fs
lrwxrwxrwx 1 root root      6 Jun  1  2022 /usr/sbin/mkfs.ext3 -> mke2fs
lrwxrwxrwx 1 root root      6 Jun  1  2022 /usr/sbin/mkfs.ext4 -> mke2fs
-rwxr-xr-x 1 root root  52048 Mar 23  2022 /usr/sbin/mkfs.fat
-rwxr-xr-x 1 root root  43408 Apr  9 15:32 /usr/sbin/mkfs.minix
lrwxrwxrwx 1 root root      8 Mar 23  2022 /usr/sbin/mkfs.msdos -> mkfs.fat
lrwxrwxrwx 1 root root      6 Nov  1  2022 /usr/sbin/mkfs.ntfs -> mkntfs
lrwxrwxrwx 1 root root      8 Mar 23  2022 /usr/sbin/mkfs.vfat -> mkfs.fat
-rwxr-xr-x 1 root root 391952 Feb  9  2022 /usr/sbin/mkfs.xfs
-rwxr-xr-x 1 root root  22704 Jan 10 13:54 /usr/sbin/mkhomedir_helper
-rwxr-xr-x 1 root root  12453 Jun 14  2023 /usr/sbin/mkinitramfs
-rwxr-xr-x 1 root root  14648 Jun  1  2022 /usr/sbin/mklost+found
-rwxr-xr-x 1 root root  72072 Nov  1  2022 /usr/sbin/mkntfs
-rwxr-xr-x 1 root root  47496 Apr  9 15:32 /usr/sbin/mkswap
You can then create a filesystem using the format shown above.
Example;
I have just added an additional disk to my server (/dev/sdb). I've then split that disk into 2 separate partitions (/dev/sdb1 & /dev/sdb2). I'd like to format /dev/sdb2 as an EXT4 filesystem:mkfs.ext4 /dev/sdb2
Alternatively, you can use the full command syntax to specify a desired filesystem type:
mkfs -t type /dev/devicename------------------------------------------------------------------------------------------------------------------------------------------------
Mounting filesystems & fstab
Syntax to mount a filesystem (not persistent):
mount /dev/devicename /mountpointUsing the above command will force the system to try and identify the filesystem type of the filesystem you're mounting. The preferred and safer method is to specify the type manually, as shown below:mount -t ext4 /dev/devicename /mountpoint
Syntax to mount a filesystem (persistent) -fstab
To persistently mount a filesystem, we need to add an entry to the /etc/fstab file instructing the system to do this.
vim /etc/fstabOnce editing, you can then add a line, following the format below:
/dev/devicename /mountpoint fstype defaults
Example;
I've added a new additional disk to my machine, I've partitioned the disk into 2 (/dev/sdb1 & /dev/sdb2) and I've created filesystems on both (EXT4 on /dev/sdb1, XFS on /dev/sdb2). The below lines could be added to /etc/fstab to persistently mount these filesystems:/dev/sdb1 /mnt/mount1 ext4 defaults 0 0/dev/sdb2 /mnt/mount2 xfs defaults 0 0
Once the entries have been added, the mount -a command can be used to mount all entries in /etc/fstab.
You'll notice on the above fstab entries, there is 'defaults'. This specifies that the system default options should be used, however, there are lots of options available for us to set, some common examples I've listed below:
| ro | read only |
| rw | read & write |
| async | write operations may be cached and written to disk at a later time. This can improve performance but may risk data integrity in case of unexpected shutdowns. |
| sync | writes have to be completed before the next write starts. Ensures better data integrity at the cost of performance. |
You'll also notice the 2 numbers after defaults:
| First number (Dump Field) (potential value 0 or 1) | determines whether disks will be backed up when the dump command is run. The dump command is deprecated so this value can safely be set to 0. |
| Second number (Pass Field) (potential value 0 or 1) |
This field determines the order in which
|
LVM (Logical Volume Manager)
====================================================================================
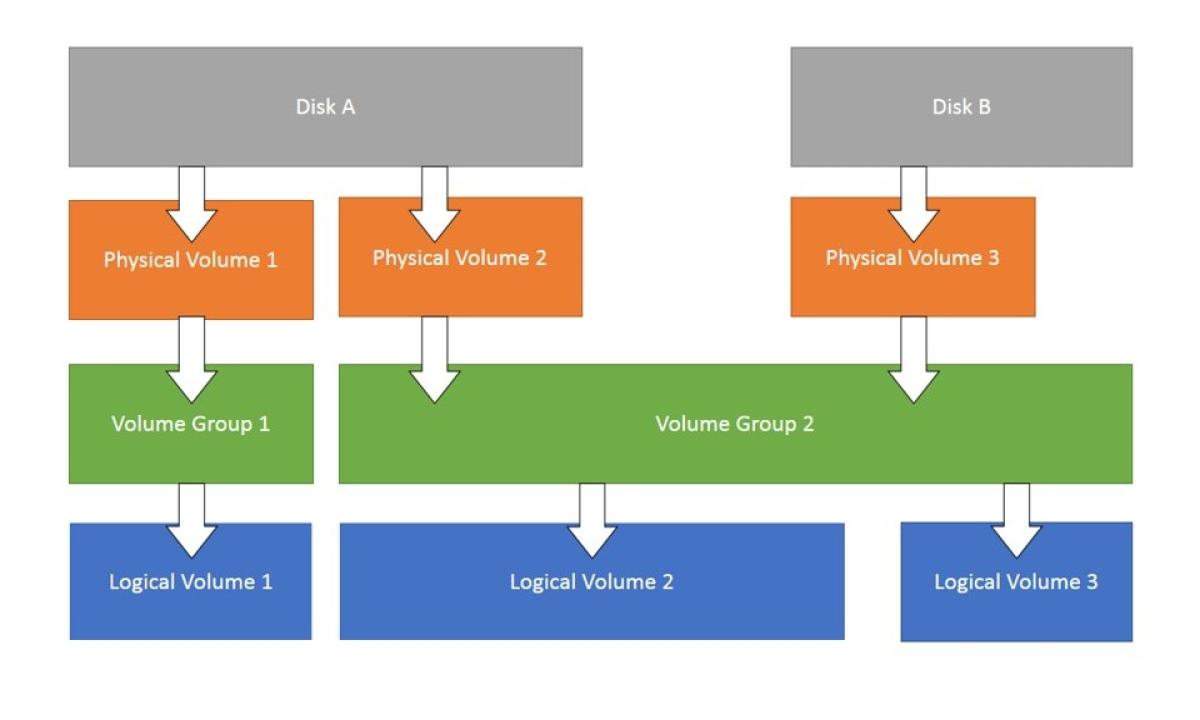
LVM, or Logical Volume Manager, is a tool used on Linux systems to manage disk space in a more flexible way compared to traditional partitioning. It acts like a layer of abstraction between your physical disks and the logical volumes you use for your filesystems. Here's a breakdown of how it works:
Components of LVM:
- Physical Volumes (PV): These are your actual physical hard drives or partitions on those drives. They are the raw storage devices that LVM uses.
- Volume Group (VG): A VG is a collection of PVs that are grouped together under LVM management. You can think of it as a pool of storage space.
- Logical Volume (LV): This is the virtual partition that you create from the storage space in a VG. You can format an LV with a filesystem (like ext4) and use it to store your data just like a regular partition.
Physical Volume (PV) Management:
Initializes a physical disk or partition for use with LVM.
Replace /dev/sdX with the actual device name.
pvcreate /dev/sdXDisplays information about all the PVs in your system.
pvdisplay
Move extents (data chunks) from one PV to another.
This is useful for migrating data or rebalancing PVs within a VG.
pvmove /dev/sdX /dev/sdYResizes a physical disk or partition that's already a PV.
pvresize /dev/sdX
pvremove /dev/sdX: Removes a PV from LVM management.
Volume Group (VG) Management:
vgcreate vg_name /dev/sdX /dev/sdY: Creates a new volume group namedvg_nameusing the specified PVs (/dev/sdXand/dev/sdY). You can add more PVs to a VG later.vgdisplay: Displays information about all the VGs in your system.vgreduce vg_name /dev/sdX: Removes a PV from a volume group (assuming there are other PVs in the VG and the data is not exclusively on the PV being removed).vgremove vg_name: Removes a volume group entirely. This destroys the VG and all its LVs. Use with caution!
Logical Volume (LV) Management:
lvcreate -n lv_name -L <size> vg_name: Creates a new logical volume namedlv_namewith the specified size<size>within the volume groupvg_name. You can specify the size in various units (e.g., M for Megabytes, G for Gigabytes).lvdisplay: Displays information about all the LVs in your system.lvextend -L <size> /dev/mapper/vg_name-lv_name: Extends the size of an existing LV. Replace<size>with the desired expansion size.lvreduce -L <size> /dev/mapper/vg_name-lv_name: Reduces the size of an existing LV. Use with caution as data loss might occur if shrinking beyond the size of the data written on the LV.lvremove /dev/mapper/vg_name-lv_name: Removes a logical volume from the VG. The space becomes available for other LVs within the VG.- lvresize [OPTIONS] LV [PV ...]: Resizes an existing LV. This command was covered in detail previously.
Information and Scanning:
lvmconfig: Displays global LVM configuration information.vgscan: Scans all disks for PVs. This updates LVM's internal information about available physical devices.lvscan: Scans all VGs for LVs. This updates LVM's information about logical volumes within existing VGs.
SWAP
====================================================================================
What is SWAP?
Swap memory is space that is reserved via the hard disk and should only be utilized when necessary and in cases where the servers dedicated memory has been mostly used up.
The swappiness value is actually a kernel tunable - see here for more information
How does a system decide how often to use SWAP over physical memory?
In Linux, the /proc/sys/vm/swappiness file is a kernel parameter that controls the swappiness behavior of the virtual memory system. Swappiness is a setting that determines how aggressively the kernel will use swap space.
Understanding Swappiness
Swappiness Value: The value of swappiness can range from 0 to 100.
0: The kernel will avoid swapping out processes as much as possible, preferring to keep data in RAM.
100: The kernel will aggressively swap processes out of physical memory and move them to swap space, keeping more RAM free.
Swappiness at 0:
The kernel will prioritize keeping processes in RAM, only swapping out data when absolutely necessary.
This setting is useful for systems where you want to minimize latency and keep performance high for active applications, such as on a desktop or server where response time is critical.
Swappiness at 100:
The kernel will swap out data more readily, even if there is still available RAM.
This setting can be useful in certain scenarios where you want to maximize the use of RAM for disk caches and reduce the amount of cached data being cleared to make room for process memory.
------------------------------------------------------------------------------------------------------------------------------------------------
Managing swappiness configuration
Check swappiness value
cat /proc/sys/vm/swappinessChanging swappiness
Since swappiness is a kernel tunable, the only method to make a swappiness value change persist a reboot is to create a custom configuration in /etc/sysctl.d. I'll also detail the steps below:
Change swappiness value (persistent)
Create a new custom configuration file in /etc/sysctl.d
vim 00-custom-swap.confWithin this file, place the following string (with your desired value added)
vm.swappiness=10Once created, apply the settings using the below command:
sysctl -pChange swappiness value (not persistent)
To change the swappiness value on a machine for the current session (doesn't persist reboot), we need to manually update the swappiness file:
vim /proc/sys/vm/swappinessThe file should contain only a number - this being the swappiness value. Change this number to your desired value. For example, to set a swap value of 60:
root@test:~# cat /proc/sys/vm/swappiness
60
Once the swappiness value has been changed, we then need to switch off/switch on swap to pull in the new value:
swapoff -a
swapon -a
------------------------------------------------------------------------------------------------------------------------------------------------
SWAP storage types
For SWAP to work in Linux, there has to be sections of a disk partitioned specifically for this purpose.
There are 2 types of disk allocation that we can use to define swap storage:
- swap file
- swap partition
A swap file and a swap partition both serve the same fundamental purpose in Linux: to provide additional virtual memory by swapping out inactive pages from the RAM to disk. However, they differ in their implementation, flexibility, and some performance aspects. Here's a detailed comparison between the two:
Swap Partition
- A swap partition is a dedicated section of the disk specifically set aside for swap space.
- It does not reside within any filesystem and is recognized by its partition type (typically "Linux swap").
- Swap partitions can offer slightly better performance because they avoid the overhead of filesystem management.
- The dedicated nature of swap partitions can make disk I/O more predictable and efficient for swapping purposes.
Swap File
- A swap file is a regular file within an existing filesystem, such as ext4, XFS, etc.
- It is easier to resize a swap file compared to a swap partition. You can simply create a larger or smaller file and configure it without repartitioning the disk.
- Swap files can be created, resized, and managed without needing to repartition the disk, making them more convenient for adding or adjusting swap space on the fly.
- Swap files may have slightly lower performance compared to swap partitions due to filesystem overhead.
------------------------------------------------------------------------------------------------------------------------------------------------
Configuring SWAP storage
Check the current swap partition configuration
swapon --showSWAP Partition
Create and enable a swap partition:
mkswap /dev/devicename
swapon /dev/devicename
The above will create a SWAP partition and enable it until reboot. If we want to create a persistently enabled swap partition, then we'll need to add an entry in /etc/fstab to specify this:
vim /etc/fstabAdd an entry like the following, ensuring to change the /dev/devicename path:
/dev/devicename none swap sw 0 0SWAP File
Creating a SWAP file:
fallocate -l 1G /swapfileThe above creates an empty 1GB file.
Set the correct permissions:
chmod 600 /swapfileInitialise the SWAP file:
mkswap /swapfileThe above formats the file into SWAP format.
Enable the SWAP file (not persistent):
swapon /swapfilePersistently enable the SWAP file:
vim /etc/fstabAdd the following contents:
/swapfile none swap sw 0 0====================================================================================
Archiving and Compression
====================================================================================
gzip
====================================================================================
tar (.tar) - Tape Archive
Take multiple files and compress them into a single file.
-c -create archive
-f -filename
-x -extract
-z -compress/decompress
-f -filename
Creating an archive (uncompressed)
tar -cf archivename.tar filestoarchiveCreating an archive (compressed)
tar -czf archivename.tar.gz filestoarchiveExtracting a tar archive (compressed)
tar -xzf archivename.tar.gzExtracting a tar archive (uncompressed)
tar -xf archivename.tar====================================================================================
DD - Convert and copy
Full disk backup
dd if=/dev/sda of=/pathtobackupfile.imgBy default, dd will take the backup 1 block at a time - meaning it can take a while. We can add the 'bs' option to specify how much data dd should copy at a time.
dd if=/dev/sda of=/pathtobackupfile.img bs=1MFor sensitive copies, we can add the conv=sync flag to have dd compare the original data and the copy for 100% accuracy - this will take a lot longer.
dd if=/dev/sda of=/pathtobackupfile.img bs=1M conv=syncCompression
We can also pipe the dd output into gzip for compression.
dd if=/dev/sda bs=1M | gzip -o > pathtobackupfile.gzTo uncompress:
gunzip pathtobackupfile.gz | dd of=/dev/sdc bs=1M====================================================================================
xz (.xz) -
cpio (.io) -
fstab
====================================================================================
fstab (File Systems Table)
The fstab (file systems table) is a system configuration file (/etc/fstab) used to define how disk partitions, filesystems, and other storage devices should be mounted and integrated into the filesystem at boot time.
------------------------------------------------------------------------------------------------------------------------------------------------
Purpose of fstab
- Mounting Filesystems:
fstabtells the operating system which filesystems to mount and where to mount them in the directory structure. - Automating Mounting: It allows for the automatic mounting of filesystems at boot time without user intervention.
- Specifying Options: It provides options for mounting, such as read/write permissions, mount points, and special parameters for specific filesystems.
------------------------------------------------------------------------------------------------------------------------------------------------
File Format
The fstab file consists of lines, each of which describes a filesystem. Each line contains six fields, separated by spaces or tabs:
- Filesystem: The block device or remote filesystem to be mounted (e.g.,
/dev/sda1,UUID=xxxxx,LABEL=xxxxx,/server/share). - Mount Point: The directory where the filesystem will be mounted (e.g.,
/,/home,/mnt/data). - Type: The type of filesystem (e.g.,
ext4,ntfs,nfs,tmpfs). - Options: Mount options (e.g.,
defaults,noatime,ro,rw). Multiple options are comma-separated. - Dump: A number indicating whether the filesystem should be backed up by the
dumputility (0for no,1for yes). - Pass: The order in which filesystems should be checked at boot time by the
fsckutility (0for no check,1for the root filesystem,2for other filesystems).
You never need to enable dump - it's an old outdated command.
example:
# <file system>  <mount point>  <type>  <options>           <dump>  <pass>
UUID=1234-5678   /              ext4    defaults            0       1
UUID=8765-4321   /home          ext4    defaults            0       2
/dev/sda2        swap           swap    sw                  0       0
/server/share   /mnt/share     cifs    username=user,password=pass 0 0
====================================================================================
Disk Performance
====================================================================================
I/O Schedulers
In Linux, the I/O scheduler is responsible for determining the order in which block I/O operations are submitted to storage devices. The scheduler affects the performance and behavior of disk I/O operations, impacting both throughput and latency. Different I/O schedulers are available, each optimized for specific workloads and scenarios.
By default, I/O tasks are scheduled by fifo - first in first out.
Common Linux I/O Schedulers
- CFQ (Completely Fair Queuing) - Provides a balanced approach to I/O scheduling, aiming to give each process a fair share of the I/O bandwidth.
- Deadline - Designed to prevent starvation of I/O operations by imposing deadlines on requests.
- NOOP - Implements a simple FIFO (First-In, First-Out) queue, essentially a passthrough scheduler.
- BFQ (Budget Fair Queuing) - Aims to provide predictable I/O performance by distributing I/O bandwidth according to budgets assigned to tasks.
- MQ Deadline (Multiqueue Deadline) - Similar to the Deadline scheduler but designed for multiqueue block devices.
- Kyber - A relatively new scheduler designed to work well with modern hardware and to provide low latency.
- BFQ (Budget Fair Queuing) - Bypasses software I/O scheduling, relying entirely on hardware-level I/O management.
Changing the scheduler
The scheduler is set on a per disk basis, not per filesystem.
(none persistent) method:
The scheduler can be set within the below file:
/sys/block/diskname/queue/scheduler
Within this file, you'll likely see a number of the potential I/O scheduler types. Tne one surrounded by [] is the currently selected scheduler, ie:
cat /sys/block/sda/queue/scheduler
[mq-deadline] none
(persistent) method:
To persistently set a disk scheduler, we'll need to alter the grub configuration
/etc/default/grub
append the below to the line prefaced with 'GRUB_CMDLINE_LINUX='
elevator=schedulertypeSave the new GRUB configuration:
update-grub2or
grub-mkconfig====================================================================================
Disk Performance Troubleshooting Tools
------------------------------------------------------------------------------------------------------------------------------------------------
sar
------------------------------------------------------------------------------------------------------------------------------------------------
lsof
We can use the lsof command to check what parts of a disk a process is accessing.
lsof -p pidlsof -c command------------------------------------------------------------------------------------------------------------------------------------------------
systat tools
The sysstat package includes a collection of performance monitoring tools for Unix-like systems.
iotop
iotop [options]| -a | aggregate disk IO over time (duration of command) |
iostat
Similar to iotop. Provides statistical information about I/O device loading. It reports on CPU utilization, device I/O statistics, and system throughput, making it useful for overall system performance analysis.
iostatioping
ioping is basically the ping command but for disks. It is used to measure the IO latency of storage devices - basically it measures how long a storage device will take to respond to an I/O request.
ioping [options] target| -c | specify a number of IO requests to make |
| -i | interval between requests |
| -s | request size (default 4kb) |
| -q | suppress regular output, only show statistics |
====================================================================================