# Software & Service Management
# Package Managers
====================================================================================
## YUM (Yellowdog Update Manager) & DNF
Both yum and DNF are found on RedHat based systems, and are pretty much interchangable.
------------------------------------------------------------------------------------------------------------------------------------------
#### Cache & Repositories
##### Update cache
```
yum makecache
```
##### List enabled repositories
```
yum repolist
```
##### List all active repositories
```
yum repolist --all
```
##### Use specific repository:
```
yum --enablerepo="repoID" install packagename
```
##### Disable specific repository
```
yum --disablerepo="repoID" install packagename
```
##### Adding additional repositories
repositories are stored in /etc/yum.repos.d/ (for both YUM and DNF)
##### Searching repositories for packages and package info
The below can be used to check whether a package is available in the currently configured repositories (requires the exact package name):
```
dnf list packagename
```
The below can be used to search repositories for a keyword relating to a package - ie a part of its name or description:
```
dnf search packagename
```
or
```
yum list available | grep -i packagename
```
##### Retrieve information about an available package:
```
dnf info packagename
```
------------------------------------------------------------------------------------------------------------------------------------------
### Installing/Updating Packages
#### Install package
```
yum install packagename
```
or
```
dnf install packagename
```
#### remove package
```
yum remove packagename
```
or
```
dnf remove packagename
```
remove unused dependencies:
```
dnf autoremove
```
#### update packages
```
yum update
```
or
```
dnf update
```
update a specific package
```
yum update packagename
```
or
```
dnf update packagename
```
====================================================================================
## APT (Advanced Package Tool) & DPKG (Debian Package)
APT is a package manager found primarily on Debian based systems.
====================================================================================
#### Cache & Repositories
Ubuntu apt uses a cache to store what can be installed/updated from repos. Before installing or updating software, it's worth checking that the cache has been recently updated to ensure that the most recent available packages are stored.
##### Update cache
```
apt update
```
Check when cache was last updated:
```
stat -c %z /var/lib/apt/periodic/update-success-stamp
```
##### Searching repositories
```
apt list packagename
```
or
```
apt search packagename
```
##### Adding repositories.
repositories are stored in /etc/apt/sources.list or /etc/apt/sources.list.d
Typically, you will need a key for apt to be able to use a repository. Keys will be available via the repository website.
Download the key file
Add the key to 'apt trusted keys'
```
apt-key add filename
```
Once added, create the repository file within /etc/apt/sources.list.d with a name of your choice.
Add the repository details, typically prefaced with 'deb' and then the repo URL, and then OS release version.
------------------------------------------------------------------------------------------------------------------------------------------
#### Installing & Updating Packages
##### Install packages
```
apt install packagename
```
Install multiple packages
```
apt install packagename packagename packagename
```
##### Removing packages
Remove package without removing configuration files
```
apt remove packagename
```
Remove package and configuration files
```
apt purge packagename
```
Remove package dependencies
```
apt autoremove
```
##### Updates
(remember to apt update before hand)
Check for updates
```
apt list --upgradable
```
Run all package updates
```
apt upgrade
```
Upgrade specific package
```
apt upgrade packagename
```
Update the OS and kernel:
```
apt dist-upgrade
```
Update everything (packages and kernel)
```
apt full-upgrade
```
====================================================================================
### openSuse - zypper
#### Cache & Repositories
Zypper uses a cache to store what can be installed/updated from repos. Before installing or updating software, it's worth checking that the cache has been recently updated, and if it hasn't; running an update on the cache.
update cache
```
zypper ref
```
List repositories
```
zypper lr
```
Repositories are stored in /etc/zypp/repos.d
------------------------------------------------------------------------------------------------------------------------------------------
#### Installing/ Searching/ Updating Packages
Search packages
```
zypper se packagename
```
Search specifically
```
zypper se --match-words packagename
```
or
```
zypper se --match-exact packagename
```
Install package
```
zypper in packagename
```
Remove package (only option to remove package and configuration files)
```
zypper rm packagename
```
====================================================================================
# Compiling from source
Compiling an application from source essentially means that you are manually creating a package using the source code.
In this example, I'm compiling the [John the Ripper password cracker](https://www.openwall.com/john/) from source, on an Ubuntu machine.
To being, ensure that the required packages are installed:
```
apt install make gcc gzip
```
download and unzip (if zipped) source code file
```
root@test:~# wget https://www.openwall.com/john/k/john-1.9.0.tar.gz
--2024-05-23 15:03:10-- https://www.openwall.com/john/k/john-1.9.0.tar.gz
Resolving www.openwall.com (www.openwall.com)... 193.110.157.242
Connecting to www.openwall.com (www.openwall.com)|193.110.157.242|:443... connected.
HTTP request sent, awaiting response... 200 OK
Length: 13110145 (13M) [application/octet-stream]
Saving to: ‘john-1.9.0.tar.gz’
john-1.9.0.tar.gz 100%[============================================================================>] 12.50M 8.23MB/s in 1.5s
2024-05-23 15:03:11 (8.23 MB/s) - ‘john-1.9.0.tar.gz’ saved [13110145/13110145]
root@test:~# ls -l
total 12808
-rw-r--r-- 1 root root 13110145 Apr 12 2019 john-1.9.0.tar.gz
root@test:~# tar -xvzf john-1.9.0.tar.gz
```
cd into the source code directory
```
root@test:~# ls -l
total 12812
drwxr-xr-x 5 root root 4096 May 23 15:03 john-1.9.0
-rw-r--r-- 1 root root 13110145 Apr 12 2019 john-1.9.0.tar.gz
root@test:~# cd john-1.9.0
root@test:~/john-1.9.0# ls -l
total 12
drwxr-xr-x 2 root root 4096 May 23 15:03 doc
drwxr-xr-x 2 root root 4096 May 23 15:03 run
drwxr-xr-x 2 root root 4096 May 23 15:03 src
root@test:~/john-1.9.0# cd src/
```
Within the src directory, you'll see the actual source code files - there can sometimes be many thousands of these files depending on the application.
run the make command to view the available options for compilation:
```
make
```
This will typically show the available options for hardware (CPU) compatibility, as shown below:
```
root@test:~/john-1.9.0/src# make
To build John the Ripper, type:
make clean SYSTEM
where SYSTEM can be one of the following:
linux-x86-64-avx512 Linux, x86-64 with AVX-512 (some 2017+ Intel CPUs)
linux-x86-64-avx2 Linux, x86-64 with AVX2 (some 2013+ Intel CPUs)
linux-x86-64-xop Linux, x86-64 with AVX and XOP (some AMD CPUs)
linux-x86-64-avx Linux, x86-64 with AVX (some 2011+ Intel CPUs)
linux-x86-64 Linux, x86-64 with SSE2 (most common)
linux-x86-avx512 Linux, x86 32-bit with AVX-512 (some 2017+ Intel CPUs)
linux-x86-avx2 Linux, x86 32-bit with AVX2 (some 2013+ Intel CPUs)
linux-x86-xop Linux, x86 32-bit with AVX and XOP (some AMD CPUs)
linux-x86-avx Linux, x86 32-bit with AVX (2011+ Intel CPUs)
linux-x86-sse2 Linux, x86 32-bit with SSE2 (most common, if 32-bit)
linux-x86-mmx Linux, x86 32-bit with MMX (for old computers)
linux-x86-any Linux, x86 32-bit (for truly ancient computers)
linux-mic Linux, Intel MIC (first generation Xeon Phi)
linux-arm64le Linux, ARM 64-bit little-endian w/ASIMD (best)
linux-arm32le-neon Linux, ARM 32-bit little-endian w/NEON (best 32-bit)
linux-arm32le Linux, ARM 32-bit little-endian
linux-alpha Linux, Alpha
linux-sparc64 Linux, SPARC 64-bit
```
To view the current CPU architecture of your system run:
```
name -a
```
In this example, the system is running x86\_64:
```
root@test:~# uname -a
Linux test 5.15.0-106-generic #116-Ubuntu SMP Wed Apr 17 09:17:56 UTC 2024 x86_64 x86_64 x86_64 GNU/Linux
```
Next, we want to compile the code using the correct CPU architecture:
```
make clean linux-x86-64
```
Now that the code has been compiled we can access the binary for the application. In this example, the binary is located within the run directory:
```
root@test:~/john-1.9.0/run# pwd
/root/john-1.9.0/run
root@test:~/john-1.9.0/run# ls -l
total 20084
-rw------- 1 root root 4086722 May 29 2013 alnum.chr
-rw------- 1 root root 1950539 May 29 2013 alpha.chr
-rw------- 1 root root 5720262 May 29 2013 ascii.chr
-rw------- 1 root root 465097 May 29 2013 digits.chr
-rwxr-xr-x 1 root root 323680 May 23 15:06 john
-rw------- 1 root root 35972 Mar 21 2019 john.conf
-rw------- 1 root root 1184244 May 29 2013 lm_ascii.chr
-rw------- 1 root root 1161863 May 29 2013 lower.chr
-rw------- 1 root root 2464980 May 29 2013 lowernum.chr
-rw------- 1 root root 1209621 May 29 2013 lowerspace.chr
-rwx------ 1 root root 1432 May 29 2013 mailer
-rwx------ 1 root root 842 May 29 2013 makechr
-rw------- 1 root root 26325 May 29 2013 password.lst
-rwx------ 1 root root 4782 May 29 2013 relbench
lrwxrwxrwx 1 root root 4 May 23 15:06 unafs -> john
lrwxrwxrwx 1 root root 4 May 23 15:06 unique -> john
lrwxrwxrwx 1 root root 4 May 23 15:06 unshadow -> john
-rw------- 1 root root 668568 May 29 2013 upper.chr
-rw------- 1 root root 1220961 May 29 2013 uppernum.chr
```
Time to test.
```
root@test:~/john-1.9.0/run# ./john --test
Benchmarking: descrypt, traditional crypt(3) [DES 128/128 SSE2]... DONE
Many salts: 5636K c/s real, 5647K c/s virtual
Only one salt: 5386K c/s real, 5386K c/s virtual
```
# Auto Restart Services
[https://www.redhat.com/sysadmin/systemd-automate-recovery](https://www.redhat.com/sysadmin/systemd-automate-recovery)
1\) Edit elasticsearch service unit file using the following command
```
systemctl edit elasticsearch.service
```
2\) Now, add the following lines in the unit file.
```
[Service]
Restart=always
```
3\) Refresh the unit file using command
```
sudo systemctl daemon-reload
```
# Sandboxing & CHROOT
====================================================================================
#### CHROOT (Changed Root) Jail
CHROOT essentially means that a user or application has it's root changed, essentially locking it away from the rest of the server filesystem.
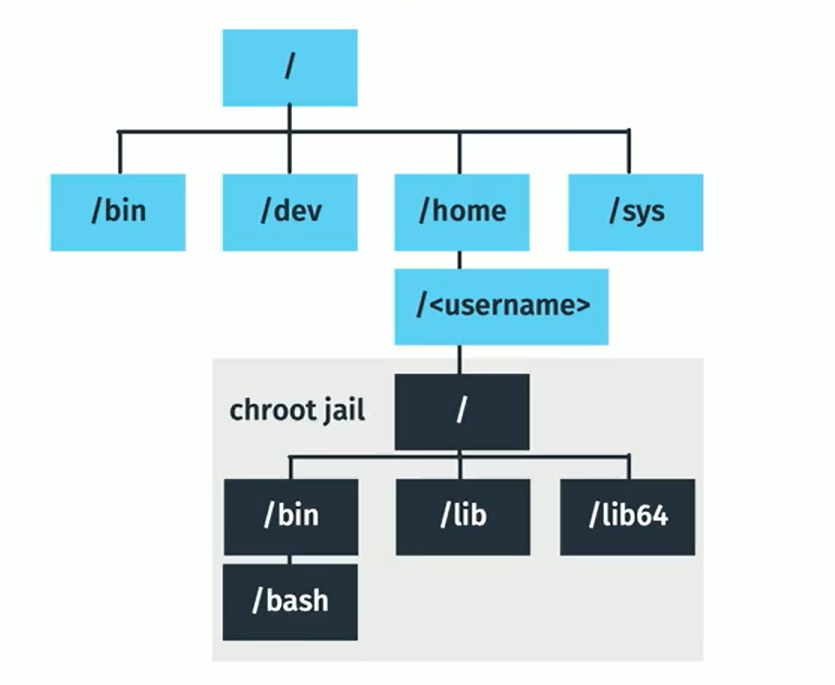
There are limitations to using a CHROOT Jail, an example being that applications that are chrooted are unable to communicate with each other.
====================================================================================
#### Sandboxing
Sandboxing essentially means that an application and its dependencies are 'wrapped' together. This is useful if you have 2 packages that share a dependency, but require different versions of that dependency.
------------------------------------------------------------------------------------------------------------------------------------------
#### Debian Based Systems
Debian-based systems will typically have the snap application installed, this can be used for sandboxing software.
##### list applications installed through snap
```
snap list
```
##### Install an application
```
snap install packagename
```
When you install an application through snap, you'll see that a 'loopback' storage device is added (you can see this by running the lsblk command). The reason for this is that the application is stored on it's own virtual storage device, so as to not interfere with versions installed elsewhere across the system, for example:
```
$ lsblk
NAME MAJ:MIN RM SIZE RO TYPE MOUNTPOINT
loop0 7:0 0 14.5M 1 loop /snap/gnome-logs/37
loop1 7:1 0 2.3M 1 loop /snap/gnome-calculator/170
loop2 7:2 0 86.6M 1 loop /snap/core/4486
loop3 7:3 0 86.6M 1 loop /snap/core/4650
loop4 7:4 0 1.6M 1 loop /snap/gnome-calculator/154
loop5 7:5 0 14.5M 1 loop /snap/gnome-logs/34
loop6 7:6 0 3.3M 1 loop /snap/gnome-system-monitor/36
loop7 7:7 0 2.3M 1 loop /snap/gnome-calculator/178
loop8 7:8 0 13M 1 loop /snap/gnome-characters/101
loop9 7:9 0 3.7M 1 loop /snap/gnome-system-monitor/45
loop10 7:10 0 139.5M 1 loop /snap/gnome-3-26-1604/64
loop11 7:11 0 140M 1 loop /snap/gnome-3-26-1604/59
loop12 7:12 0 3.7M 1 loop /snap/gnome-system-monitor/41
loop13 7:13 0 21M 1 loop /snap/gnome-logs/25
loop14 7:14 0 12.2M 1 loop /snap/gnome-characters/69
loop15 7:15 0 13M 1 loop /snap/gnome-characters/96
sda 8:0 0 298.1G 0 disk
├─sda1 8:1 0 512M 0 part /boot/efi
└─sda2 8:2 0 297.6G 0 part /
sr0 11:0 1 1024M 0 rom
```
##### Remove applications
```
snap remove packagename
```
------------------------------------------------------------------------------------------------------------------------------------------
Alternative sandbox package managers include:
[Flatpak](https://www.flatpak.org/)
====================================================================================