# User Management & File Permissions
# User & Group Management
====================================================================================
### Adding Users
====================================================================================
#### Adding Users
To add a user, the useradd command can be used.
```
useradd username
```
If you want to create a user with it's own home directory, this can be done using the -m flag:
```
useradd -m username
```
The default contents of a users home directory are defined within the /etc/skel directory, please see [HERE ](https://bookstack.b4sed.xyz/link/29#bkmrk-%2Fetc%2Fskel)for more info on this.
------------------------------------------------------------------------------------------------------------------------------------------------
#### Adding a system user
```
useradd -r username
```
Once created, you'll want to restrict the account by disabling the ability for login, as mentioned here
------------------------------------------------------------------------------------------------------------------------------------------------
##### Default options
There are lots of different options that can be set when creating users and groups, the default options can be viewed using the below command:
```
useradd -D
```
------------------------------------------------------------------------------------------------------------------------------------------------
#### Additional options:
##### -e -expires
```
-e 2023/12/31
```
##### -c - comment
```
-c "full name"
```
##### -s -shell
```
-s /bin/sh
```
------------------------------------------------------------------------------------------------------------------------------------------------
#### Groups
When creating a user, you can also specify groups to add the user to, this is done using the -G flag:
```
useradd -G groupname username
```
------------------------------------------------------------------------------------------------------------------------------------------------
#### Comments
When creating a user, you can also opt to add a comment using the -c flag, for example this could be a name:
```
useradd -c "comment" username
```
====================================================================================
### Passwords
====================================================================================
#### Set Password
Once a user has been created, you can add a password using the passwd command:
```
passwd username
```
Once run, you'll be prompted to enter a new password
------------------------------------------------------------------------------------------------------------------------------------------------
#### Changing password
Changing a users password can be done using the passwd command when signed in as that user.
You can either SSH to the server directly using the required user, or access as root and use su- username to access the user. Once accessed, the passwd command can be run alone to change the password:
```
passwd
```
You can also change a users password using root:
```
passwd username
```
------------------------------------------------------------------------------------------------------------------------------------------------
#### Additional Options:
[chage ](https://linux.die.net/man/1/chage)
##### Checking user password metrics (password expiration, last time password changed)
```
chage -l username
```
##### Forcing password change at logon
```
chage -d 0 username
```
##### Temporary Password
When setting a password, you're able to set a temporary placeholder password that can be used to log in by the user, upon logging in the user will be prompted to change to a password of their choice. This can be achieved by using the -e flag after setting a password
```
passwd username #set as temp password
passwd -e #sets password as expired
```
====================================================================================
### Deleting Users
====================================================================================
#### Deleting Users
Users can be deleted using the userdel command:
```
userdel username
```
The above command only removes the user from the system, without removing their home directory.
Remove user and home directory
```
userdel -r username
```
====================================================================================
### Modifying Users
====================================================================================
Post Creation, users can be modified using the usermod command.
#### Add User To Group
```
usermod -a -G groupname username
```
------------------------------------------------------------------------------------------------------------------------------------------------
#### Lock/Unlock Users
Lock User Login
```
usermod -L username
```
Unlock User Login
```
usermod -U username
```
------------------------------------------------------------------------------------------------------------------------------------------------
#### Disable login access
```
usermod -s /sbin/nologin username
```
or we can use the change shell (chsh) command:
```
chsh -s /bin/nologin username
```
------------------------------------------------------------------------------------------------------------------------------------------------
#### Change User Home Directory
```
usermod -d /pathtonewhome username
chown username:usergroup /pathtonewhome
```
====================================================================================
### Groups
====================================================================================
#### Viewing Groups
```
groups username
```
------------------------------------------------------------------------------------------------------------------------------------------------
#### Creating Groups
New groups can be created using the groupadd command:
```
groupadd groupname
```
------------------------------------------------------------------------------------------------------------------------------------------------
#### Managing group users
Users can be added/removed from a group with 2 main methods,
1. They can be added when initially created, as mentioned [above](https://bookstack.b4sed.xyz/link/27#bkmrk-groups)
2. They can be added after creation using the usermod command, as mentioned [above](https://bookstack.b4sed.xyz/link/27#bkmrk-add-user-to-group)
3. They can be added using the gpasswd command. ##### Add a user to a group
```
gpasswd -a username groupname
```
##### Removing a user from a group
```
gpasswd -d username groupname
```
##### Add user to a group as an admin
```
gpasswd -A username groupname
```
------------------------------------------------------------------------------------------------------------------------------------------------
#### Deleting groups
Groups can be removed using the groupdel command, note that this doesn't delete the users that are part of this group.
```
groupdel groupname
```
------------------------------------------------------------------------------------------------------------------------------------------------
### Modifying Groups
There are various group properties that can be modified using the groupmod command.
------------------------------------------------------------------------------------------------------------------------------------------------
#### Change Group Name
```
groupmod -n newname oldname
```
------------------------------------------------------------------------------------------------------------------------------------------------
#### Change Group ID
```
groupmod -g NEWID groupname
```
# User/Group/Password Files
====================================================================================
#### /etc/passwd
used to store user and system accounts
====================================================================================
#### /etc/shadow
Used to store user passwords (encrypted)
====================================================================================
#### /etc/group
Used to store group information, and which users are included in a group.
====================================================================================
#### /etc/skel
This directory is used to define the default items that will get added to a new users home directory
For example, this could contain a README file that contains rules for using the server.
====================================================================================
#### /etc/default/useradd
This directory is used to define the default options used when the useradd command is used.
For example, this could specify a location that user directories are created, default group to be added to, and more.
====================================================================================
#### /etc/sudoers
This file is used to define which users have sudo access/
# Admin Privileges
### User & group privileges
------------------------------------------------------------------------------------------------------------------------------------------------
For users to have escalated privilege on a server (root access), they need to be granted this permission.
====================================================================================
#### sudo
Users with sudo access have full administrator permissions, this means that they can essentially perform any task on the system.
There are 2 methods we can use to grant users sudo access:
------------------------------------------------------------------------------------------------------------------------------------------------
##### 1. [usermod](https://bookstack.b4sed.xyz/link/27#bkmrk-modifying-users)
```
sudo usermod -aG sudo username
```
You can then validate that this has worked by checking the groups that the specified user is included in:
```
groups username
```
------------------------------------------------------------------------------------------------------------------------------------------------
##### 2 Editing the sudoers file directly
Users with sudo access are defined within the /etc/sudoers file. This file should ONLY ever be edited using the visudo text editor - as this will check the syntax for any errors.
```
visudo
```
To add a new user to the sudoers group, we need to append a line to the /etc/sudoers file.
1\. Edit the /etc/sudoers file using visudo:
```
visudo
```
2\. Find the line that reads `# User privilege specification` and add the following line below it:
```
username ALL=(ALL:ALL) ALL
```
------------------------------------------------------------------------------------------------------------------------------------------------
##### Adding user groups to sudoers
In addition to adding specific users to the sudoers group, we can also add user groups. Once again, this is best achieved by editing the sudoers file directly using visudo.
1. Edit the sudoers file
```
visudo
```
2. Find the line that reads `# User privilege specification` and add the following line below it:
```
%groupname ALL=(ALL:ALL) ALL
```
Groups are defined by placing a % symbol in front of the group name.
------------------------------------------------------------------------------------------------------------------------------------------------
##### Giving users sudo privilege for specific tasks/commands
In addition to giving a user full sudo permission on a system, we can also implement a more limited set of sudo-enabled privileges.
For example, I want to add a user who has sudo permission to run updates on a system, but I don't want them to have all privileges. To do this, we would need to edit the sudoers file as above using the visudo command, once there you can add a line like the following:
```
username ALL=(ALL:ALL) /usr/bin/apt update,/user/bin/apt upgrade
```
Note: As best practice, you're best off specifying the full binary path of the commands you wish to grant access to. This prevents a user from renaming a binary to apt (in this example) and being able to run the command with sudo privilege.
====================================================================================
#### Wheel
The alternative to adding users to the sudoers file, is to add users to the Wheel group. The Wheel group is essentially an exclusion that can be added for users to allow access to certain roles.
By default, any users in the wheel group have full privileges on the server.
An example of how this could be utilised, would be to add a rule into the /etc/wheel file that specifies a group that can be used to perform a specific task. Users that need this privilege could then be added to this file.
====================================================================================
#### PolicyKit
PolicyKit (also known as polkit) is a toolkit for defining and handling authorizations in Linux systems. It is used to manage privileges for unprivileged processes to perform tasks that normally require higher privileges, such as those of the root user. This allows for more fine-grained control over what users and processes are allowed to do without requiring full administrative access.
# File Permissions & Ownership
====================================================================================
#### Linux File Permissions
Every file in Linux has permissions, these define which actions can be undertaken by the user,group, and other.
As seen on the file below, permissions are set at the start of the line using 10 characters.
```
-r--r-xrw- 1 root root 27 May 26 10:56 test.txt
```
These 10 characters are the permission classes, and are used as follows:
[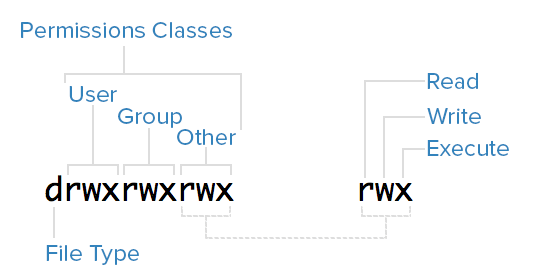](https://bookstack.b4sed.xyz/uploads/images/gallery/2024-05/8hWimage.png)
(For file type: - is a file, d is a directory).
Permissions can also be represented in number format.
[](https://bookstack.b4sed.xyz/uploads/images/gallery/2024-05/xbwimage.png)
\------------------------------------------------------------------------------------------------------------------------------------------------
##### Changing file or directory permissions
(Numerical representation)
```
chmod 777 filename
```
(Letter representation)
```
chmod u=rwx,g=rwx,o=r
```
You can also use -R to chmod recursively:
```
chmod -R 777 directoryname
```
====================================================================================
#### Linux File Ownership
Files in Linux are owned by a user and group.
```
-rw-r--r-- 1 root root 27 May 26 10:56 test.txt
```
##### Changing user/group
```
chown newuser:newgroup
```
For instances where you want to chown a directory, and all of the subdirectories & files within, we can use the -R (recursive) flag:
```
chown -R newuser:newgroup directoryname
```
====================================================================================
#### FACL - File Access Control List
File Access Control Lists (FACLs) provide a robust mechanism for managing file permissions in Linux, offering greater flexibility and control than traditional Unix permissions. By using commands like setfacl and getfacl, administrators can easily set and view ACLs to fine-tune access to files and directories for multiple users and groups.
##### View file/directory ACL
```
getfacl filename
```
##### Grant an additional user permissions on a file
```
setfacl -m u:username:rwx filename
```
##### Remove a user's permissions on a file
```
setfacl -x u:username filename
```
##### Define default ownership/permissions for directories
```
setfacl -m d:u:username:rwx filename
```
====================================================================================
##### Sticky bits
In Linux, the sticky bit is a special permission that can be set on directories to control user access to the files within those directories. When the sticky bit is set on a directory, it restricts the deletion or renaming of files within that directory. Specifically, only the file's owner, the directory's owner, or the root user can delete or rename files.
Enable sticky bits
```
chmod o+t directoryname
```
Disable sticky bits
```
chmod o-t directoryname
```
====================================================================================