Linux
- Hardware and System Performance
- Boot, Kernel, Recovery, and Tunables
- Linux Boot Process
- Troubleshooting Boot Issues & System Recovery
- GRUB - Grand Unified Boot Loader
- Kernel, Modules, Tunables & initrd (Initialisation RAM Disk)
- Single User Mode
- FSCK
- OOB Management - KVM & DRAC
- Single User Mode
- Linux Filesystem (FHS), Storage Concepts, LVM, & Disks
- QUICK GUIDE: Clearing Disk Space
- Quick Guide: Expanding Disks
- STORAGE CONCEPTS
- FHS - Filesystem Hierarchy Standard
- Partitions and Filesystems
- LVM (Logical Volume Manager)
- SWAP
- Archiving and Compression
- fstab
- Disk Performance
- System Networking
- User Management & File Permissions
- Software & Service Management
- Linux System Variables
- SSH & Authentication
- File Transfers, Synchronisation & Shared Storage
- Monitoring
- Nick Abbots Script
- One-liners
- Bots/Crawlers & Control/Mitigation
- Resource usage and performance
- xmlrpc & wp-login
- ANS IPs
- Useful Online Tools
- MySQL
- MySQL Optimisation, Performance, and Logging
- Corruption and Repairs
- User and Database Management
- Binary Logging
- Database Monitoring (New Relic)
- MySQL Encryption
- MySQL Remote Access
- Storage Engines
- MySQL Replication
- XtraBackup
- MySQL Backups - mysqldump and xtrabackup
- CloudFlare
- Backups & Restores
- Full Server Restore (Dedi or Virtual)
- Commvault Backups
- Bacula Restores
- Commvault Restores
- Permissions Restores
- Bacula Bextract
- Bacula Backups
- LoadBalancers
- Magento
- Cluster
- NGINX
- APACHE
- Logging
- WordPress
- Bash
- SSL
- cPanel
- PHP
- Containerisation & Automation
- What is a container?
- General Docker Information
- Docker Compose
- Kubernetes (K8s)
- What is automation?
- Ansible
- GIT - Version Control
- Vulnerabilities, Patching, and Security
- Linux Firewalls
Hardware and System Performance
Disks, CPU, RAM, etc
Check devices and connections
List disks
lsblkList PCI controller connections:
lspciList CPU details
lscpuList USB bus devices
lsusbRAM
View current RAM configuration
lsmemView current RAM usage (human readable)
free -hOlder systems might not like -h, you can also run the command without it.
Boot, Kernel, Recovery, and Tunables
Linux Boot Process
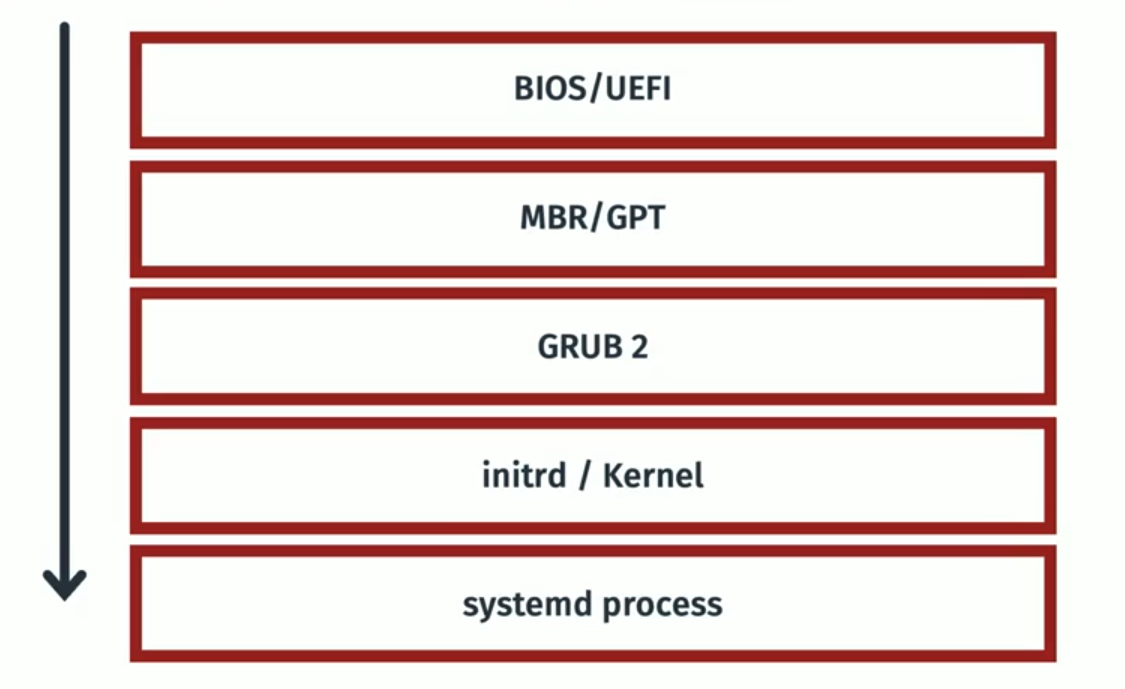
The below image outlines the typical flow of a Linux system boot.
====================================================================================
BIOS (Basic Input/Output System) & UEFI (Unified Extensible Firmware Interface)
BIOS (Basic Input/Output System) and UEFI (Unified Extensible Firmware Interface) are both firmware interfaces that provide a critical layer between your hardware and operating system during the startup process. However, they differ significantly in their functionality and capabilities.
Similarities:
- Both BIOS and UEFI are pre-installed on your motherboard and activate when you turn on your computer.
- They perform essential tasks like initializing hardware components, performing power-on self-tests (POST), and loading the operating system from a storage device.
====================================================================================
MBR - master boot record & GPT - GUID partition table
MBR (Master Boot Record) and GPT (GUID Partition Table) are both partition table formats used on hard disk drives (HDDs) and solid-state drives (SSDs) to define how the storage space is organized. However, they have some key differences:
Similarities:
- Both MBR and GPT are located at the beginning of a storage device and define how the storage space is divided into partitions.
- They both store information about each partition, such as its size, file system type, and location on the disk.
- Both allow you to create multiple partitions on a single storage device, enabling you to manage different operating systems or data types more efficiently.
- Identification of boot loader (typically at beginning of disk) - Once identified, the boot process is handled by the boot loader - most commonly GRUB2.
Note; MBR is an older standard of partitioning, most systems will now use GUID.
====================================================================================
GRUB2 (Grand Unified Boot Loader)
GRUB2 is a software program, specifically a bootloader. Its primary function is to take control during the computer startup process after the firmware (BIOS or UEFI) has initialized the hardware. Here's a breakdown of its role:
- Loading the Operating System Kernel: GRUB2 locates the kernel (the core program) of your operating system on the storage device. It then loads this kernel into memory.
- starts kernel and systemd.
====================================================================================
Initrd & Kernel
------------------------------------------------------------------------------------------------------------------------------------------------
What is initrd?
initrd (initialisation RAM disk) is essentially a set of instructions used to load the kernel. initrd is stored temporarily in system memory whilst the kernel is loaded.
------------------------------------------------------------------------------------------------------------------------------------------------
What is a Linux Kernel?
The Linux kernel is the core software that acts as an interface between the hardware and various software applications running on your system.
====================================================================================
Systemd
Systemd is the first process that starts on a booting OS. Systemd is a foundational software suite for Linux operating systems. It acts as a system and service manager, handling tasks like booting up the system and managing services that run in the background.
------------------------------------------------------------------------------------------------------------------------------------------------
Troubleshooting Boot Issues & System Recovery
====================================================================================
System boot logs
The below log files are most relevant to viewing boot logs and errors
dmesg - Contains all boot data
syslog/journal/messges - Logging post boot
====================================================================================
Recovery Options
------------------------------------------------------------------------------------------------------------------------------------------------
Alternative Kernel
Firstly, it's worth ruling out a bad kernel file. When attempting to boot the system, enter grub and set an old kernel version to be booted from.
------------------------------------------------------------------------------------------------------------------------------------------------
Live CD Boot
Booting from a live CD essentially means that an external device is connected to the server containing a live CD image. This can be used to launch the operating system (from the external device) with a fresh (temporary) Linux installation.
The process for attaching the live CD varies depending on the tools available. If you're dealing with a physical server that you have physical access to, we can connect a USB drive or CD containing the live CD image.
Since we have access to DRAC, we can actually attach the image from there:
DRAC > Attach Media
Once attached, you'll need to boot the system an
Once you're booted into the OS (live CD), we'll be able to mount the original server disks (still containing the old OS) within the new OS. From here we can troubleshoot the issues we're seeing.
------------------------------------------------------------------------------------------------------------------------------------------------
Example Scenario; GRUB Broken
In this scenario, there's a problem with GRUB (boot loader) on the server OS. One way we could look to resolve this is by reconfiguring/reinstalling GRUB.
Luckily, our live CD will contain a fully working version of GRUB that we can use to fix our broken system.
In this scenario, I've attached and booted from a live CD. I've then mounted the original server disks (/dev/sdb1 mounted to /mnt/sdb1).
sudo grub-install --root-directory=/mnt/sdb1 /dev/sdbOnce done, reboot into the original OS and see if it's fixed.
------------------------------------------------------------------------------------------------------------------------------------------------
Example scenario; Slow Boot
For troubleshooting slow server boots, we can use the below command:
systemd-analyze blameThis command will list the amount of time that each service has taken to start at boot.
====================================================================================
GRUB - Grand Unified Boot Loader
====================================================================================
GRUBs responsibility in the boot process
====================================================================================
GRUB Configuration Options
There are 2 directories to note when talking about GRUB;
/etc/grub - This directory stores configuration scripts that define boot entries for GRUB2.
/boot/grub - This directory stores the actual GRUB2 configuration files used during boot.
There are also 2 commands to note for GRUB configuration:
grubby
-
Function:
grubbyis a command-line tool that allows you to directly manipulate individual GRUB2 menu entries on your system. It provides functionalities for:- Setting the default boot entry
- Adding, removing, or modifying existing entries
- Changing boot order
- Viewing information about current entries
-
Focus:
grubbyoperates on individual boot entries within the existing GRUB2 configuration.
grub2-mkconfig
- Function:
grub2-mkconfig(or sometimes shortened toupdate-grubon some systems) is a utility used to regenerate the GRUB2 configuration file (grub.cfg) located in/boot/grub. It reads configuration scripts from the/etc/grub.ddirectory. - Focus:
grub2-mkconfigfocuses on rebuilding the entire GRUB2 configuration file based on the defined scripts. This ensures thegrub.cfgfile reflects any changes made to the configuration scripts in/etc/grub.d.
====================================================================================
Kernel, Modules, Tunables & initrd (Initialisation RAM Disk)
Kernel
====================================================================================
What is a Linux Kernel?
The Linux kernel is the core software that acts as an interface between the hardware and various software applications running on your system.
------------------------------------------------------------------------------------------------------------------------------------------------
Check kernel version
uname -rAfter installing a new kernel version, a server reboot is required.
------------------------------------------------------------------------------------------------------------------------------------------------
Which file in /boot is the kernel?
Typically, the kernel file itself (located within /boot) is prefaced with 'vmlinuz', for example:
vmlinuz-5.15.0-106-generic
Note; is the kernel is prefaced with vmlinuz - this means that the kernel is compressed and must be uncompressed on boot. If the kernel file is prefaced with vmlinux - then it isn't compressed.
Working on Linux systems, you may see systems with various kernels installed.
To check which kernel is currently being treated as the primary one (which will be loaded on boot), you can check the symlinks (in /boot), as below:
vmlinuz -> vmlinuz-5.15.0-107-generic
vmlinuz.old -> vmlinuz-5.15.0-106-generic
------------------------------------------------------------------------------------------------------------------------------------------------
Kernel Modules
What is a kernel module?
A kernel module is essentially a piece of code that can be loaded into the operating system's kernel on demand. Think of it like an extension for the kernel, providing additional functionality without requiring a complete system restart. In other systems, modules are known as drivers.
For clarification; Kernel modules are not the only method that the kernel can be altered. You can also directly edit GRUB to pass additional commands during boot, or alter the kernel manually.
Why do we need kernel modules?
The Linux Kernel is 'monolithic', this means that it's a single file containing every aspect of that particular kernel. In order to change this, we would have to alter and recompile the kernel manually - which is lots of work. Alternatively, we can use pre-built kernel modules to add additional functionality to the Linux Kernel.
About Kernel Modules
Kernel Modules are typically stored in /lib/modules.
Typically, this directory will contain various modules that come pre-installed with the OS, note that these won't all be active.
List active kernel modules:
lsmodActivate an installed kernel module
Firstly, identify the module file path (within /lib/modules). This will have a .ko file extension.
sudo insmod /lib/modules/path/to/ko/fileDisable an installed kernel module
sudo rmmod modulenameCheck for module dependencies
This is worth doing if you're adding a new kernel module to a system:
sudo modprobe -a modulename------------------------------------------------------------------------------------------------------------------------------------------------
Kernel Tunables
In Linux, a tunable refers to a specific type of configuration setting within the kernel. These tunables allow you to customize the behavior of the kernel while the system is running, offering more fine-grained control over how your system operates.
There are lots of tunables set for the Linux Kernel that dictate how the system will handle a variety of system aspects. As an example, there's a tunable for the maximum number of files that a Linux system can have open at any one time, called 'fs-file-max'
View all tunables:
sysctl -a View specific tunable:
sysctl tunable-nameChange tunable value (doesn't persist reboot):
sysctl -w tunable-name=newvaluePermanently change tunable value
Specifically where this can be done is OS dependent, a typical location is /etc/sysctl.d
Create a new file ie 00-custom-settings.conf
contents:
tunable-name=newvalue
====================================================================================
initrd
------------------------------------------------------------------------------------------------------------------------------------------------
What is initrd?
initrd (initialisation RAM disk) is essentially a set of instructions used to load the kernel. initrd is stored temporarily in system memory whilst the kernel is loaded.
-----------------------------------------------------------------------------------------------------------------------------------------------
Which file in /boot is initrd?
The initrd file will be prefaced with just that - initrd:
initrd.img-5.15.0-106-generic
To check which initrd file is currently being treated as the primary one (which will be loaded on boot), you can check the symlinks (in /boot), as below:
initrd.img -> initrd.img-5.15.0-107-generic
initrd.img.old -> initrd.img-5.15.0-106-generic
-----------------------------------------------------------------------------------------------------------------------------------------------
Single User Mode
====================================================================================
You might need to boot into single user mode in some of the following cases:
Completely locked out of server - no credentials know
root or sudo users inaccessible.
Filesystem corruption
====================================================================================
Reboot server and access console via OOB (DRAC or KVM)
Once you see the kernel selection screen in boot menu, hit 'e' on your keyboard. This will load up the GRUB boot menu.
Once here, you want to instruct GRUB to boot the system into single user mode by appending the following to the line beginning with 'linux' or similar:
init=/bin/bashOnce you've appended this to the line, press ctrl + x to proceed with the boot up.
You should then be entered into the system at single user mode, you'll know this has worked because you'll be shown the CLI showing:
:#
From here, we then need to mount the filesystem with rw (read & write) enabled:
(ensure to mount the correct disk)
mount -o remount,rw /dev/sda1 /You can then look to reset the password for required accounts, ie ukfastsupport, root, graphiterack:
passwd usernameOnce you've reset the required passwords, you then need to remount the filesystem as ro (read only):
(ensure to mount the correct disk)
mount -o remount,ro /dev/sda1 /Now we can look to reboot the system via OS:
shutdown -r now, reboot, systemctl reboot etc
You should now be able to access the server via SSH using the newly reset credentials.
FSCK
====================================================================================
FSCK (File System Consistency Check)
------------------------------------------------------------------------------------------------------------------------------------------------
What does FSCK do?
fsck (file system consistency check) is a system utility used to check and repair filesystems. FSCK is made up of various tools that are made to handle different filesystem types, these are stored within /usr/sbin:
lrwxrwxrwx 1 root root         8 Mar 23  2022 dosfsck -> fsck.fat
-rwxr-xr-x 1 root root    360280 Jun  1  2022 e2fsck
-rwxr-xr-x 1 root root     43440 Apr  9 15:32 fsck
-rwxr-xr-x 1 root root      1185 Feb 24  2022 fsck.btrfs
-rwxr-xr-x 1 root root     31168 Apr  9 15:32 fsck.cramfs
lrwxrwxrwx 1 root root         6 Jun  1  2022 fsck.ext2 -> e2fsck
lrwxrwxrwx 1 root root         6 Jun  1  2022 fsck.ext3 -> e2fsck
lrwxrwxrwx 1 root root         6 Jun  1  2022 fsck.ext4 -> e2fsck
-rwxr-xr-x 1 root root     84360 Mar 23  2022 fsck.fat
-rwxr-xr-x 1 root root     55712 Apr  9 15:32 fsck.minix
lrwxrwxrwx 1 root root         8 Mar 23  2022 fsck.msdos -> fsck.fat
lrwxrwxrwx 1 root root         8 Mar 23  2022 fsck.vfat -> fsck.fat
-rwxr-xr-x 1 root root      1968 Feb  9  2022 fsck.xfs
-rwxr-xr-x 1 root root     51592 Nov  1  2022 ntfsclone
-rwxr-xr-x 1 root root     35200 Nov  1  2022 ntfscp
Purpose of fsck
- Checking Filesystem Integrity: It scans the filesystem for inconsistencies and potential errors, such as corrupted metadata, lost clusters, and bad sectors.
- Repairing Errors:
fsckcan fix detected issues to prevent data loss and improve system stability.
------------------------------------------------------------------------------------------------------------------------------------------------
You can only run a filesystem check on an unmounted disk.
Scanning a specific disk (optional repair):
fsck -t ext4 /dev/sda2Scanning all disks (optional repair)
fsck -AFSCK Options:
| -A | Check all filesystems. |
| -t [option] | Specify filesystem type |
| -y | Automatically attempt to fix any errors without user prompt |
| -n | Do not attempt to repair |
| -f | Forces a check, even if the filesystem appears to be fine |
| -T | Skip mounted filesystems |
| -R | Skip the root filesystem |
------------------------------------------------------------------------------------------------------------------------------------------------
FSCK on boot
FSCK can be configured to run for each filesystem when the server boots. For more info see here.
====================================================================================
OOB Management - KVM & DRAC
====================================================================================
KVM
------------------------------------------------------------------------------------------------------------------------------------------
Useful Links:
------------------------------------------------------------------------------------------------------------------------------------------
What is a KVM?
A KVM is an out-of-band access device which can be attached to servers in order to allow engineers to access them. KVMs are useful to have attached when a server goes down or isn't accessible through DRAC.
------------------------------------------------------------------------------------------------------------------------------------------
Attaching a KVM
To have a KVM attached to a server you need to create a task for the relevant data center:
In the task ask them to attach a KVM to the required SID
------------------------------------------------------------------------------------------------------------------------------------------
Accessing a KVM
Each KVM has its own SID
Search for the IP of the KVM in a browser – creds to sign in will be in password tab on the SID – search TechDB for KVM IP
Access through Firefox on DRAC Jumpbox
Enter console > download > open with > Java
Java can be funny sometimes, if it won't load, open Java Configure (search start menu) and add the KVM URL to the allow list on security tab
====================================================================================
DRAC
------------------------------------------------------------------------------------------------------------------------------------------
Useful Links:
------------------------------------------------------------------------------------------------------------------------------------------
What is DRAC?
DRAC (Dell Remote Access Controller) is an out-of-band management tool which can be used for managing/ controlling servers resources and functions. DRAC essentially allows servers to be controlled when we aren't able to directly connect to the server through SSH or RDP. It has features such as hardware monitoring, reboot/restart controls/ terminal access and more.
------------------------------------------------------------------------------------------------------------------------------------------
Single User Mode
Boot the server into 'single user mode'
B. Once in single user mode, we can look to initiate the fsck
We will first need to check the filesystem type being used:
get the device name:
root@test:~# df
Filesystem                        1K-blocks    Used Available Use% Mounted on
tmpfs                                400556    1068    399488   1% /run
/dev/mapper/ubuntu--vg-ubuntu--lv  15371208 7497096   7071504  52% /
tmpfs                               2002776       0   2002776   0% /dev/shm
tmpfs                                  5120       0      5120   0% /run/lock
/dev/sda2                           1992552  256828   1614484  14% /boot
tmpfs                                400552       4    400548   1% /run/user/0
In this example, we want to check '/dev/mapper/ubuntu--vg-ubuntu--lv' which is mounted to /.
Check the filesystem type:
root@test:~# blkid /dev/mapper/ubuntu--vg-ubuntu--lv
/dev/mapper/ubuntu--vg-ubuntu--lv: UUID="2f1c5c3e-54e0-4edc-9d19-a1f170959479" BLOCK_SIZE="4096" TYPE="ext4"
As you can see, in this example the type is ext4.
C. Running the fsck:
The general command structure for running an fsck is as below:
##Check for errors (No repair)
fsck.filesystem_type /dev/device_name -o ro

##Check and repair errors
fsck.filesystem_type /dev/device_name
In this example, I'm going to run a check and then a repair seperately:
##Check for errors (No repair)
fsck.ext4 /dev/mapper/ubuntu--vg-ubuntu--lv -o ro

##Check and repair errors
fsck.ext4 /dev/mapper/ubuntu--vg-ubuntu--lv
2.
3.
Linux Filesystem (FHS), Storage Concepts, LVM, & Disks
Disk and filesystem management
QUICK GUIDE: Clearing Disk Space
====================================================================================
Identifying where disk space is being used
NCDU
NCDU is a command line tool that can be used to review disk usage across a filesystem.
ncdu /Note: You can specify a directory other than /. ie if you wanted to review the contents of /var, you would format the command as follows:
ncdu /varFind
We can also use the find command to locate files over a specified size.
find / -type f -size +300M > filelist.txt The above command would search / (and all subdirectories) for any files over 300M in size. There are various options available for size specification:
-
G-> for gibibytes
-
M-> for megabytes
-
K-> for kibibytes
-
b-> for bytes
------------------------------------------------------------------------------------------------------------------------------------------
Quick wins
/var/log/journal - this can be vacuumed to reduce the size:
journalctl --vacuum-size=500M View largest directories in /
du -h --max-depth=1 / 2> /dev/null------------------------------------------------------------------------------------------------------------------------------------------
Disk Reserve
Most linux filesystems (depending on FS type) will have a segment reserved for special processes. The default percentage is 5.
We can use the tune2fs command for ext2/ext3/ext4 filesystems.
Check disk reserve:
tune2fs -l /dev/partitionChanging disk reserve:
tune2fs -m2 /dev/partition
------------------------------------------------------------------------------------------------------------------------------------------
Inodes
Check for inode usage:
du --inodes -d 1 / 2>/dev/nullQuick Guide: Expanding Disks
====================================================================================
Virtual Disk Expansion
 for i in /sys/class/scsi_host/host*/scan; do echo "- - -" > $i; done
 for i in /sys/class/scsi_device/*/device/rescan; do echo "1" > $i; done
2. Check for updated disk size:
lsblkYour output will look something like this:
NAME            MAJ:MIN RM   SIZE RO TYPE MOUNTPOINT
 sda               8:0    0   120G  0 disk
 ├─sda1            8:1    0   512M  0 part /boot
 └─sda2            8:2    0 103.5G  0 part
   ├─eCloud-root 253:0    0 102.5G  0 lvm  /
   └─eCloud-swap 253:1    0     1G  0 lvm  [SWAP]
 sdc               8:32   0   200G  0 disk
 └─sdc1            8:33   0   200G  0 part
 sr0              11:0    1  1024M  0 rom
3. Check partitions using fdisk
fdisk -lOutput will look something like this:
 [root@server ~]# fdisk -l
 Disk /dev/sda: 128.8 GB, 128849018880 bytes, 251658240 sectors
 Units = sectors of 1 * 512 = 512 bytes
 Sector size (logical/physical): 512 bytes / 512 bytes
 I/O size (minimum/optimal): 512 bytes / 512 bytes
 Disk label type: dos
 Disk identifier: 0x000b9cfe
    Device Boot      Start         End      Blocks   Id  System
 /dev/sda1   *        2048     1050623      524288   83  Linux
 /dev/sda2         1050624   218103774   108526575+  8e  Linux LVM
4. Run growpart against the expanded device:
growpart /dev/sda 25. Run pvresize command against the partition:
pvresize /dev/sda26. Resize the logical volume, ensure to replace vg and lv with the appropriate values (these will typically be the same as seen on df -h):
lvresize -rl +100%FREE /dev/mapper/vg/lv7. Check that the space has been applied to the filesystem:
df -h====================================================================================
Physical Disk Expansion (Additional Disk)
 for i in /sys/class/scsi_host/host*/scan; do echo "- - -" > $i; done
 for i in /sys/class/scsi_device/*/device/rescan; do echo "1" > $i; done
2. Check for updated disk size:
lsblkYour output will look something like this:
NAME                MAJ:MIN RM   SIZE RO TYPE MOUNTPOINT
sda                   8:0    0 111.3G  0 disk
├─sda1                8:1    0     1G  0 part /boot
└─sda2                8:2    0 110.3G  0 part
  ├─vg_main-lv_root 253:0    0   105G  0 lvm  /
  └─vg_main-lv_swap 253:1    0     4G  0 lvm  [SWAP]
sdb                   8:16   0 111.8G  0 disk /mnt
sdc                   8:32   0 237.9G  0 disk
In this example, the additional disk is /dev/sdc.
3. Create a new partition on the additional disk:
fdisk /dev/sdc
Once you've run the above command, you'll be entered into the fdisk prompt, the below options are typically suitable:
p - print
n - make new partition
p - primary
w - write
4. Check the physical volume and create a new physical volume on the new partition:
[root@test ~]# pvs
  PV         VG      Fmt  Attr PSize    PFree
  /dev/sda2  vg_main lvm2 a--  <110.25g <1.25g
Create a new physical volume on the new partition:
pvcreate /dev/sdc1
Show new Physical Volume
[root@test ~]# pvs
  PV         VG      Fmt  Attr PSize    PFree
  /dev/sda2  vg_main lvm2 a--  <110.25g  <1.25g
  /dev/sdc1          lvm2 ---   237.87g 237.87g
6: Extend the volume group “vg_main” over the new partition
vgextend vg_main /dev/sdc1
Show volume group
[root@test ~]# vgs
  VG      #PV #LV #SN Attr   VSize    VFree
  vg_main   2   2   0 wz--n- <348.12g <239.12g
7. Resize the logical volume, ensure to replace vg and lv with the appropriate values (these will typically be the same as seen on df -h):
lvresize -rl +100%FREE /dev/mapper/vg/lv8. Check that the space has been applied to the filesystem:
df -hSTORAGE CONCEPTS
====================================================================================
This page details the storage concepts for a linux system.
------------------------------------------------------------------------------------------------------------------------------------------------
FILE
------------------------------------------------------------------------------------------------------------------------------------------------
BLOCK
In a block storage system, you can break the data into independent fixed-size blocks or pieces. Each block is an individual piece of data storage. A complete piece of information, such as a data file, is stored in multiple, nonsequential blocks.
The block storage system does not maintain high-level metadata, such as file type, ownership, and timestamp. Developers must design a data lookup table in the application system to manage the storage of data into respective blocks. The application might store data in different operating environments to increase read/write efficiency.
------------------------------------------------------------------------------------------------------------------------------------------------
OBJECT
Object storage is a technology that stores and manages data in an unstructured format called objects. Each object is tagged with a unique identifier and contains metadata that describes the underlying content. For example, object storage for photos contains metadata regarding the photographer, resolution, format, and creation time.
Developers use object storage to store unstructured data, such as text, video, and images.
------------------------------------------------------------------------------------------------------------------------------------------------
FHS - Filesystem Hierarchy Standard
====================================================================================
FHS as defined by RedHat:
------------------------------------------------------------------------------------------------------------------------------------------------
/boot/
The /boot/ directory contains static files required to boot the system, such as the Linux kernel. These files are essential for the system to boot properly.
------------------------------------------------------------------------------------------------------------------------------------------------
/dev/
The /dev/ directory contains file system entries which represent devices that are attached to the system. These files are essential for the system to function properly.
------------------------------------------------------------------------------------------------------------------------------------------------
/etc/
The /etc/ directory is reserved for configuration files that are local to the machine. No binaries are to be placed in /etc/.
------------------------------------------------------------------------------------------------------------------------------------------------
/lib/
The /lib/ directory should contain only those libraries needed to execute the binaries in /bin/ and /sbin/. These shared library images are particularly important for booting the system and executing commands within the root file system.
------------------------------------------------------------------------------------------------------------------------------------------------
/media
The /media/ directory contains subdirectories used as mount points for removeable media, such as 3.5 diskettes, CD-ROMs, and Zip disks.
------------------------------------------------------------------------------------------------------------------------------------------------
/mnt/
The /mnt/ directory is reserved for temporarily mounted file systems, such as NFS file system mounts. For all removeable media, use the /media/ directory.
------------------------------------------------------------------------------------------------------------------------------------------------
/opt/
/opt/ directory provides storage for large, static application software packages./opt/ directory creates a directory bearing the same name as the package. This directory, in turn, holds files that otherwise would be scattered throughout the file system, giving the system administrator an easy way to determine the role of each file within a particular package.sample is the name of a particular software package located within the /opt/ directory, then all of its files are placed in directories inside the /opt/sample/ directory, such as /opt/sample/bin/ for binaries and /opt/sample/man/ for manual pages.------------------------------------------------------------------------------------------------------------------------------------------------
/proc/
The /proc/ directory contains special files that either extract information from or send information to the kernel.
------------------------------------------------------------------------------------------------------------------------------------------------
/sbin/
The /sbin/ directory stores executables used by the root user. The executables in /sbin/ are only used at boot time and perform system recovery operations. Of this directory, the FHS says:
/sbincontains binaries essential for booting, restoring, recovering, and/or repairing the system in addition to the binaries in/bin. Programs executed after/usr/is known to be mounted (when there are no problems) are generally placed into/usr/sbin. Locally-installed system administration programs should be placed into/usr/local/sbin.
------------------------------------------------------------------------------------------------------------------------------------------------
/srv/
The /srv/ directory contains site-specific data served by your system running Red Hat Enterprise Linux. This directory gives users the location of data files for a particular service, such as FTP, WWW, or CVS. Data that only pertains to a specific user should go in the /home/ directory.
------------------------------------------------------------------------------------------------------------------------------------------------
/sys/
The /sys/ directory utilizes the new sysfs virtual file system specific to the 2.6 kernel. With the increased support for hot plug hardware devices in the 2.6 kernel, the /sys/ directory contains information similarly held in /proc/, but displays a hierarchical view of specific device information in regards to hot plug devices.
------------------------------------------------------------------------------------------------------------------------------------------------
/usr/
The /usr/ directory is for files that can be shared across multiple machines. The /usr/ directory is often on its own partition and is mounted read-only.
/usr/local
The /usr/local hierarchy is for use by the system administrator when installing software locally. It needs to be safe from being overwritten when the system software is updated. It may be used for programs and data that are shareable among a group of hosts, but not found in /usr.
------------------------------------------------------------------------------------------------------------------------------------------------
/var/
Since the FHS requires Linux to mount /usr/ as read-only, any programs that write log files or need spool/ or lock/ directories should write them to the /var/ directory. The FHS states /var/ is for:
...variable data files. This includes spool directories and files, administrative and logging data, and transient and temporary files.
------------------------------------------------------------------------------------------------------------------------------------------------
Partitions and Filesystems
====================================================================================
Partitions
------------------------------------------------------------------------------------------------------------------------------------------------
What is a partition?
Partitions allow you to divide a single physical disk into multiple, isolated sections. Each partition can be managed independently
Partition types in Linux
MBR- Master Boot Record
The Master Boot Record (MBR) is a special type of boot sector at the very beginning of a disk. The MBR contains important information about the disk's partitions and the filesystem, as well as executable code necessary to boot an operating system. MBR permits for up to 4 partitions on a storage device and also has limitations in the size of disks it can partition, as well as the size of partitions that can be created.
TLDR; MBR can partition a drive into 4 partitions. Not ideal for large drives. Old standard that's being phased out in favour of GPT.
GPT - GUID Partition Table
The GUID Partition Table (GPT) is a modern standard for the layout of partition tables on a physical storage device. GPT is part of the Unified Extensible Firmware Interface (UEFI) standard, which is designed to replace the older BIOS firmware interface used by PCs.
Benefits of GPT include:
Larger Disk and Partition Support - GPT allows for a virtually unlimited number of partitions. GPT can support disks larger than 2 terabytes (TB), up to 9.4 zettabytes (ZB).
Redundancy - GPT stores a primary partition table at the beginning of the disk and a backup partition table at the end of the disk.
TLDR; GPT is more modern, handles larger disks & partitions, and also has redundancy features.
------------------------------------------------------------------------------------------------------------------------------------------------
Configuration & management of partitions
------------------------------------------------------------------------------------------------------------------------------------------------
fdisk
fdisk (format disk) is a command-line utility that can be used for making changes to MBR disk partitions.
fdisk is primarily designed for use with MBR partitioned disks. Check the disk partitioning your disk is using before making changes (fdisk -l /dev/devicename). If your disk is GPT, see here.
View current partitions and partitioning standard:
fdisk -l /dev/devicenameTo enter into the fdisk utility to manage partitions:
fdisk /dev/devicename We then have the following options available:
n |
Create a new partition |
d |
Delete a partition |
i |
print current boot record |
Example;
Let's say we have a single drive, and want to create a 10GB partition. This is an MBR drive.
Firstly, enter into the fdisk utility:fdisk /dev/diskname
From there, the following options can be used to add a new partition with a size of 10GB.
Command (m for help): n
Partition type:
p primary
e extended
Select (default p): p
Partition number (4-128, default 4): #left at default value
First sector (34-16777182, default 16775168): #left at default value (typically)
Last sector, +/-sectors or +/-size{K,M,G,T,P} (16775168-16777182, default 16777182): +10G
NOTE: fdisk shouldn't really be used for partitioning GPT drives.
NOTE: Leaving the last sector blank will automatically cause the remainder of space on the drive to be allocated.
------------------------------------------------------------------------------------------------------------------------------------------------
gdisk
gdisk is the GPT equivalent of fdisk, meaning that it's designed specifically for partitioning disks using GPT formatting.
gdisk is primarily designed for use with GPT partitioned disks. Check the disk partitioning your disk is using before making changes (fdisk -l /dev/devicename). If your disk is MBR, see here.
View current partitions and partitioning standard:
gdisk -l /dev/devicenameTo enter into the gdisk utility to manage partitions:
gdisk /dev/devicenameWe then have the following options available:
n |
Create a new partition |
d |
Delete a partition |
i |
print current boot record |
Example;
Let's say we have a single drive, and want to create a 10GB partition. This is a GPT drive.
Firstly, enter into the fdisk utility:gdisk /dev/diskname
From there, the following options can be used to add a new partition with a size of 10GB.
Command (? for help): n
Partition number (5-128, default 5):
First sector (34-2047, default = 34) or {+-}size{KMGTP}:
Last sector (34-2047, default = 2047) or {+-}size{KMGTP}: +5G
Current type is 8300 (Linux filesystem)
Hex code or GUID (L to show codes, Enter = 8300):
NOTE: fdisk shouldn't really be used for partitioning GPT drives.
NOTE: Leaving the last sector blank will automatically cause the remainder of space on the drive to be allocated.
------------------------------------------------------------------------------------------------------------------------------------------------
Parted
Whilst gdisk and fdisk are designed for use with specific partition formatting (GPT or MBR), the parted command can be used to manage partitions on both. Parted is also a mini-CLI tool.
Parted is a more versatile tool, but is also much ore complex to use. Also may not be installed by default on some systems. I would personally advise sticking with fdisk and gdisk.
Enter the parted CLI:
parted /dev/devicenameWe then have the following options:
print |
print current partition configuration |
mkpart |
create new partition |
====================================================================================
Filesystems
What is a filesystem?
a filesystem is a method and data structure that the operating system uses to manage files on a storage device or partition. It provides a way to organize, store, retrieve, and manage data.
Filesystem types in Linux
EXT (Extended Filesystem)
The current newest EXT version is EXT4. EXT standards (2-4) provide backward compatibility. This is to ensure that newer versions of the file system can work seamlessly with older versions. This compatibility provides several important benefits:
- Data Migration and Upgrade
- Mixed Environment Compatibility
- Data Integrity and Recovery
XFS (Extense Filesystem)
Able to track a much higher number of small files. XFS is better for systems handling large files or volumes of data - XFS is able to perform better than EXT in this scenario.
BTRFS (B-tree File System)
A modern file system developed by Oracle Corporation for Linux. It is designed to address various shortcomings of traditional file systems like ext4 and to offer advanced features, scalability, and improved performance.
BTRFS whilst being much more advanced in it's capabilities than the alternatives, also has it's own shortcomings. For example, additional ability means additional complexity, BTRFS is also known to be temperamental.
BTRFS offers features such as:
cross server partitions
SWAP
SWAP is technically a partition type, but it isn't focused on traditional data storage. Rather SWAP is allocated space on a storage device used by a Linux System that allows for the storage device to be used as an alternative to RAM. See this page for more info.
------------------------------------------------------------------------------------------------------------------------------------------------
Configuring filesystems
Once a disk has been partitioned, we can then look to create a filesystem on that disk. You can also create a filesystem on an unpartitioned disk, this will cause the entire disk to be formatted into the specified filesystem type.
Check existing filesystem types:
df -Tor
lsblk -fCreate a filesystem on a device/partition
There are lots of different filesystem types available in Linux. To simplify the process for configuring filesystems, there are symlinks to binaries added in most systems that can be used to specify filesystem types:
root@test:~# ls -l /usr/sbin/mk*
lrwxrwxrwx 1 root root      8 Mar 23  2022 /usr/sbin/mkdosfs -> mkfs.fat
-rwxr-xr-x 1 root root 133752 Jun  1  2022 /usr/sbin/mke2fs
-rwxr-xr-x 1 root root  14720 Apr  9 15:32 /usr/sbin/mkfs
-rwxr-xr-x 1 root root  22912 Apr  9 15:32 /usr/sbin/mkfs.bfs
-rwxr-xr-x 1 root root 482560 Feb 24  2022 /usr/sbin/mkfs.btrfs
-rwxr-xr-x 1 root root  35144 Apr  9 15:32 /usr/sbin/mkfs.cramfs
lrwxrwxrwx 1 root root      6 Jun  1  2022 /usr/sbin/mkfs.ext2 -> mke2fs
lrwxrwxrwx 1 root root      6 Jun  1  2022 /usr/sbin/mkfs.ext3 -> mke2fs
lrwxrwxrwx 1 root root      6 Jun  1  2022 /usr/sbin/mkfs.ext4 -> mke2fs
-rwxr-xr-x 1 root root  52048 Mar 23  2022 /usr/sbin/mkfs.fat
-rwxr-xr-x 1 root root  43408 Apr  9 15:32 /usr/sbin/mkfs.minix
lrwxrwxrwx 1 root root      8 Mar 23  2022 /usr/sbin/mkfs.msdos -> mkfs.fat
lrwxrwxrwx 1 root root      6 Nov  1  2022 /usr/sbin/mkfs.ntfs -> mkntfs
lrwxrwxrwx 1 root root      8 Mar 23  2022 /usr/sbin/mkfs.vfat -> mkfs.fat
-rwxr-xr-x 1 root root 391952 Feb  9  2022 /usr/sbin/mkfs.xfs
-rwxr-xr-x 1 root root  22704 Jan 10 13:54 /usr/sbin/mkhomedir_helper
-rwxr-xr-x 1 root root  12453 Jun 14  2023 /usr/sbin/mkinitramfs
-rwxr-xr-x 1 root root  14648 Jun  1  2022 /usr/sbin/mklost+found
-rwxr-xr-x 1 root root  72072 Nov  1  2022 /usr/sbin/mkntfs
-rwxr-xr-x 1 root root  47496 Apr  9 15:32 /usr/sbin/mkswap
You can then create a filesystem using the format shown above.
Example;
I have just added an additional disk to my server (/dev/sdb). I've then split that disk into 2 separate partitions (/dev/sdb1 & /dev/sdb2). I'd like to format /dev/sdb2 as an EXT4 filesystem:mkfs.ext4 /dev/sdb2
Alternatively, you can use the full command syntax to specify a desired filesystem type:
mkfs -t type /dev/devicename------------------------------------------------------------------------------------------------------------------------------------------------
Mounting filesystems & fstab
Syntax to mount a filesystem (not persistent):
mount /dev/devicename /mountpointUsing the above command will force the system to try and identify the filesystem type of the filesystem you're mounting. The preferred and safer method is to specify the type manually, as shown below:mount -t ext4 /dev/devicename /mountpoint
Syntax to mount a filesystem (persistent) -fstab
To persistently mount a filesystem, we need to add an entry to the /etc/fstab file instructing the system to do this.
vim /etc/fstabOnce editing, you can then add a line, following the format below:
/dev/devicename /mountpoint fstype defaults
Example;
I've added a new additional disk to my machine, I've partitioned the disk into 2 (/dev/sdb1 & /dev/sdb2) and I've created filesystems on both (EXT4 on /dev/sdb1, XFS on /dev/sdb2). The below lines could be added to /etc/fstab to persistently mount these filesystems:/dev/sdb1 /mnt/mount1 ext4 defaults 0 0/dev/sdb2 /mnt/mount2 xfs defaults 0 0
Once the entries have been added, the mount -a command can be used to mount all entries in /etc/fstab.
You'll notice on the above fstab entries, there is 'defaults'. This specifies that the system default options should be used, however, there are lots of options available for us to set, some common examples I've listed below:
| ro | read only |
| rw | read & write |
| async | write operations may be cached and written to disk at a later time. This can improve performance but may risk data integrity in case of unexpected shutdowns. |
| sync | writes have to be completed before the next write starts. Ensures better data integrity at the cost of performance. |
You'll also notice the 2 numbers after defaults:
| First number (Dump Field) (potential value 0 or 1) | determines whether disks will be backed up when the dump command is run. The dump command is deprecated so this value can safely be set to 0. |
| Second number (Pass Field) (potential value 0 or 1) |
This field determines the order in which
|
LVM (Logical Volume Manager)
====================================================================================
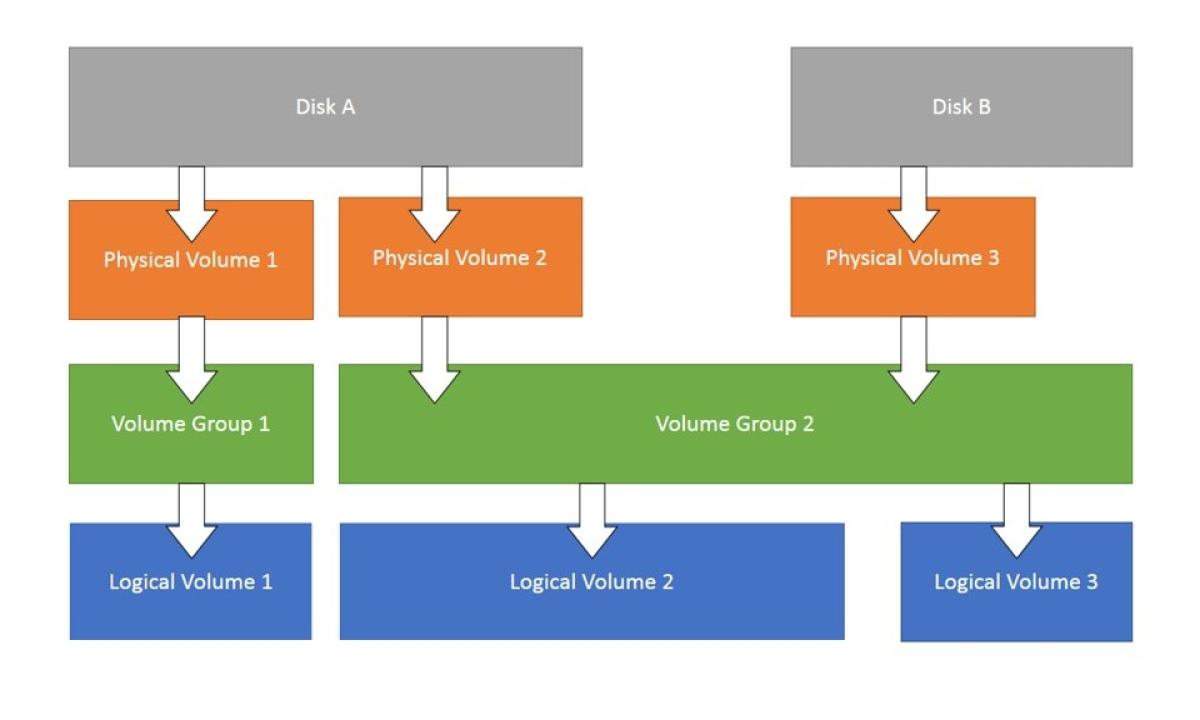
LVM, or Logical Volume Manager, is a tool used on Linux systems to manage disk space in a more flexible way compared to traditional partitioning. It acts like a layer of abstraction between your physical disks and the logical volumes you use for your filesystems. Here's a breakdown of how it works:
Components of LVM:
- Physical Volumes (PV): These are your actual physical hard drives or partitions on those drives. They are the raw storage devices that LVM uses.
- Volume Group (VG): A VG is a collection of PVs that are grouped together under LVM management. You can think of it as a pool of storage space.
- Logical Volume (LV): This is the virtual partition that you create from the storage space in a VG. You can format an LV with a filesystem (like ext4) and use it to store your data just like a regular partition.
Physical Volume (PV) Management:
Initializes a physical disk or partition for use with LVM.
Replace /dev/sdX with the actual device name.
pvcreate /dev/sdXDisplays information about all the PVs in your system.
pvdisplay
Move extents (data chunks) from one PV to another.
This is useful for migrating data or rebalancing PVs within a VG.
pvmove /dev/sdX /dev/sdYResizes a physical disk or partition that's already a PV.
pvresize /dev/sdX
pvremove /dev/sdX: Removes a PV from LVM management.
Volume Group (VG) Management:
vgcreate vg_name /dev/sdX /dev/sdY: Creates a new volume group namedvg_nameusing the specified PVs (/dev/sdXand/dev/sdY). You can add more PVs to a VG later.vgdisplay: Displays information about all the VGs in your system.vgreduce vg_name /dev/sdX: Removes a PV from a volume group (assuming there are other PVs in the VG and the data is not exclusively on the PV being removed).vgremove vg_name: Removes a volume group entirely. This destroys the VG and all its LVs. Use with caution!
Logical Volume (LV) Management:
lvcreate -n lv_name -L <size> vg_name: Creates a new logical volume namedlv_namewith the specified size<size>within the volume groupvg_name. You can specify the size in various units (e.g., M for Megabytes, G for Gigabytes).lvdisplay: Displays information about all the LVs in your system.lvextend -L <size> /dev/mapper/vg_name-lv_name: Extends the size of an existing LV. Replace<size>with the desired expansion size.lvreduce -L <size> /dev/mapper/vg_name-lv_name: Reduces the size of an existing LV. Use with caution as data loss might occur if shrinking beyond the size of the data written on the LV.lvremove /dev/mapper/vg_name-lv_name: Removes a logical volume from the VG. The space becomes available for other LVs within the VG.- lvresize [OPTIONS] LV [PV ...]: Resizes an existing LV. This command was covered in detail previously.
Information and Scanning:
lvmconfig: Displays global LVM configuration information.vgscan: Scans all disks for PVs. This updates LVM's internal information about available physical devices.lvscan: Scans all VGs for LVs. This updates LVM's information about logical volumes within existing VGs.
SWAP
====================================================================================
What is SWAP?
Swap memory is space that is reserved via the hard disk and should only be utilized when necessary and in cases where the servers dedicated memory has been mostly used up.
The swappiness value is actually a kernel tunable - see here for more information
How does a system decide how often to use SWAP over physical memory?
In Linux, the /proc/sys/vm/swappiness file is a kernel parameter that controls the swappiness behavior of the virtual memory system. Swappiness is a setting that determines how aggressively the kernel will use swap space.
Understanding Swappiness
Swappiness Value: The value of swappiness can range from 0 to 100.
0: The kernel will avoid swapping out processes as much as possible, preferring to keep data in RAM.
100: The kernel will aggressively swap processes out of physical memory and move them to swap space, keeping more RAM free.
Swappiness at 0:
The kernel will prioritize keeping processes in RAM, only swapping out data when absolutely necessary.
This setting is useful for systems where you want to minimize latency and keep performance high for active applications, such as on a desktop or server where response time is critical.
Swappiness at 100:
The kernel will swap out data more readily, even if there is still available RAM.
This setting can be useful in certain scenarios where you want to maximize the use of RAM for disk caches and reduce the amount of cached data being cleared to make room for process memory.
------------------------------------------------------------------------------------------------------------------------------------------------
Managing swappiness configuration
Check swappiness value
cat /proc/sys/vm/swappinessChanging swappiness
Since swappiness is a kernel tunable, the only method to make a swappiness value change persist a reboot is to create a custom configuration in /etc/sysctl.d. I'll also detail the steps below:
Change swappiness value (persistent)
Create a new custom configuration file in /etc/sysctl.d
vim 00-custom-swap.confWithin this file, place the following string (with your desired value added)
vm.swappiness=10Once created, apply the settings using the below command:
sysctl -pChange swappiness value (not persistent)
To change the swappiness value on a machine for the current session (doesn't persist reboot), we need to manually update the swappiness file:
vim /proc/sys/vm/swappinessThe file should contain only a number - this being the swappiness value. Change this number to your desired value. For example, to set a swap value of 60:
root@test:~# cat /proc/sys/vm/swappiness
60
Once the swappiness value has been changed, we then need to switch off/switch on swap to pull in the new value:
swapoff -a
swapon -a
------------------------------------------------------------------------------------------------------------------------------------------------
SWAP storage types
For SWAP to work in Linux, there has to be sections of a disk partitioned specifically for this purpose.
There are 2 types of disk allocation that we can use to define swap storage:
- swap file
- swap partition
A swap file and a swap partition both serve the same fundamental purpose in Linux: to provide additional virtual memory by swapping out inactive pages from the RAM to disk. However, they differ in their implementation, flexibility, and some performance aspects. Here's a detailed comparison between the two:
Swap Partition
- A swap partition is a dedicated section of the disk specifically set aside for swap space.
- It does not reside within any filesystem and is recognized by its partition type (typically "Linux swap").
- Swap partitions can offer slightly better performance because they avoid the overhead of filesystem management.
- The dedicated nature of swap partitions can make disk I/O more predictable and efficient for swapping purposes.
Swap File
- A swap file is a regular file within an existing filesystem, such as ext4, XFS, etc.
- It is easier to resize a swap file compared to a swap partition. You can simply create a larger or smaller file and configure it without repartitioning the disk.
- Swap files can be created, resized, and managed without needing to repartition the disk, making them more convenient for adding or adjusting swap space on the fly.
- Swap files may have slightly lower performance compared to swap partitions due to filesystem overhead.
------------------------------------------------------------------------------------------------------------------------------------------------
Configuring SWAP storage
Check the current swap partition configuration
swapon --showSWAP Partition
Create and enable a swap partition:
mkswap /dev/devicename
swapon /dev/devicename
The above will create a SWAP partition and enable it until reboot. If we want to create a persistently enabled swap partition, then we'll need to add an entry in /etc/fstab to specify this:
vim /etc/fstabAdd an entry like the following, ensuring to change the /dev/devicename path:
/dev/devicename none swap sw 0 0SWAP File
Creating a SWAP file:
fallocate -l 1G /swapfileThe above creates an empty 1GB file.
Set the correct permissions:
chmod 600 /swapfileInitialise the SWAP file:
mkswap /swapfileThe above formats the file into SWAP format.
Enable the SWAP file (not persistent):
swapon /swapfilePersistently enable the SWAP file:
vim /etc/fstabAdd the following contents:
/swapfile none swap sw 0 0====================================================================================
Archiving and Compression
====================================================================================
gzip
====================================================================================
tar (.tar) - Tape Archive
Take multiple files and compress them into a single file.
-c -create archive
-f -filename
-x -extract
-z -compress/decompress
-f -filename
Creating an archive (uncompressed)
tar -cf archivename.tar filestoarchiveCreating an archive (compressed)
tar -czf archivename.tar.gz filestoarchiveExtracting a tar archive (compressed)
tar -xzf archivename.tar.gzExtracting a tar archive (uncompressed)
tar -xf archivename.tar====================================================================================
DD - Convert and copy
Full disk backup
dd if=/dev/sda of=/pathtobackupfile.imgBy default, dd will take the backup 1 block at a time - meaning it can take a while. We can add the 'bs' option to specify how much data dd should copy at a time.
dd if=/dev/sda of=/pathtobackupfile.img bs=1MFor sensitive copies, we can add the conv=sync flag to have dd compare the original data and the copy for 100% accuracy - this will take a lot longer.
dd if=/dev/sda of=/pathtobackupfile.img bs=1M conv=syncCompression
We can also pipe the dd output into gzip for compression.
dd if=/dev/sda bs=1M | gzip -o > pathtobackupfile.gzTo uncompress:
gunzip pathtobackupfile.gz | dd of=/dev/sdc bs=1M====================================================================================
xz (.xz) -
cpio (.io) -
fstab
====================================================================================
fstab (File Systems Table)
The fstab (file systems table) is a system configuration file (/etc/fstab) used to define how disk partitions, filesystems, and other storage devices should be mounted and integrated into the filesystem at boot time.
------------------------------------------------------------------------------------------------------------------------------------------------
Purpose of fstab
- Mounting Filesystems:
fstabtells the operating system which filesystems to mount and where to mount them in the directory structure. - Automating Mounting: It allows for the automatic mounting of filesystems at boot time without user intervention.
- Specifying Options: It provides options for mounting, such as read/write permissions, mount points, and special parameters for specific filesystems.
------------------------------------------------------------------------------------------------------------------------------------------------
File Format
The fstab file consists of lines, each of which describes a filesystem. Each line contains six fields, separated by spaces or tabs:
- Filesystem: The block device or remote filesystem to be mounted (e.g.,
/dev/sda1,UUID=xxxxx,LABEL=xxxxx,/server/share). - Mount Point: The directory where the filesystem will be mounted (e.g.,
/,/home,/mnt/data). - Type: The type of filesystem (e.g.,
ext4,ntfs,nfs,tmpfs). - Options: Mount options (e.g.,
defaults,noatime,ro,rw). Multiple options are comma-separated. - Dump: A number indicating whether the filesystem should be backed up by the
dumputility (0for no,1for yes). - Pass: The order in which filesystems should be checked at boot time by the
fsckutility (0for no check,1for the root filesystem,2for other filesystems).
You never need to enable dump - it's an old outdated command.
example:
# <file system>  <mount point>  <type>  <options>           <dump>  <pass>
UUID=1234-5678   /              ext4    defaults            0       1
UUID=8765-4321   /home          ext4    defaults            0       2
/dev/sda2        swap           swap    sw                  0       0
/server/share   /mnt/share     cifs    username=user,password=pass 0 0
====================================================================================
Disk Performance
====================================================================================
I/O Schedulers
In Linux, the I/O scheduler is responsible for determining the order in which block I/O operations are submitted to storage devices. The scheduler affects the performance and behavior of disk I/O operations, impacting both throughput and latency. Different I/O schedulers are available, each optimized for specific workloads and scenarios.
By default, I/O tasks are scheduled by fifo - first in first out.
Common Linux I/O Schedulers
- CFQ (Completely Fair Queuing) - Provides a balanced approach to I/O scheduling, aiming to give each process a fair share of the I/O bandwidth.
- Deadline - Designed to prevent starvation of I/O operations by imposing deadlines on requests.
- NOOP - Implements a simple FIFO (First-In, First-Out) queue, essentially a passthrough scheduler.
- BFQ (Budget Fair Queuing) - Aims to provide predictable I/O performance by distributing I/O bandwidth according to budgets assigned to tasks.
- MQ Deadline (Multiqueue Deadline) - Similar to the Deadline scheduler but designed for multiqueue block devices.
- Kyber - A relatively new scheduler designed to work well with modern hardware and to provide low latency.
- BFQ (Budget Fair Queuing) - Bypasses software I/O scheduling, relying entirely on hardware-level I/O management.
Changing the scheduler
The scheduler is set on a per disk basis, not per filesystem.
(none persistent) method:
The scheduler can be set within the below file:
/sys/block/diskname/queue/scheduler
Within this file, you'll likely see a number of the potential I/O scheduler types. Tne one surrounded by [] is the currently selected scheduler, ie:
cat /sys/block/sda/queue/scheduler
[mq-deadline] none
(persistent) method:
To persistently set a disk scheduler, we'll need to alter the grub configuration
/etc/default/grub
append the below to the line prefaced with 'GRUB_CMDLINE_LINUX='
elevator=schedulertypeSave the new GRUB configuration:
update-grub2or
grub-mkconfig====================================================================================
Disk Performance Troubleshooting Tools
------------------------------------------------------------------------------------------------------------------------------------------------
sar
------------------------------------------------------------------------------------------------------------------------------------------------
lsof
We can use the lsof command to check what parts of a disk a process is accessing.
lsof -p pidlsof -c command------------------------------------------------------------------------------------------------------------------------------------------------
systat tools
The sysstat package includes a collection of performance monitoring tools for Unix-like systems.
iotop
iotop [options]| -a | aggregate disk IO over time (duration of command) |
iostat
Similar to iotop. Provides statistical information about I/O device loading. It reports on CPU utilization, device I/O statistics, and system throughput, making it useful for overall system performance analysis.
iostatioping
ioping is basically the ping command but for disks. It is used to measure the IO latency of storage devices - basically it measures how long a storage device will take to respond to an I/O request.
ioping [options] target| -c | specify a number of IO requests to make |
| -i | interval between requests |
| -s | request size (default 4kb) |
| -q | suppress regular output, only show statistics |
====================================================================================
System Networking
Networking configuration and commands
Networking Commands
====================================================================================
Show networking information
show current networking configuration and status
ip aShow IPv4 or IPv6 specifically
ip -4 a

ip -6 a
Show IPs assigned to interfaces in simple format
ip -br addrshow network interfaces
ip lshow configuration for a specific interface
ip a s interfacenameshow route table
ip rshow arp cache
ip n------------------------------------------------------------------------------------------------------------------------------------------
Changing networking information
Add an IP address to an interface:
ip a a IPADDRESS dev interfacenameDelete an IP from an interface
====================================================================================
Network Troubleshooting
------------------------------------------------------------------------------------------------------------------------------------------
traceroute/6
The traceroute command is used to send a request to a domain/IP. The output then includes each server that the request has passed through to get to the target:
root@test:~# traceroute google.com
traceroute to google.com (142.250.185.78), 30 hops max, 60 byte packets
 1  pfsense.b4sed.xyz (192.168.1.1)  0.162 ms  0.120 ms  0.097 ms
 2  100.88.196.1 (100.88.196.1)  0.374 ms  0.392 ms  0.372 ms
 3  core23.fsn1.hetzner.com (213.239.203.141)  0.432 ms core22.fsn1.hetzner.com (213.239.254.113)  5.252 ms core23.fsn1.hetzner.com (213.239.203.141)  0.383 ms
 4  core21.fsn1.hetzner.com (213.239.224.14)  5.029 ms core5.fra.hetzner.com (213.239.224.78)  5.003 ms  4.982 ms
 5  72.14.218.176 (72.14.218.176)  5.067 ms 142.250.160.234 (142.250.160.234)  5.087 ms 72.14.218.94 (72.14.218.94)  6.109 ms
 6  * * *
 7  142.250.214.190 (142.250.214.190)  5.225 ms fra16s48-in-f14.1e100.net (142.250.185.78)  5.223 ms 142.250.210.208 (142.250.210.208)  6.215 ms
You can also use traceroute for IPv6 connections:
traceroute6 ip/hostname------------------------------------------------------------------------------------------------------------------------------------------
mtr ( My TraceRoute)
The mtr command is very similar to traceroute, except the data is formatted more nicely, and the output continuously updates.
mtr google.com

 Host                                           Loss%   Snt   Last   Avg  Best  Wrst StDev
 1. pfsense.b4sed.xyz                           0.0%    33    0.3   0.2   0.2   0.4   0.1
 2. 100.88.196.1                                0.0%    33    9.8   1.1   0.4   9.8   1.7
 3. core21.fsn1.hetzner.com                     0.0%    33    3.2   1.2   0.5   6.1   1.4
 4. hos-tr4.ex3k5.dc4.fsn1.hetzner.com          0.0%    32    5.3   5.3   5.1   5.6   0.1
 5. 142.250.160.234                             0.0%    32    5.2   5.4   5.1   6.5   0.3
 6. 72.14.239.217                               0.0%    32    5.4   5.6   5.2   7.1   0.4
 7. 142.250.62.151                              0.0%    32    5.4   5.3   5.2   5.5   0.1
 8. fra16s48-in-f14.1e100.net                   0.0%    32    5.3   5.3   5.1   5.5   0.1
------------------------------------------------------------------------------------------------------------------------------------------
tracepath/6
Tracepath is similar to both of the above commands, however, it has more of a focus on the connection to each host. Tracepath spends 30 seconds analysis the connection between the local machine, and each machine identified as a hop in the trace, making it ideal to identify whether slow responses from a device on the trace are causing slow loading issues.
You can also use tracepath for IPv6 connections:
traceroute6 ip/hostname====================================================================================
Network Managers
====================================================================================
Ubuntu - Netplan
Before making changes to the network configuration on an Ubuntu machine, ensure that Cloud-init isn't enabled. Cloud-init is essentially Canonicals attempt at having Ubuntu servers fully configure themselves, in terms of networking, Cloud-init will force an Ubuntu machine to attempt to automatically configure it's networking
Netplan uses .yaml files for network configuration, these are stored in /etc/netplan
Check DHCP IP leases info
netplan ip leases interfacenameChanges to interfaces are made in the .yaml files, once changes have been made they need to be applied.
To test changes, use the try command. This essentially implements the change for a set amount of time, after which the change is reverted.
netplan tryYou can also set a custom timeout time using the below command:
netplan try --timeout=15To permanently apply a change, use the below command:
netplan apply====================================================================================
RHEL - nmcli
Network configuration files are stored in /etc/syconfig/network-scripts. Files stored within this directory shouldn't really be edited - these are used for functionality of the ifconfig command, rather than being the interface configuration itself.
Viewing network configuration
View interface connections
nmcli connection showView interface device status
nmcli device statusView network device configuration
nmcli device show devicenameEditing network settings & configuration
Edit connection settings
nmcli connection edit connectionnameFrom here, you can edit any of the settings shown in the 'nmcli device show devicename' command
As an example, the below could be used to change the default gateway IP
set ipv4.gateway 10.0.0.2You would then want to save changes, you're given the option to trial the change or save it permanently
save persistentor
save temporaryThe above uses the nmcli cli to make changes, you can also format commands as below to make changes without entering the dedicated cli:
Add an additional IP to a connection
nmcli connection modify connectionname ipv4.addresses oldIP, newIPDelete a connection
nmcli connection delete connectionnameOnce changes have been made via nmcli, the interface will need restarting
nmcli connection down

nmcli connection up
or
nmcli connection reload====================================================================================
OpenSUSE - Wicked
Network configuration files are stored in /etc/sysconfig/networks
systemctl status network
Show all interfaces
wicked show allShow info for specific interface
wicked show eth1Take interface down or up
wicked ifdown eth1

wicked ifup eth1DNS and Hosts Resolution
====================================================================================
DNS and Hosts Testing
------------------------------------------------------------------------------------------------------------------------------------------------
dig domainnamedig from a specific DNS server
dig domainname @DNS_ServerIP====================================================================================
DNS and Host Resolution
------------------------------------------------------------------------------------------------------------------------------------------------
/etc/resolv.conf
The /etc/resolv.conf file is used to configure DNS server that your server will use for DNS lookups.
Important Note; The below documentation is related to the /etc/resolve.conf file. This is not the primary file that Linux machines will use for the resolution configuration. Instead, this file is symlinked to /run/systemd/resolve/stub-resolve.conf which is referenced by systemd-resolvd. The primary configuration file used by systemd-resolvd is /run/systemd/resolve/resolve.conf, but stub-resolv.conf is also referenced. TLDR; /etc/resolve.conf is still used, but it's not the primary place referenced by systemd-resolvd.
root@test:~# ls -l /etc/resolv.conf
lrwxrwxrwx 1 root root 39 Aug 10  2023 /etc/resolv.conf -> ../run/systemd/resolve/stub-resolv.conf
The systemd-resolved service listens on port 53 locally: this port needs to be open in order for DNS resolution to function.
root@test:~# lsof -i:53
COMMAND      PID            USER   FD   TYPE  DEVICE SIZE/OFF NODE NAME
systemd-r 127318 systemd-resolve   13u  IPv4 1028696      0t0  UDP localhost:domain
systemd-r 127318 systemd-resolve   14u  IPv4 1028697      0t0  TCP localhost:domain (LISTEN)
/etc/Resolve.conf config:
Below is a typical default configuration you might see on a Linux system:
# This file configures your system's DNS resolution.

nameserver 127.0.0.53  # Local DNS server (systemd-resolved)
options edns0 trust-ad  # Enables EDNS for performance
search b4sed.xyz        # Search domain to append to incomplete names
nameserver - specifies where the system looks for DNS resolution
search - This is the default search domain. For example, if a lookup is made to google, this option would append .b4sed.xyz to the end: google.b4sed.xyz
options:
edns0 - enables a potentially performance-enhancing feature.
trust-ad - instructs your resolver to accept and potentially use the information in the Additional Records section without further verification.
View current DNS configuration:
resolvectl status------------------------------------------------------------------------------------------------------------------------------------------------
/etc/hosts
The /etc/hosts file can be thought of as essentially a local DNS configuration. This means that DNS entries can be mapped here, overwriting any DNS entries provided by an external service.
Entries into the /etc/hosts file can be formatted as follows:
IP domainname------------------------------------------------------------------------------------------------------------------------------------------------
ARP
show arp cache
arp -a
User Management & File Permissions
User & Group Management
====================================================================================
Adding Users
====================================================================================
Adding Users
To add a user, the useradd command can be used.
useradd usernameIf you want to create a user with it's own home directory, this can be done using the -m flag:
useradd -m usernameThe default contents of a users home directory are defined within the /etc/skel directory, please see HERE for more info on this.
------------------------------------------------------------------------------------------------------------------------------------------------
Adding a system user
useradd -r usernameOnce created, you'll want to restrict the account by disabling the ability for login, as mentioned here
------------------------------------------------------------------------------------------------------------------------------------------------
Default options
There are lots of different options that can be set when creating users and groups, the default options can be viewed using the below command:
useradd -D------------------------------------------------------------------------------------------------------------------------------------------------
Additional options:
-e -expires
-e 2023/12/31-c - comment
-c "full name"-s -shell
-s /bin/sh------------------------------------------------------------------------------------------------------------------------------------------------
Groups
When creating a user, you can also specify groups to add the user to, this is done using the -G flag:
useradd -G groupname username------------------------------------------------------------------------------------------------------------------------------------------------
Comments
When creating a user, you can also opt to add a comment using the -c flag, for example this could be a name:
useradd -c "comment" username====================================================================================
Passwords
====================================================================================
Set Password
Once a user has been created, you can add a password using the passwd command:
passwd usernameOnce run, you'll be prompted to enter a new password
------------------------------------------------------------------------------------------------------------------------------------------------
Changing password
Changing a users password can be done using the passwd command when signed in as that user.
You can either SSH to the server directly using the required user, or access as root and use su- username to access the user. Once accessed, the passwd command can be run alone to change the password:
passwdYou can also change a users password using root:
passwd username------------------------------------------------------------------------------------------------------------------------------------------------
Additional Options:
Checking user password metrics (password expiration, last time password changed)
chage -l usernameForcing password change at logon
chage -d 0 usernameTemporary Password
When setting a password, you're able to set a temporary placeholder password that can be used to log in by the user, upon logging in the user will be prompted to change to a password of their choice. This can be achieved by using the -e flag after setting a password
passwd username #set as temp password

passwd -e #sets password as expired
====================================================================================
Deleting Users
====================================================================================
Deleting Users
Users can be deleted using the userdel command:
userdel usernameThe above command only removes the user from the system, without removing their home directory.
Remove user and home directory
userdel -r username====================================================================================
Modifying Users
====================================================================================
Post Creation, users can be modified using the usermod command.
Add User To Group
usermod -a -G groupname username------------------------------------------------------------------------------------------------------------------------------------------------
Lock/Unlock Users
Lock User Login
usermod -L usernameUnlock User Login
usermod -U username------------------------------------------------------------------------------------------------------------------------------------------------
Disable login access
usermod -s /sbin/nologin usernameor we can use the change shell (chsh) command:
chsh -s /bin/nologin username------------------------------------------------------------------------------------------------------------------------------------------------
Change User Home Directory
usermod -d /pathtonewhome username
chown username:usergroup /pathtonewhome
====================================================================================
Groups
====================================================================================
Viewing Groups
groups username------------------------------------------------------------------------------------------------------------------------------------------------
Creating Groups
New groups can be created using the groupadd command:
groupadd groupname------------------------------------------------------------------------------------------------------------------------------------------------
Managing group users
Users can be added/removed from a group with 2 main methods,
- They can be added when initially created, as mentioned above
- They can be added after creation using the usermod command, as mentioned above
- They can be added using the gpasswd command.
Add a user to a group
gpasswd -a username groupnameRemoving a user from a group
gpasswd -d username groupnameAdd user to a group as an admin
gpasswd -A username groupname
------------------------------------------------------------------------------------------------------------------------------------------------
Deleting groups
Groups can be removed using the groupdel command, note that this doesn't delete the users that are part of this group.
groupdel groupname------------------------------------------------------------------------------------------------------------------------------------------------
Modifying Groups
There are various group properties that can be modified using the groupmod command.
------------------------------------------------------------------------------------------------------------------------------------------------
Change Group Name
groupmod -n newname oldname------------------------------------------------------------------------------------------------------------------------------------------------
Change Group ID
groupmod -g NEWID groupname
User/Group/Password Files
====================================================================================
/etc/passwd
used to store user and system accounts
====================================================================================
/etc/shadow
Used to store user passwords (encrypted)
====================================================================================
/etc/group
Used to store group information, and which users are included in a group.
====================================================================================
/etc/skel
This directory is used to define the default items that will get added to a new users home directory
For example, this could contain a README file that contains rules for using the server.
====================================================================================
/etc/default/useradd
This directory is used to define the default options used when the useradd command is used.
For example, this could specify a location that user directories are created, default group to be added to, and more.
====================================================================================
/etc/sudoers
This file is used to define which users have sudo access/
Admin Privileges
User & group privileges
------------------------------------------------------------------------------------------------------------------------------------------------
For users to have escalated privilege on a server (root access), they need to be granted this permission.
====================================================================================
sudo
Users with sudo access have full administrator permissions, this means that they can essentially perform any task on the system.
There are 2 methods we can use to grant users sudo access:
------------------------------------------------------------------------------------------------------------------------------------------------
1. usermod
sudo usermod -aG sudo usernameYou can then validate that this has worked by checking the groups that the specified user is included in:
groups username------------------------------------------------------------------------------------------------------------------------------------------------
2 Editing the sudoers file directly
Users with sudo access are defined within the /etc/sudoers file. This file should ONLY ever be edited using the visudo text editor - as this will check the syntax for any errors.
visudoTo add a new user to the sudoers group, we need to append a line to the /etc/sudoers file.
1. Edit the /etc/sudoers file using visudo:
visudo2. Find the line that reads # User privilege specification and add the following line below it:
username ALL=(ALL:ALL) ALL------------------------------------------------------------------------------------------------------------------------------------------------
Adding user groups to sudoers
In addition to adding specific users to the sudoers group, we can also add user groups. Once again, this is best achieved by editing the sudoers file directly using visudo.
1. Edit the sudoers file
visudo2. Find the line that reads # User privilege specification and add the following line below it:
%groupname ALL=(ALL:ALL) ALLGroups are defined by placing a % symbol in front of the group name.
------------------------------------------------------------------------------------------------------------------------------------------------
Giving users sudo privilege for specific tasks/commands
In addition to giving a user full sudo permission on a system, we can also implement a more limited set of sudo-enabled privileges.
For example, I want to add a user who has sudo permission to run updates on a system, but I don't want them to have all privileges. To do this, we would need to edit the sudoers file as above using the visudo command, once there you can add a line like the following:
username ALL=(ALL:ALL) /usr/bin/apt update,/user/bin/apt upgradeNote: As best practice, you're best off specifying the full binary path of the commands you wish to grant access to. This prevents a user from renaming a binary to apt (in this example) and being able to run the command with sudo privilege.
====================================================================================
Wheel
The alternative to adding users to the sudoers file, is to add users to the Wheel group. The Wheel group is essentially an exclusion that can be added for users to allow access to certain roles.
By default, any users in the wheel group have full privileges on the server.
An example of how this could be utilised, would be to add a rule into the /etc/wheel file that specifies a group that can be used to perform a specific task. Users that need this privilege could then be added to this file.
====================================================================================
PolicyKit
PolicyKit (also known as polkit) is a toolkit for defining and handling authorizations in Linux systems. It is used to manage privileges for unprivileged processes to perform tasks that normally require higher privileges, such as those of the root user. This allows for more fine-grained control over what users and processes are allowed to do without requiring full administrative access.
File Permissions & Ownership
====================================================================================
Linux File Permissions
Every file in Linux has permissions, these define which actions can be undertaken by the user,group, and other.
As seen on the file below, permissions are set at the start of the line using 10 characters.
-r--r-xrw- 1 root root 27 May 26 10:56 test.txtThese 10 characters are the permission classes, and are used as follows:
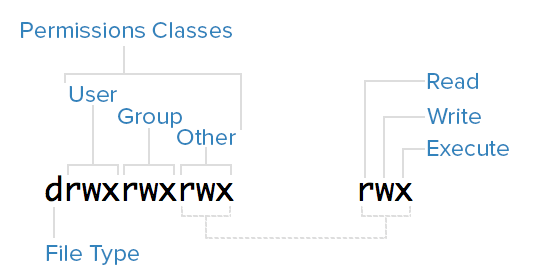
(For file type: - is a file, d is a directory).
Permissions can also be represented in number format.

------------------------------------------------------------------------------------------------------------------------------------------------
Changing file or directory permissions
(Numerical representation)
chmod 777 filename (Letter representation)
chmod u=rwx,g=rwx,o=rYou can also use -R to chmod recursively:
chmod -R 777 directoryname====================================================================================
Linux File Ownership
Files in Linux are owned by a user and group.
-rw-r--r-- 1 root root 27 May 26 10:56 test.txtChanging user/group
chown newuser:newgroupFor instances where you want to chown a directory, and all of the subdirectories & files within, we can use the -R (recursive) flag:
chown -R newuser:newgroup directoryname ====================================================================================
FACL - File Access Control List
File Access Control Lists (FACLs) provide a robust mechanism for managing file permissions in Linux, offering greater flexibility and control than traditional Unix permissions. By using commands like setfacl and getfacl, administrators can easily set and view ACLs to fine-tune access to files and directories for multiple users and groups.
View file/directory ACL
getfacl filenameGrant an additional user permissions on a file
setfacl -m u:username:rwx filenameRemove a user's permissions on a file
setfacl -x u:username filenameDefine default ownership/permissions for directories
setfacl -m d:u:username:rwx filename ====================================================================================
Sticky bits
In Linux, the sticky bit is a special permission that can be set on directories to control user access to the files within those directories. When the sticky bit is set on a directory, it restricts the deletion or renaming of files within that directory. Specifically, only the file's owner, the directory's owner, or the root user can delete or rename files.
Enable sticky bits
chmod o+t directorynameDisable sticky bits
chmod o-t directoryname====================================================================================
Software & Service Management
Package Managers
====================================================================================
YUM (Yellowdog Update Manager) & DNF
Both yum and DNF are found on RedHat based systems, and are pretty much interchangable.
------------------------------------------------------------------------------------------------------------------------------------------
Cache & Repositories
Update cache
yum makecacheList enabled repositories
yum repolistList all active repositories
yum repolist --allUse specific repository:
yum --enablerepo="repoID" install packagenameDisable specific repository
yum --disablerepo="repoID" install packagenameAdding additional repositories
repositories are stored in /etc/yum.repos.d/ (for both YUM and DNF)
Searching repositories for packages and package info
The below can be used to check whether a package is available in the currently configured repositories (requires the exact package name):
dnf list packagenameThe below can be used to search repositories for a keyword relating to a package - ie a part of its name or description:
dnf search packagenameor
yum list available | grep -i packagenameRetrieve information about an available package:
dnf info packagename------------------------------------------------------------------------------------------------------------------------------------------
Installing/Updating Packages
Install package
yum install packagenameor
dnf install packagenameremove package
yum remove packagenameor
dnf remove packagenameremove unused dependencies:
dnf autoremoveupdate packages
yum updateor
dnf updateupdate a specific package
yum update packagenameor
dnf update packagename====================================================================================
APT (Advanced Package Tool) & DPKG (Debian Package)
APT is a package manager found primarily on Debian based systems.
====================================================================================
Cache & Repositories
Ubuntu apt uses a cache to store what can be installed/updated from repos. Before installing or updating software, it's worth checking that the cache has been recently updated to ensure that the most recent available packages are stored.
Update cache
apt updateCheck when cache was last updated:
stat -c %z /var/lib/apt/periodic/update-success-stampSearching repositories
apt list packagenameor
apt search packagenameAdding repositories.
repositories are stored in /etc/apt/sources.list or /etc/apt/sources.list.d
Typically, you will need a key for apt to be able to use a repository. Keys will be available via the repository website.
Download the key file
Add the key to 'apt trusted keys'
apt-key add filenameOnce added, create the repository file within /etc/apt/sources.list.d with a name of your choice.
Add the repository details, typically prefaced with 'deb' and then the repo URL, and then OS release version.
------------------------------------------------------------------------------------------------------------------------------------------
Installing & Updating Packages
Install packages
apt install packagenameInstall multiple packages
apt install packagename packagename packagenameRemoving packages
Remove package without removing configuration files
apt remove packagenameRemove package and configuration files
apt purge packagenameRemove package dependencies
apt autoremoveUpdates
(remember to apt update before hand)
Check for updates
apt list --upgradableRun all package updates
apt upgradeUpgrade specific package
apt upgrade packagenameUpdate the OS and kernel:
apt dist-upgradeUpdate everything (packages and kernel)
apt full-upgrade====================================================================================
openSuse - zypper
Cache & Repositories
Zypper uses a cache to store what can be installed/updated from repos. Before installing or updating software, it's worth checking that the cache has been recently updated, and if it hasn't; running an update on the cache.
update cache
zypper refList repositories
zypper lrRepositories are stored in /etc/zypp/repos.d
------------------------------------------------------------------------------------------------------------------------------------------
Installing/ Searching/ Updating Packages
Search packages
zypper se packagenameSearch specifically
zypper se --match-words packagenameor
zypper se --match-exact packagenameInstall package
zypper in packagenameRemove package (only option to remove package and configuration files)
zypper rm packagename====================================================================================
Compiling from source
Compiling an application from source essentially means that you are manually creating a package using the source code.
In this example, I'm compiling the John the Ripper password cracker from source, on an Ubuntu machine.
To being, ensure that the required packages are installed:
apt install make gcc gzipdownload and unzip (if zipped) source code file
root@test:~# wget https://www.openwall.com/john/k/john-1.9.0.tar.gz
--2024-05-23 15:03:10--  https://www.openwall.com/john/k/john-1.9.0.tar.gz
Resolving www.openwall.com (www.openwall.com)... 193.110.157.242
Connecting to www.openwall.com (www.openwall.com)|193.110.157.242|:443... connected.
HTTP request sent, awaiting response... 200 OK
Length: 13110145 (13M) [application/octet-stream]
Saving to: ‘john-1.9.0.tar.gz’

john-1.9.0.tar.gz                       100%[============================================================================>]  12.50M  8.23MB/s    in 1.5s

2024-05-23 15:03:11 (8.23 MB/s) - ‘john-1.9.0.tar.gz’ saved [13110145/13110145]

root@test:~# ls -l
total 12808
-rw-r--r-- 1 root root 13110145 Apr 12  2019 john-1.9.0.tar.gz

root@test:~# tar -xvzf john-1.9.0.tar.gz
cd into the source code directory
root@test:~# ls -l
total 12812
drwxr-xr-x 5 root root     4096 May 23 15:03 john-1.9.0
-rw-r--r-- 1 root root 13110145 Apr 12  2019 john-1.9.0.tar.gz

root@test:~# cd john-1.9.0
root@test:~/john-1.9.0# ls -l
total 12
drwxr-xr-x 2 root root 4096 May 23 15:03 doc
drwxr-xr-x 2 root root 4096 May 23 15:03 run
drwxr-xr-x 2 root root 4096 May 23 15:03 src

root@test:~/john-1.9.0# cd src/
Within the src directory, you'll see the actual source code files - there can sometimes be many thousands of these files depending on the application.
run the make command to view the available options for compilation:
makeThis will typically show the available options for hardware (CPU) compatibility, as shown below:
root@test:~/john-1.9.0/src# make
To build John the Ripper, type:
        make clean SYSTEM
where SYSTEM can be one of the following:
linux-x86-64-avx512      Linux, x86-64 with AVX-512 (some 2017+ Intel CPUs)
linux-x86-64-avx2        Linux, x86-64 with AVX2 (some 2013+ Intel CPUs)
linux-x86-64-xop         Linux, x86-64 with AVX and XOP (some AMD CPUs)
linux-x86-64-avx         Linux, x86-64 with AVX (some 2011+ Intel CPUs)
linux-x86-64             Linux, x86-64 with SSE2 (most common)
linux-x86-avx512         Linux, x86 32-bit with AVX-512 (some 2017+ Intel CPUs)
linux-x86-avx2           Linux, x86 32-bit with AVX2 (some 2013+ Intel CPUs)
linux-x86-xop            Linux, x86 32-bit with AVX and XOP (some AMD CPUs)
linux-x86-avx            Linux, x86 32-bit with AVX (2011+ Intel CPUs)
linux-x86-sse2           Linux, x86 32-bit with SSE2 (most common, if 32-bit)
linux-x86-mmx            Linux, x86 32-bit with MMX (for old computers)
linux-x86-any            Linux, x86 32-bit (for truly ancient computers)
linux-mic                Linux, Intel MIC (first generation Xeon Phi)
linux-arm64le            Linux, ARM 64-bit little-endian w/ASIMD (best)
linux-arm32le-neon       Linux, ARM 32-bit little-endian w/NEON (best 32-bit)
linux-arm32le            Linux, ARM 32-bit little-endian
linux-alpha              Linux, Alpha
linux-sparc64            Linux, SPARC 64-bit
To view the current CPU architecture of your system run:
name -aIn this example, the system is running x86_64:
root@test:~# uname -a
Linux test 5.15.0-106-generic #116-Ubuntu SMP Wed Apr 17 09:17:56 UTC 2024 x86_64 x86_64 x86_64 GNU/Linux
Next, we want to compile the code using the correct CPU architecture:
make clean linux-x86-64Now that the code has been compiled we can access the binary for the application. In this example, the binary is located within the run directory:
root@test:~/john-1.9.0/run# pwd
/root/john-1.9.0/run
root@test:~/john-1.9.0/run# ls -l
total 20084
-rw------- 1 root root 4086722 May 29  2013 alnum.chr
-rw------- 1 root root 1950539 May 29  2013 alpha.chr
-rw------- 1 root root 5720262 May 29  2013 ascii.chr
-rw------- 1 root root  465097 May 29  2013 digits.chr
-rwxr-xr-x 1 root root  323680 May 23 15:06 john
-rw------- 1 root root   35972 Mar 21  2019 john.conf
-rw------- 1 root root 1184244 May 29  2013 lm_ascii.chr
-rw------- 1 root root 1161863 May 29  2013 lower.chr
-rw------- 1 root root 2464980 May 29  2013 lowernum.chr
-rw------- 1 root root 1209621 May 29  2013 lowerspace.chr
-rwx------ 1 root root    1432 May 29  2013 mailer
-rwx------ 1 root root     842 May 29  2013 makechr
-rw------- 1 root root   26325 May 29  2013 password.lst
-rwx------ 1 root root    4782 May 29  2013 relbench
lrwxrwxrwx 1 root root       4 May 23 15:06 unafs -> john
lrwxrwxrwx 1 root root       4 May 23 15:06 unique -> john
lrwxrwxrwx 1 root root       4 May 23 15:06 unshadow -> john
-rw------- 1 root root  668568 May 29  2013 upper.chr
-rw------- 1 root root 1220961 May 29  2013 uppernum.chr
Time to test.
root@test:~/john-1.9.0/run# ./john --test
Benchmarking: descrypt, traditional crypt(3) [DES 128/128 SSE2]... DONE
Many salts:     5636K c/s real, 5647K c/s virtual
Only one salt:  5386K c/s real, 5386K c/s virtual
Auto Restart Services
https://www.redhat.com/sysadmin/systemd-automate-recovery
1) Edit elasticsearch service unit file using the following command
systemctl edit elasticsearch.service 2) Now, add the following lines in the unit file.
[Service]
Restart=always
3) Refresh the unit file using command
sudo systemctl daemon-reloadSandboxing & CHROOT
====================================================================================
CHROOT (Changed Root) Jail
CHROOT essentially means that a user or application has it's root changed, essentially locking it away from the rest of the server filesystem.

There are limitations to using a CHROOT Jail, an example being that applications that are chrooted are unable to communicate with each other.
====================================================================================
Sandboxing
Sandboxing essentially means that an application and its dependencies are 'wrapped' together. This is useful if you have 2 packages that share a dependency, but require different versions of that dependency.
------------------------------------------------------------------------------------------------------------------------------------------
Debian Based Systems
Debian-based systems will typically have the snap application installed, this can be used for sandboxing software.
list applications installed through snap
snap listInstall an application
snap install packagenameWhen you install an application through snap, you'll see that a 'loopback' storage device is added (you can see this by running the lsblk command). The reason for this is that the application is stored on it's own virtual storage device, so as to not interfere with versions installed elsewhere across the system, for example:
$ lsblk
NAME   MAJ:MIN RM   SIZE RO TYPE MOUNTPOINT
loop0    7:0    0  14.5M  1 loop /snap/gnome-logs/37
loop1    7:1    0   2.3M  1 loop /snap/gnome-calculator/170
loop2    7:2    0  86.6M  1 loop /snap/core/4486
loop3    7:3    0  86.6M  1 loop /snap/core/4650
loop4    7:4    0   1.6M  1 loop /snap/gnome-calculator/154
loop5    7:5    0  14.5M  1 loop /snap/gnome-logs/34
loop6    7:6    0   3.3M  1 loop /snap/gnome-system-monitor/36
loop7    7:7    0   2.3M  1 loop /snap/gnome-calculator/178
loop8    7:8    0    13M  1 loop /snap/gnome-characters/101
loop9    7:9    0   3.7M  1 loop /snap/gnome-system-monitor/45
loop10   7:10   0 139.5M  1 loop /snap/gnome-3-26-1604/64
loop11   7:11   0   140M  1 loop /snap/gnome-3-26-1604/59
loop12   7:12   0   3.7M  1 loop /snap/gnome-system-monitor/41
loop13   7:13   0    21M  1 loop /snap/gnome-logs/25
loop14   7:14   0  12.2M  1 loop /snap/gnome-characters/69
loop15   7:15   0    13M  1 loop /snap/gnome-characters/96
sda      8:0    0 298.1G  0 disk
├─sda1   8:1    0   512M  0 part /boot/efi
└─sda2   8:2    0 297.6G  0 part /
sr0     11:0    1  1024M  0 rom
Remove applications
snap remove packagename------------------------------------------------------------------------------------------------------------------------------------------
Alternative sandbox package managers include:
====================================================================================
Linux System Variables
Date, time, language
Locale, Date & Time
Locale
In Linux, a locale is a set of environment variables that defines the language, country, and character encoding settings for a user's environment. Locales affect various aspects of a program's behavior, such as the way dates and times are displayed, the format of numbers, the sort order of strings, and the language used for messages.
------------------------------------------------------------------------------------------------------------------------------------------------
View locale configuration
localectland
localeView specific locale variable option
locale LC_NUMERICView available locales
localectl list-locales------------------------------------------------------------------------------------------------------------------------------------------------
Setting locale
localectl set-locale LANG=fr_FR.utf8(reboot may be required)
====================================================================================
Time
------------------------------------------------------------------------------------------------------------------------------------------------
Check system time
dateor for more detail
timedatectl------------------------------------------------------------------------------------------------------------------------------------------------
NTP
View current NTP configuration:
timedatectl show-timesync --allEnable NTP
timedatectl set-ntp onDisable NTP
timedatectl set-ntp offNTP Server selection
Most mainstream Linux distributions come with NTP servers preconfigured, these can be altered however, this is done via the /etc/systemd/timesync.conf file. Simply add a new line to the file formatted as follows:
NTP=NTPSERVERHOSTNAME------------------------------------------------------------------------------------------------------------------------------------------------
Timezone
Check available timezones
timedatectl list-timezonesSet server timezone
timedatectl set-timezone timezonename------------------------------------------------------------------------------------------------------------------------------------------------
Hostname
Show current server hostname:
hostnameShow current server hostname, and other useful info:
hostnamectl statusexample output:
root@test:~# hostnamectl status
 Static hostname: test
       Icon name: computer-vm
         Chassis: vm
      Machine ID: 8c1d97558b594586af68685af4a049c9
         Boot ID: c2478c600d2b43f0bf58682f1df01013
  Virtualization: kvm
Operating System: Ubuntu 22.04.3 LTS
          Kernel: Linux 5.15.0-106-generic
    Architecture: x86-64
 Hardware Vendor: QEMU
  Hardware Model: Standard PC _i440FX + PIIX, 1996_
Change server hostname:
SSH & Authentication
All things SSH and authentication.
PAM
Pluggable Authentication Modules (PAM)
PAM is essentially an authentication system that allows for different modules to be added for support of different authentication methods, as an example; 2fa would be handled by PAM on a Linux system.
/etc/security/
====================================================================================
Lockout Policies
FailLock
FailLock is a PAM module used for tracking failed authentication attempts in Linux systems.
It is primarily used to prevent brute force attacks by locking out user accounts after a specified number of consecutive failed login attempts.
Key Features of faillock
- Account Lockout: Locks a user account after a specified number of failed authentication attempts.
- Unlocking: Automatically unlocks the account after a specified period, or an administrator can manually unlock it.
- Logging: Records failed login attempts and lockout events, which can be useful for security auditing.
------------------------------------------------------------------------------------------------------------------------------------------------
Pam_Tally2
Pam_Tally2 is the older version of failock which essentially does the same thing, just with fewer features. You'll potentially need to use this on older servers as they may not support failock.
Pam_Tally2 configuration file - /etc/pam.d/login
The below example locks users out after 3 failed logins, denies any root login attempts, and keeps accounts locked for 1 hour.
#
# The PAM configuration file for the Shadow `login' service
#

auth required pam_tally2.so deny=3 even_deny_root unlock_time=3600
====================================================================================
2-Factor Authentication (2FA)
2FA can be configured for SSH logins to servers. You'll most likely want to configure 2FA using PAM modules.
-----------------------------------------------------------------------------------------------------------------------------------------------
Cisco DUO
- Create an account for Duo here
- Add an 'application' to protect with duo
application type in this case will be 'UNIX application'
Once created, you'll be given access to the keys required for setting up DUO - DUO configuration on server:
Ubuntu 22 example
add repo key and install duo
Create /etc/apt/sources.list.d/duosecurity.list with the following contents:
deb [arch=amd64] https://pkg.duosecurity.com/Ubuntu jammy maincurl -s https://duo.com/DUO-GPG-PUBLIC-KEY.asc | sudo gpg --dearmor -o /etc/apt/trusted.gpg.d/duo.gpg
apt-get update && apt-get install duo-unixOnce installed, you can configure duo from /etc/duo
in /etc/duo add the integration key, secret key, and API hostname from your Duo Unix application.
As a regular user, test login_duo manually by running
/usr/sbin/login_duoYou'll be given a link at this point which can be used to configure your 2FA device.
Once you've tested that this is working, we can then look to implement duo to the SSHD and PAM config.
Edit /etc/pam.d/sshd and add the below:
auth requisite pam_unix.so
auth [success=1 default=ignore] /lib64/security/pam_duo.so
auth requisite pam_deny.so
Note: On some systems, the path to pam_duo.so might be /lib/security/pam_duo.so.
Edit the /etc/ssh/sshd_config and add:
UsePAM yes
ChallengeResponseAuthentication yes
Restart the SSHD service and test the configuration.
Clearing Command Line History
Oh dear, you've made a mistake on a clients server and want to hide the evidence...
There's a few options here, also see the history man page for more info.
1. Remove the command from bash history using the history -d command:
history -d LINE-NUMBERThe downside of this, is that the command run to delete the history will be included in the bash history, this brings us on to the sneakier method.
2. When running the history -d command, preface the command with a space. A leading space before a command instructs the shell to ignore it for history logging.
history -d LINE-NUMBER3. Finally, there's another option we can use to clear the entire bash history:
history -cSSH Configuration
====================================================================================
What is SSH?
SSH, or Secure Shell, is a cryptographic network protocol used for secure communication over an unsecured network. It is widely used to manage and access remote servers securely. SSH provides strong authentication and encrypted data communications between two computers, which helps protect against eavesdropping, connection hijacking, and other types of attacks.
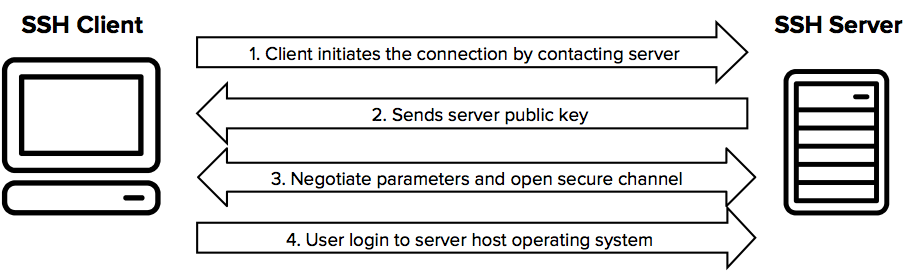
SSH Connection Process
-
Client Initiates Connection:
The client initiates an SSH connection to the SSH server by sending a connection request. -
Server Responds with Public Key:
The server responds with its public key (and often a host key, which is used to uniquely identify the server and can be used to verify the server's identity). -
Client Verifies Server Identity:
The client verifies the server's public key against a local list of known hosts to ensure it is connecting to the correct server. If the server's key is not in the known hosts file, the user is usually prompted to accept the new key. -
Key Exchange:
The client and server perform a key exchange to securely generate a shared secret key. This key exchange process does not involve the client generating a private key. Instead, they use the server's public key to negotiate a shared secret (symmetric key) through an algorithm such as Diffie-Hellman. Both the client and server use their own private keys (already generated and stored) for this purpose. -
Session Key Generation:
The shared secret generated during the key exchange is used to create session keys, which are symmetric keys for encrypting the data transferred during the session. Both the client and the server now have the same session keys. -
Client Authentication:
The client authenticates itself to the server. This can be done using various methods:-
- Password Authentication: The client sends a password over the encrypted connection.
- Public Key Authentication: The client generates an SSH key pair (public and private keys) before the connection. The public key is stored on the server in the
~/.ssh/authorized_keysfile. During the authentication process, the client proves possession of the corresponding private key by using it to sign a challenge provided by the server.
-
-
Secure Communication:
After successful authentication, the client and server use the session keys to encrypt and decrypt the data transferred between them, ensuring secure communication.
-----------------------------------------------------------------------------------------------------------------------------------------------
SSH Configuration
When it comes to SSH configuration, we're either talking about the SSH client, or the SSH server. (Ttypically both are installed on Linux Systems)
The configuration for the SSH server is located in /etc/ssh/sshd_config
The configuration for the SSH client is located in /etc/ssh/ssh_config
SSH Server Configuration Options
NOTE: Any changes made to the sshd_config won't be applied to your session until you reconnect (and restart SSHD).
NOTE: You can use the command sshd -T to view the current SSH server setup - also lists ciphers!
These are all options that can be added to the SSH server (sshd_config) configuration file.
| Port 22 | Specify port for SSH server to listen on. |
| Listen Address IP_IP_IP_IP | Change the IP that the SSH server listens on |
| PasswordAuthentication yes | Enable password authentication |
| PubkeyAuthentication yes |
Enable key authentication |
| Match User ukfastsupport PasswordAuthentication yes AuthenticationMethods password |
A match user block is where specific rules can be set for a specified user. |
| Match Address 10.0.0.5,10.0.0.11 PermitRootLogin yes AuthenticationMethods publickey PasswordAuthentication no |
Similarly to 'match user', we can also create rules based on the connecting address. |
| PermitRootLogin no |
allow direct logins to the root user (or not) |
| Protocol 2 |
Disable SSH1 (old and shouldn't really be used) |
| ClientAliveInterval 300 |
Idle timeout for connections |
| ClientAliveCountMax 2 |
Max number of 'alive' messages sent before a user is disconnected |
| X11Forwarding no |
Disable graphical environments over SSH |
|
|
-----------------------------------------------------------------------------------------------------------------------------------------------
Known Hosts
known_hosts is a file kept in the home directory of a user. This file contains the fingerprint key of each SSH-server that a connection has been made to. This is a security feature within SSH as it allows for host fingerprint keys (unique) to be validated before the connection is established.
~/.ssh/known_hosts-----------------------------------------------------------------------------------------------------------------------------------------------
SSH Keys
SSH keys are a pair of cryptographic keys used in SSH (Secure Shell) protocol to authenticate a user and establish a secure communication channel between the client and server. The SSH key pair consists of a private key and a public key.
For key-based authentication to work, you'll need to ensure that key authentication is enabled in your SSHD configuration.
SSH key pairs are user-specific, and are stored by default in the home directory as:
private key: ~/.ssh/id_rsa
public key: ~/.ssh/id_rsa.pub
Generate an SSH key pair
ssh-keygenSharing SSH keys
The ssh-copy-id command is used to install your public SSH key on the remote server, allowing you to log in to that server without needing to enter a password each time.
ssh-copy-id user@remoteserverViewing stored keys
Keys that have been stored for a user can be viewed within ~/.ssh/authorized_keys
-----------------------------------------------------------------------------------------------------------------------------------------------
SSH Certificates
"SSH certificates are a method of managing SSH keys that involves issuing signed certificates from a Certificate Authority (CA). These certificates contain a user's public key, identity information, and access permissions. They enhance security and simplify management compared to traditional SSH key pairs."
ssh-keygen -q -N "" -t rsa -b 4096 -f /etc/ssh/ssh_host_rsa_key-----------------------------------------------------------------------------------------------------------------------------------------------
Algorithms
SSH's support algorithms can be defined within the SSHD configuration file.
LDAP (Lightweight Directory Access Protocol)
LDAP (Lightweight Directory Access Protocol) is a protocol used to access and manage directory services over a network. It is designed to provide a standard way to store and retrieve hierarchical data structures, which can include information about users, groups, systems, and other resources.
Client Configuration
Installing required packages
apt install libnss-ldapd libpam-ldapd ldap-utilsrealm -v discover ldap.servername
File Transfers, Synchronisation & Shared Storage
Unison, NFS, rSync, SCP
Unison
====================================================================================
What is Unison?
-----------------------------------------------------------------------------------------------------------------------------------------------
Install Unison
Unison will need to be installed on both servers that are sharing files.
RHEL:
yum install unisonDebian:
apt install unison-----------------------------------------------------------------------------------------------------------------------------------------------
Configuration of unison
Before configuring unison itself, you need to ensure that the hosts have shared keys (since this connection is made via SSH).
ssh-keygen -t rsa

ssh-copy-id root@otherserver
Once that's sorted, the unison service itself can be configured.
default unison config file:
/root/.unison/default.prf
root = /
root = ssh://b4sed-01//

path = var/spool/cron/
path = etc/passwd
path = etc/shadow
path = etc/group
path = etc/motd
path = etc/drbd.conf
path = etc/cluster/cluster.conf
path = etc/php.ini
path = etc/nginx/

ignore = Name access.log*
To have unison run automatically, you'll need to configure a cron:
vi /usr/local/bin/sync.shContents of the file (the SISTER= value needs to be updated).
#!/bin/bash

SISTER=ABC-WEBDB-01

[ -f /var/run/file_sync.pid ] && exit 1;

trap "{
        rm /var/run/file_sync.pid;
        exit;
}" EXIT;

trap "{
        echo 'Bailing out!' 1>&2
        ssh -T -p2020 root@$SISTER <<<'killall unison; exit' &>/dev/null
}" KILL ABRT INT TERM HUP SEGV

touch /var/run/file_sync.pid
/usr/bin/unison -sshargs "-p 2020" -batch -terse -silent -owner -group -numericids -prefer /
Once added, then the cron needs setting up
crontab -e

* * * * * /usr/local/bin/sync.sh > /root/.unison/unison.log
You would then need to add a cron on the 2nd server, you'll need to add this with the '-prefer' omitted, as below:
#!/bin/bash

SISTER=ABC-WEBDB-01

[ -f /var/run/file_sync.pid ] && exit 1;

trap "{
        rm /var/run/file_sync.pid;
        exit;
}" EXIT;

trap "{
        echo 'Bailing out!' 1>&2
        ssh -T -p2020 root@$SISTER <<<'killall unison; exit' &>/dev/null
}" KILL ABRT INT TERM HUP SEGV

touch /var/run/file_sync.pid
/usr/bin/unison -sshargs "-p 2020" -batch -terse -silent -owner -group -numericids /
====================================================================================
Multi-server (2+) Unison setup
To preface this; Advanced Unison topologies such as the one I detail on this page aren't ideal, one reason for this is that any change requires that unison be run bidirectionally for each node - meaning that synchronisation is definitely not instant. Depending on the content type, a better option might be to have an NFS Share configured.
There are different methods that can be used to setup Unison when more than 2 servers are installed, for example, ring and star topology. In this example, I've focussed on the star topology:

To set the context for this example and give some explanation;
This setup consists of 6 servers, with 1 of those servers acting as the 'master' - being the middle of the star.
Unison should be configured on only the master node, from here, you'll need to configure the .prf files and alter the Unison cronjob script accordingly.
------------------------------------------------------------------------------------------------------------------------------------------------
Configuration
1. Install Unison on the master node
Decide which node is going to be the master, and install Unison on there.
2.
====================================================================================
NFS
NFS
(Guidance based on RHEL/CentOS 7, packages and commands may differ depending on OS)
====================================================================================
NFSSHARE SERVER CONFIGURATION
1. Install NFS packages on NFS Server
yum install nfs-utils rpcbind2. Start on-boot
If this is not a cluster then start these at boot time:
systemctl enable --now rpcbind nfs-server nfs-lock nfs-idmap3. exports
Once installed, we can look to configure the nfs share within the /etc/exports file:
vim /etc/exportsAdd the below config (updated with IP of the client server that need to be able to access the nfsshare.
/nfsshare IP_IP_IP_IP(rw,sync,no_root_squash)To specify multiple client servers, add separate lines, as below:
/nfsshare IP_IP_IP_IP(rw,sync,no_root_squash)
/nfsshare IP_IP_IP_IP(rw,sync,no_root_squash)
/nfsshare IP_IP_IP_IP(rw,sync,no_root_squash)
Once added, you can publish the exports changes using the below command:
exportfs -a=================================================================================
NFS CLIENT CONFIGURATION
1. Install the required NFS packages:
yum install nfs-utils2. Mount the NFSSHARE (won't persist reboot until next step):
Firstly, create the file path that you wish for the NFSSHARE to be mounted to:
mkdir /nfsshare The below command mounts the NFSSHARE. Ensure to replace the IP_IP_IP_IP:nfsshare with the NFS server IP, and location of the NFSSHARE on the NFS server. Finally, also ensure to update the second /nfsshare on the command to the path you wish for the share to be mounted to on the client server.
mount -t nfs IP_IP_IP_IP:/nfsshare /nfsshare3. Test the configuration
Test that mounting the nfsshare has worked using the df -h command. You should now see an entry dedicated to the NFSSHARE, as below:
4. Permanently configure the NFSSHARE
Once you've confirmed that the NFSSHARE is working, you can then look to add the fstab entry that will allow this configuration to persist time & reboots.
vim /etc/fstabAdd the below link, ensuring the update the syntax as mentioned above
IP_IP_IP_IP:/nfsshare /nfsshare nfs rw,relatime,vers=4,_netdev,timeo=100,retrans=4 0 0Once you've added this, ensure that this is now working by forcing all fstab-configured mounts to mount:
mount -a
rSync
====================================================================================
What is rSync?
rSync is a file transfer command that can be used for both local and remote transfers.
Remember to be careful with rSync - it's a synchronisation command and can overwrite files.
example:
I have 2 directories:
/:
directory1:
|_>file1
directory2:
|_> file1
|_> file2
If I run rsync directory1 directory2, then file2 would be removed, and file1 would be synced.
-----------------------------------------------------------------------------------------------------------------------------------------------
rSync command syntax
rsync [option] [user@host]
Basic local file transfer
rsync /sourcefile /destinationfileBasic remote file transfer:
rsync /sourcefile user@IP_IP_IP_IP:destination/location/on/remote/serverrSync Tunelling (secure rsync over SSH)
rsync -e ssh /sourcefile user@IP_IP_IP_IP:destination/location/on/remote/serverflags:
| -a | archive |
| -z | gzip compression |
| -u | skip existing files at destination |
| -r | recursive |
| -P |
show progress of transfer |
| --exclude= |
specify files to ignore (ie "*.log") (needs to be paired with --include). Appended to command prior to source file specification. |
| --include= |
(only needed if using --exclude) If you're excluding files from an rsync transfer, you'll need to add --include="*". Appended to command prior to source file specification. |
| --dry-run |
Test run of rSync to display the changes that would be made. No file synchronisation is performed with this option enabled. Appended to end of command. |
====================================================================================
FTP Troubleshooting
====================================================================================
FTP Passive Mode
Passive ports are used to allow multiple FTP connections by moving open FTP connections from port 21 to a port specified in the passive port range (40,000-40,100 is the standard ANS passive port range ).
If your FTP client is using passive mode, you'll usually see an output similar to the below. We can use this to calculate the port being used for passive mode (which we can then check for any restrictions on).
80,244,185,220,156,149
First 4 numbers are the server IP,
Multiply 5th number by 256 = x
X+6th number = passive port which is being used
156x256=39936+149=40085
------------------------------------------------------------------------------------------------------------------------------------------------
SFTP
SFTP, which stands for Secure File Transfer Protocol, is a network protocol that provides file access, file transfer, and file management functionalities over any reliable data stream. Unlike FTP (File Transfer Protocol), which is often used with FTP over SSL/TLS (FTPS) for security, SFTP inherently provides secure file transfer through the SSH (Secure Shell) protocol.
The primary cPanel/Plesk user can use SFTP if enabled.
====================================================================================
FTP Troubleshooting
------------------------------------------------------------------------------------------------------------------------------------------------
cPanel
Identify which FTP server is running
lsof -i:21For Pure-FTPd:
/var/cpanel/conf/pureftpd/localFor ProFTPD:
/var/cpanel/conf/proftpd/localAdd this line to set which ports your server should use.
PassivePortRange: 40000 40100If your server is behind a firewall and you are seeing unroutable address errors, add the following line, replacing 123.123.123.123 with your server’s public IP:
ForcePassiveIP: IP_IP_IP_IPRestart Pure-FTPd by running:
/usr/local/cpanel/scripts/setupftpserver pure-ftpd --forceAllow inbound connections on the passive port range.
------------------------------------------------------------------------------------------------------------------------------------------------
Plesk
Plesk also uses the ProFTPD server, but the configuration is slightly different.
Plesk Onyx:
Edit/create the file /etc/proftpd.d/55-passive-ports.conf
Add the following configuration this file:
<Global>
PassivePorts 40000 40100
</Global>
Restart the FTP service to pick up the changes:
systemctl restart xinetdOn your firewall, allow inbound connections on the passive port range.
If your server is behind a firewall and you are seeing unroutable address errors, add the following line, replacing 123.123.123.123 with your server’s public IP:
MasqueradeAddress IP_IP_IP_IP------------------------------------------------------------------------------------------------------------------------------------------------
vSFTPd
vsftpd (Very Secure FTP Daemon) is a popular FTP server for Linux systems. To use vSFTPd, you'll need to install the vsftpd package.
------------------------------------------------------------------------------------------------------------------------------------------------
vSFTPd Config Options
| pasv_enable=YES pasv_min_port=40000 pasv_max_port=40100 |
Enable passive mode and set port range |
| pasv_address=your.external.ip.address |
Specify FTP listening IP. |
| anonymous_enable=NO |
Disable anonymous access |
| write_enable=YES |
Enable file uploads |
| local_enable=YES |
Enable local users |
| chroot_local_user=YES |
Enable user chroot |
| chroot_list_enable=YES chroot_list_file=/etc/vsftpd.chroot_list |
Configure chroot bypass for users. |
| ssl_enable=YES |
Enable SSL |
| rsa_cert_file=/etc/ssl/certs/vsftpd.pem rsa_private_key_file=/etc/ssl/private/vsftpd.pem |
Specify SSL certificate files for FTPS/ES |
| force_local_data_ssl=YES force_local_logins_ssl=YES |
Force SSL usage |
| ssl_tlsv1=YES ssl_sslv2=NO ssl_sslv3=NO |
SSL Protocol options |
| ssl_ciphers=HIGH |
SSL cipher |
| force_local_data_ssl=NO force_local_logins_ssl=NO |
Enable FTPES |
------------------------------------------------------------------------------------------------------------------------------------------------
Adding users for FTP usage
1. In order to create an account that can use VSFTPd, you will first need to set up a user on the server that you want to transfer files to and from.
useradd guest
2. Once created, you'll want to set a password for that user
passwd guest
3. Also disable shell access for the user
usermod -s /sbin/nologin guest------------------------------------------------------------------------------------------------------------------------------------------------
Chrooting users
Chrooting a user in vsftpd ensures that the user is restricted to their home directory and cannot navigate to other parts of the file system.
- Add the user
Either alter the existing user's home directory, or add a new user to be used for FTP
sudo adduser --home /var/ftp/ftpuser ftpuser2. Set a password
passwd ftpuser3. Set home directory permissions
sudo chown ftpuser:ftpuser /var/ftp/ftpuser
sudo chmod 755 /var/ftp/ftpuser
4. Configure vsftpd
Ensure that the following is present within /etc/vsftpd.conf
chroot_local_user=YES------------------------------------------------------------------------------------------------------------------------------------------------
FTPS & FTPES
# Enable SSL
ssl_enable=YES

# Paths to the SSL certificate and key
rsa_cert_file=/etc/ssl/certs/vsftpd.pem
rsa_private_key_file=/etc/ssl/private/vsftpd.pem

# Require SSL for both data and login
force_local_data_ssl=YES
force_local_logins_ssl=YES

# Allow anonymous users to use SSL
allow_anon_ssl=YES

# SSL protocol options
ssl_tlsv1=YES
ssl_sslv2=NO
ssl_sslv3=NO

# Strong ciphers
ssl_ciphers=HIGH

# Optional: Require SSL reuse for data connections
require_ssl_reuse=NO

# Enable Explicit SSL (FTPES)
# By default, vsftpd will use implicit FTPS (default port 990)
# If you prefer explicit FTPS (FTPES), enable the following:
force_local_data_ssl=NO
force_local_logins_ssl=NO

# Explicitly request SSL for login
ssl_request_cert=YES
====================================================================================
Monitoring
Monitoring info and scripts
Nick Abbots Script
Nick Abbots Script:
vi ukfastmon;chmod u+x ukfastmon; ./ukfastmon; rm -f ukfastmon#!/bin/bash
if [ "$1" = "w" ]; then
locate wp-includes/version.php | xargs grep -H '^$wp_version' | grep -v virtfs
echo ""
echo ""
echo -n "The latest stable release of Wordpress is: "
curl -s https://wordpress.org/download/ | grep "Version" | awk '{print $9}' | cut -d ')' -f1
exit
fi
echo ""
echo ""
if [ ! -e /usr/bin/geoiplookup ]; then
if [ -e /etc/network/interfaces ]; then
apt-get install libgeoip1 geoip-bin
else
yum install GeoIP --enablerepo=epel -y
fi
fi
if [ "$1" = "q" ]; then
querydate=$2
elif [ "$1" = "d" ]; then
querydate=$2
elif [ "$1" = "t" ]; then
querydate="`date +%d/%b/%Y`:$2"
else
querydate="`date +%d/%b/%Y`"
fi
if [ -e /dev/shm ]; then
logs="$(TMPDIR=/dev/shm mktemp)"
else
logs="$(mktemp)"
fi
if [ "$1" = "l" ]; then
if [ "$3" = "d" ]; then
querydate=$4
fi
if [ "$5" = "r" ]; then
zgrep $querydate $2 | grep -v $6 > $logs
else
zgrep $querydate $2 > $logs
fi
else
echo "Searching all access logs for $querydate"
echo ""
if [ -e /usr/local/cpanel/cpanel ]; then
if [ "$1" = "q" ]; then
find /usr/local/apache/domlogs/* -maxdepth 1 -type f | grep -v ssl | grep -v ftp | grep -v byte | grep -v siteupda | xargs zgrep "`date +%d/%b/%Y`" | grep $querydate 2>/dev/null > $logs
else
find /usr/local/apache/domlogs/* -maxdepth 1 -type f | grep -v ssl | grep -v ftp | grep -v byte | grep -v siteupda | xargs grep $querydate 2>/dev/null > $logs
find /home/*/logs -type f | grep -v ftp | xargs zgrep $querydate 2>/dev/null >> $logs
find /home/*/access-logs -type f | grep -v ftp | xargs zgrep $querydate 2>/dev/null >> $logs
fi
elif [ -e /usr/local/psa/version ]; then
if [ "$1" = "d" ]; then
if [ -e /var/www/vhosts/system ]; then
find /var/www/vhosts/system -name access_log* -o -name *proxy_access* | xargs zgrep $querydate 2>/dev/null > $logs
else
find /var/www/vhosts -name access_log* | xargs zgrep $querydate 2>/dev/null > $logs
fi
else
if [ -e /var/www/vhosts/system ]; then
find /var/www/vhosts/system -name "*access_log" -o -name *proxy_access* | xargs grep $querydate 2>/dev/null > $logs
else
find /var/www/vhosts -name "*access_log" -o -name *proxy_access* | xargs grep $querydate 2>/dev/null > $logs
fi
fi
else
find /var/log -name "*access_log*" -o -name "*access.log*" -o -name "*access_ssl_log*" -o -name "varnishncsa.log" | xargs zgrep $querydate 2>/dev/null >> $logs
find /home -name "*access_log*" -o -name "*access.log*" | xargs zgrep $querydate 2>/dev/null >> $logs
find /var/www/vhosts -name "*access_log*" -o -name "*access.log*" | xargs zgrep $querydate 2>/dev/null >> $logs
find /var/www -name "*requests.log*" | xargs zgrep $querydate 2>/dev/null >> $logs
find /root -name log | xargs zgrep $querydate 2>/dev/null >> $logs
find /root -name varnishncsa.log | xargs zgrep $querydate 2>/dev/null >> $logs
fi
fi
if [ "$1" = "l" ]; then
echo "Searching specific log file $2 for $querydate"
echo ""
echo "Total number of requests"
echo ""
wc -l $logs | awk '{print $1}'
echo ""
else
echo "Total number of requests"
echo ""
wc -l $logs | awk '{print $1}'
echo ""
echo "Top 20 access log:IPs being hit"
echo ""
awk '{print $1}' $logs | sort | uniq -c | sort -gr | head -n 20
echo ""
fi
echo "Top 20 IPs"
echo ""
awk '{print $1}' $logs | cut -d: -f2 | sort | uniq -c | sort -gr | head -20 | awk '{ printf("%5d\t%-15s\t", $1, $2); system("geoiplookup " $2 " | head -1 | cut -d \\: -f2 ") }'
echo ""
echo "Top 10 /24s - treat country code with caution"
echo ""
awk '{print $1}' $logs | cut -d: -f2 | cut -d. -f1-3 | awk -F'[ .]' '{print $1 "." $2 "." $3 ".0"}' | sort | uniq -c | sort -gr | head -10 | awk '{ printf("%5d\t%-15s\t", $1, $2); system("geoiplookup " $2 " | head -1 | cut -d \\: -f2 ") }'
echo ""
echo "Top 20 requests"
echo ""
awk '{print $6 " " $7 " " $9}' $logs | sort | uniq -c | sort -gr | head -n 20
echo ""
echo "Top 20 referrers"
echo ""
awk '{print $11}' $logs | sort | uniq -c | sort -gr | head -n 20
echo ""
echo "Top 20 user agents"
echo ""
cut -d\" -f6 $logs | sort | uniq -c | sort -gr | head -n 20One-liners
====================================================================================
Common Error/Limit identification
------------------------------------------------------------------------------------------------------------------------------------------------
Apache MaxRequestWorkers
grep -i 'MaxRequestWorkers' $(locate apache || locate httpd | grep -iE "error.log$")------------------------------------------------------------------------------------------------------------------------------------------------
PHP Max_Children
Check for all logged instances of max_children limit being reached - prints each occurrence. Remember, max_children being reached is usually the symptom of a larger issue - probably traffic.
grep -i max_children $(locate fpm | grep -iE "error.log$") Check for all instances of max_children from today's date in the logs, and output as a count for each domains number of occurrences. (untested)
grep -i max_children $(locate fpm | grep -iE "error.log$") | grep -i "$(date +%d-%b)" | cut -d' ' -f5 | tr -d ']' | sort | uniq -c | sort -nr | awk 'BEGIN {print "Total PHP max_children errors on " strftime("%d-%b-%Y")}; {print $0}'Check specific date's occurrences of PHP max_children being reached (date needs updating to desired date.)
grep -i max_children $(locate fpm | grep -iE "error.log$") | grep -i '30-May' | cut -d' ' -f5 | tr -d ']' | sort | uniq -c | sort -nr | awk 'BEGIN {print "Total PHP max_children errors today"}; {print $0}' ------------------------------------------------------------------------------------------------------------------------------------------------
PHP Memory Limit
Search logs for instances of PHP memory_limit being reached: (untested)
grep -i 'Fatal error: Allowed memory size of' $(find / -iname "*error.log")or
grep -i 'Fatal error: Allowed memory size of' $(locate "*.ini")Check domain PHP memory_limit values:
grep -i 'memory_limit' $(find / -iname "*.ini")or
grep -i 'memory_limit' $(locate "*.ini")====================================================================================
Traffic Analysis
(File paths will need updating for these commands)
------------------------------------------------------------------------------------------------------------------------------------------------
wp-login requests
grep -i 'wp-login' /path/to/access/log | cut -d ':' -f1 | sort | uniq -c------------------------------------------------------------------------------------------------------------------------------------------------
XML-RPC requests
grep -i 'xmlrpc' /path/to/access/log | cut -d ':' -f1 | sort | uniq -c------------------------------------------------------------------------------------------------------------------------------------------------
bot traffic user agents
awk -F'"' '{print $6}' /var/www/vhosts/domain/logs/access_ssl_log | sort | uniq -c | sort -nr | head -20 | grep -iE 'bot|crawler'====================================================================================
MySQL Tuner
wget -O mysqltuner.pl mysqltuner.pl && perl mysqltuner.pl====================================================================================
Bots/Crawlers & Control/Mitigation
====================================================================================
Robots.txt
Robots.txt is a file that can be used on a server to decide which bots/crawlers can access the site as well as how often they can make requests. It's important to know that this file is essentially a guideline published to and recognised by bots/crawlers, outlined in this file are the 'rules' for crawling that domain - this file will NOT forcibly block bots/crawlers from making requests.
Below is an annotated example of how the robots.txt file could be configured:
# The below line defines the 'site map' for bots to reference. This is essentially a map of a domain, useful for boosting SEO also.
Sitemap: https://www.example.com/sitemap.xml #specifies the 'site map' for bots to discover all pages on a domain

# The below block specifies that all user-agents can crawl all pages, except from /login/.
User-Agent: *
Disallow: /login/


# This below line allows all search engines to crawl all pages except /login/
User-Agent: *
Disallow: /login/

# Alternatively, you can specify a specific search engine by user agent
User-Agent: Googlebot
Disallow: /admin/

#For sites with extreme crawling rates, it may be worth adding a 'crawl-delay' directive, as below:
User-Agent: Googlebot
crawl-delay: 10
====================================================================================
Identifying Bot Traffic
There are various sorts of server setups you'll encounter while attempting to decipher traffic logs. The below outlines the general methodology I use, however, these commands and approaches will likely need to be adjusted depending on your use-case.
Counting bot requests:
grep -iE 'bot|crawler' /path/to/access/log | wc -lIdentification of user-agents
awk -F'"' '{print $6}' /path/to/access/log | sort | uniq -c | sort -nr | head -20 | grep -iE 'bot|crawler'====================================================================================
Bad Bots
Not all bots listen to rules defined within the robots.txt file, in cases where required, a server-wide block on 'bad bots' can be implemented.
------------------------------------------------------------------------------------------------------------------------------------------------
cPanel
WHM > Apache Configuration > Includes Editor > Pre-main Includes > All Versions
<Directory "/home">
SetEnvIfNoCase User-Agent "petalbot" bad_bots
SetEnvIfNoCase User-Agent "baidu" bad_bots
SetEnvIfNoCase User-Agent "360Spider" bad_bots
SetEnvIfNoCase User-Agent "dotbot" bad_bots
SetEnvIfNoCase User-Agent "megaindex\.ru" bad_bots
SetEnvIfNoCase User-Agent "yelpspider" bad_bots
SetEnvIfNoCase User-Agent "fatbot" bad_bots
SetEnvIfNoCase User-Agent "ascribebot" bad_bots
SetEnvIfNoCase User-Agent "ia_archiver" bad_bots
SetEnvIfNoCase User-Agent "moatbot" bad_bots
SetEnvIfNoCase User-Agent "mj12bot" bad_bots
SetEnvIfNoCase User-Agent "mixrankbot" bad_bots
SetEnvIfNoCase User-Agent "orangebot" bad_bots
SetEnvIfNoCase User-Agent "yoozbot" bad_bots
SetEnvIfNoCase User-Agent "paperlibot" bad_bots
SetEnvIfNoCase User-Agent "showyoubot" bad_bots
SetEnvIfNoCase User-Agent "grapeshot" bad_bots
SetEnvIfNoCase User-Agent "WeSee" bad_bots
SetEnvIfNoCase User-Agent "haosouspider" bad_bots
SetEnvIfNoCase User-Agent "spider" bad_bots
SetEnvIfNoCase User-Agent "lexxebot" bad_bots
SetEnvIfNoCase User-Agent "nutch" bad_bots
SetEnvIfNoCase User-Agent "sogou" bad_bots
SetEnvIfNoCase User-Agent "Cincraw" bad_bots
<RequireAll>
Require all granted
Require not env bad_bots
</RequireAll>
</Directory>
Plesk
------------------------------------------------------------------------------------------------------------------------------------------------
Apache
------------------------------------------------------------------------------------------------------------------------------------------------
Nginx
====================================================================================
Alternative bot traffic control measures
In cases where bot traffic continues to rampage requests to a domain/s, it's worth advising the use of CloudFlares 'Bot Fight Mode'. Other CDN providers may well have their own offerings - worth advising the client of if they utilise an alternative network.
Resource usage and performance
====================================================================================
ATOP
====================================================================================
Nice value
In Linux, the nice value is a user-space and process-level mechanism that influences the scheduling priority of a process. It helps determine how much CPU time a process receives relative to other processes. The concept of "niceness" ranges from -20 (most favorable to the process) to 19 (least favorable to the process), with the default being 0.
Setting Nice Value for a new process
Nice value can be set when initially running the command
nice -n 15 commandSetting Nice value for an existing process
1234 needs to be replaced with the PID
renice -n 5 -p 1234====================================================================================
xmlrpc & wp-login
====================================================================================
XMLRPC
Identifying the total number of xmlrpc requests:
grep -i 'xmlrpc' /path/to/access/log | cut -d ':' -f1 | sort | uniq -c | wc -l------------------------------------------------------------------------------------------------------------------------------------------------
Blocking/Disabling XMLRPC
Apache - .htaccess:
<Files ~ xmlrpc>
Order deny,allow
Deny from all
Allow from IP_IP_IP_IP #if required
</Files>
nginx -
====================================================================================
WP-LOGIN
Identifying the total number of wp-login requests:
grep -i 'wp-login' /path/to/access/log | cut -d ':' -f1 | sort | uniq -c | wc -lBlocking/Disabling WP-LOGIN Access
Firstly, I personally recommend that all clients do the following:
- Change the wp-login admin URL
- Limit access to wp-login by IP
Changing wp-login URL:
Plugin: Changing the wp-login URL can be achieved using a plugin - such as 'Admin login URL Change'
Changing the wp-login.php file directly:
Edit the wp-login.php file and locate the string beginning with 'site_url':
action="<?php echo esc_url( site_url( 'wp-login.php?action=confirm_admin_email', 'login_post' ) ); ?>" method="post">
Following the site_url string in the example above, you'll see that wp-login.php is specified. Changing the string here will update the admin URL for that WordPress instance.
Limiting wp-login access by IP
Apache - .htaccess
<Files ~ wp-login>
Order deny,allow
Deny from all
Allow from IP_IP_IP_IP #if required
</Files>
nginx -
ANS IPs
------------------------------------------------------------------------------------------------------------------------------------------------
Monitoring IPs
(Zabbix):
MAN4: 81.201.136.209
MAN5: 46.37.163.173
MAN5-Proxy: 46.37.163.133
81.201.136.192/27
94.229.162.0/27
81.201.136.168/29
46.37.163.128/26
LogicMonitor
46.37.179.0/28
81.201.138.160/28
------------------------------------------------------------------------------------------------------------------------------------------------
Support Firewalls
80.244.179.100
185.197.63.204
46.37.163.116
------------------------------------------------------------------------------------------------------------------------------------------------
Useful Online Tools
MySQL
MySQL Optimisation, Performance, and Logging
====================================================================================
MySQL Optimisation
====================================================================================
MySQL Tuner Script
wget -O mysqltuner.pl mysqltuner.pl && perl mysqltuner.pl ------------------------------------------------------------------------------------------------------------------------------------------------
Check MySQL default config files
/usr/sbin/mysqld --verbose --help | grep -A 1 "Default options"------------------------------------------------------------------------------------------------------------------------------------------------
MySQL Variables
| innodb_buffer_pool_size | Specifies the size of the memory buffer used by InnoDB to cache data and indexes. Setting this appropriately can significantly improve read/write performance for InnoDB tables. Recommendation: For dedicated MySQL servers, set to 70-80% of available memory. |
| query_cache_size | Controls the size of the query cache, which stores results of SELECT queries to speed up subsequent identical queries. Effective use depends on query patterns and workload. Recommendation: Enable and configure it based on the workload if beneficial; otherwise, keep it disabled. |
| key_buffer_size | Sets the size of the buffer used for index blocks for MyISAM tables. Adjusting this can enhance performance for MyISAM-based applications. Recommendation: Set according to the size of your MyISAM indexes; for mixed storage engines, allocate more memory to InnoDB buffer pool. |
| max_connections | Limits the number of simultaneous client connections allowed to the MySQL server. Properly setting this prevents resource exhaustion and maintains server stability. |
|
tmp_table_size = max_heap_table_size = |
Define the maximum size of temporary tables created in memory. Optimizing these can reduce disk I/O and improve query performance. |
|
sort_buffer_size=256K |
Buffer size for sorts. |
|
max_connections=151 |
Maximum number of simultaneous client connections. Recommendation: Increase based on expected load and server capacity. |
|
innodb_log_file_size |
Size of each log file in the log group.
Recommendation: Increase to improve performance, particularly for write-heavy applications. |
|
innodb_log_buffer_size |
Size of the buffer for log data before it is written to disk. |
Logging
| slow_query_log | Enables logging of queries that exceed a certain execution time. Recommendation: Enable and use for identifying slow queries; configure long_query_time to set the threshold. |
| log_error = /var/log/mysql.log | Path to the error log file. |
| general_log=/var/log/mysql.log | Enables logging of all queries. Recommendation: Use with caution due to potential performance impact and disk consumption; useful for debugging. |
====================================================================================
MyISAM v InnoDB
InnoDB has row-level locking. MyISAM only has full table-level locking.
- InnoDB:
- Default storage engine in MySQL.
- Supports ACID-compliant transactions.
- Provides row-level locking and foreign key constraints.
- Uses a clustered index for primary key storage.
- MyISAM:
- Older storage engine, primarily used before InnoDB became the default.
- Provides table-level locking.
- Faster for read-heavy operations.
- Does not support transactions or foreign keys.
Check table engine:
mysql -e "SELECT TABLE_SCHEMA as DbName ,TABLE_NAME as TableName ,ENGINE as Engine FROM information_schema.TABLES WHERE ENGINE='MyISAM' AND TABLE_SCHEMA NOT IN('mysql','information_schema','performance_schema');"Generate commands to swap table engine from MyISAM to InnoDB
mysql -e "SELECT CONCAT('ALTER TABLE \`', TABLE_SCHEMA,'\`.\`',TABLE_NAME, '\` ENGINE = InnoDB;') FROM information_schema.TABLES WHERE ENGINE='MyISAM' AND TABLE_SCHEMA NOT IN('mysql','information_schema','performance_schema');"====================================================================================
Deadlocks
A deadlock is a situation where two or more transactions are unable to proceed because each one is waiting for a lock held by the other transaction. This creates a cycle of dependencies that cannot be resolved without external intervention.
------------------------------------------------------------------------------------------------------------------------------------------------
Check for deadlocks:
SHOW ENGINE INNODB STATUS;SHOW STATUS LIKE 'Table_locks_%';
- Table_locks_immediate: The number of times a table lock was acquired immediately.
- Table_locks_waited: The number of times a table lock couldn't be acquired immediately and had to wait.
------------------------------------------------------------------------------------------------------------------------------------------------
Deadlock logging
This will cause MySQL to log all deadlock errors to the error log, which can then be examined for more details.
SET GLOBAL innodb_print_all_deadlocks = 1;
------------------------------------------------------------------------------------------------------------------------------------------------
MySQL Monitoring software such as NewRelic can provide further information on deadlocks and general MySQL performance issues.
Resolving Deadlocks
Once identified, you can resolve deadlocks by:
- Rewriting Queries: Optimize queries to reduce lock contention.
- Using Consistent Locking Order: Ensure all transactions acquire locks in a consistent order.
- Adding Indexes: Improve query performance and reduce the duration of locks.
- Reducing Transaction Size: Break large transactions into smaller ones to reduce lock time.
- Implementing Retries: Add retry logic in your application to handle deadlocks gracefully.
------------------------------------------------------------------------------------------------------------------------------------------------
Corruption and Repairs
====================================================================================
MySQL Check
mysqlcheck -options databaseMySQL Check Options:
| -c | Checks tables for errors. It performs a CHECK TABLE operation on each table in the specified databases. |
| -r | Attempts to repair corrupted tables. It performs a REPAIR TABLE operation on each corrupted table. |
| -a | Analyzes tables for optimal performance. It performs an ANALYZE TABLE operation on each table. |
| -o | Optimizes tables to reduce fragmentation and reclaim unused space. It performs an OPTIMIZE TABLE operation on each table. |
| --databases db1 db2 | Checks and repairs tables in multiple databases (db1 and db2). |
| -A | Checks and repairs tables in all databases on the MySQL server. |
------------------------------------------------------------------------------------------------------------------------------------------------
When to use mysqlcheck -r
-
Table Corruption: Use
mysqlcheck -r(ormysqlcheck --repair) when you suspect or know that one or more tables in your MySQL database are corrupted or have crashed. -
Error Messages: If MySQL reports errors such as "table is marked as crashed" or "table needs repair,"
mysqlcheck -ris a suitable approach to attempt repair.
Best Practices and Considerations
-
Backup: Always make a backup of your databases before attempting any repairs. While
mysqlcheck -ris generally safe, there is a small risk of data loss if the repair process encounters unexpected issues. - Table Locking: During repair,
mysqlcheckwill lock tables to ensure data consistency. Depending on the size and activity of your database, this can cause downtime or impact performance.
====================================================================================
User and Database Management
Command syntax will vary between MySQL Versions
====================================================================================
User Management
Show all users and hosts
SELECT user, host FROM mysql. user;Add User
CREATE USER 'name'@'localhost' IDENTIFIED BY 'password.';Granting Privileges
Available privileges:
| CREATE | Allows the user to create new databases and tables. |
| ALTER | Allows the user to alter (modify) existing tables. |
| DROP | Allows the user to drop (delete) databases and tables. |
| INSERT | Allows the user to insert new rows into tables. |
| UPDATE | Allows the user to update existing rows in tables. |
| DELETE | Allows the user to delete rows from tables. |
| SELECT | Allows the user to read (select) data from tables. |
| REFERENCES | Allows the user to create foreign key constraints when defining tables. |
| RELOAD | Allows the user to execute the FLUSH statement, which reloads various server configurations and clears or refreshes caches. |
Grant specific privilege ( or multiple comma separated):
GRANT PRIVILEGETYPE ON database.table TO 'username'@'host';
FLUSH PRIVILEGES;
Grant all:
GRANT ALL ON database.table TO 'username'@'host';
FLUSH PRIVILEGES;
Delete a user
DROP USER 'name'@'host';Change user password
ALTER USER 'user'@'host' IDENTIFIED BY 'NewPassword';
FLUSH PRIVILEGES;
====================================================================================
Database Management
Create a database
CREATE DATABASE name;------------------------------------------------------------------------------------------------------------------------------------------------
Delete a database
DROP DATABASE name;====================================================================================
Binary Logging
====================================================================================
Binary Logging
====================================================================================
What is Binary Logging?
Binary logging in MySQL is a crucial feature for data replication, backup, and recovery. It logs all changes made to the database, such as updates, deletions, and insertions, in a binary format.
Purpose of Binary Logging
- Replication: Binary logs are used to replicate data from a primary server to one or more replica servers. Changes logged on the primary server are applied to the replicas to keep them synchronized.
- Point-in-Time Recovery (PITR): In case of data corruption or accidental data loss, binary logs allow you to restore a backup and replay the transactions recorded in the binary logs to recover the database to a specific point in time.
- Audit Trails: They can be used to audit and review changes made to the database over time.
How Binary Logging Works
- Binary Log Files: The changes are recorded in binary log files (with extensions like
.000001,.000002, etc.) which are stored in the MySQL data directory. - Log Events: Each event in the binary log represents a single database change such as a query or a transaction. These events are recorded in the order they were executed.
- Binary Log Index File: MySQL maintains an index file (typically
mysql-bin.index) that lists all the binary log files and their sequence.
====================================================================================
Binary Logging Configuration
------------------------------------------------------------------------------------------------------------------------------------------------
Enabling Binary Logging
To enable binary logging, you need to configure the MySQL server with the log_bin parameter in the my.cnf configuration file:
[mysqld]
log_bin = /var/log/mysql/mysql-bin.log
------------------------------------------------------------------------------------------------------------------------------------------------
Binary Logging Options
Bin log options that can also be set in the my.cnf file:
| expire_logs_days = 7 | Defines how many days to retain binary log files before automatic deletion. |
|
binlog_format = format format: ROW |
Determines the format of the binary logs. The available formats are: ROW:Logs the actual changes at the row level. STATEMENT: Logs each SQL statement that modifies data. |
| max_binlog_size = 100M | Sets the maximum size of a binary log file before a new file is created. |
------------------------------------------------------------------------------------------------------------------------------------------------
Binary Log Management
Viewing Binary Logs
Use the SHOW BINARY LOGS or SHOW MASTER LOGS command to list the binary log files.
SHOW BINARY LOGS;Examining Binary Log Content
Use the mysqlbinlog utility to examine the content of binary log files
mysqlbinlog /var/log/mysql/mysql-bin.000001Purging Binary Logs
To manually delete old binary logs and free up space, use the PURGE BINARY LOGS statement.
PURGE BINARY LOGS TO 'mysql-bin.000010';Or, you can purge logs older than a specific date:
PURGE BINARY LOGS BEFORE '2024-01-01 00:00:00';====================================================================================
Data Recovery From Binary Logs
------------------------------------------------------------------------------------------------------------------------------------------------
Binary Logs are just transactional changes made to a database. They don't include a full copy of the database itself. In order to replay binary logs, you'll need a backup copy of the database to replay onto. See mysql backups.
1. Identify the Binary Logs to Use
Determine the range of binary logs that contain the transactions you need to replay. You can list all binary logs with:
SHOW BINARY LOGS;2. Obtain a Backup
Obtain the newest backup/dump of the database prior to the time that we need to recover to.
3. Import the backup into MySQL
mysql -u root -p < /path/to/backup.sql4. Apply Binary Logs
A. Identify the start and end points within the binary logs. You might need to apply all transactions or up to a specific point in time or transaction.
mysqlbinlog --start-datetime="2024-06-28 10:00:00" --stop-datetime="2024-06-29 14:00:00" /path/to/mysql-bin.000001 /path/to/mysql-bin.000002 | mysql -u root -p====================================================================================
Database Monitoring (New Relic)
====================================================================================
What is New Relic?
In the context of MySQL, New Relic provides monitoring and performance management capabilities through its Application Performance Monitoring (APM) and Infrastructure Monitoring features.
-
Monitor Query Performance: Track the execution time, throughput, and response times of MySQL queries. Identify slow queries and potential bottlenecks affecting application performance.
-
Transaction Tracing: Trace individual transactions from your application through to MySQL database interactions. This helps pinpoint which parts of your application are causing database load or delays.
-
Database Errors: Capture and alert on MySQL database errors that occur during application operations.
Benefits of Using New Relic with MySQL
-
Performance Optimization: Identify and resolve MySQL query performance issues that impact application responsiveness and user experience.
-
Troubleshooting: Quickly diagnose and troubleshoot database-related problems such as slow queries or database errors affecting application functionality.
-
Capacity Planning: Forecast MySQL server resource requirements based on historical performance data and trends monitored by New Relic.
-
End-to-End Visibility: Gain comprehensive insights into the entire application stack, from front-end application performance to backend MySQL database operations.
------------------------------------------------------------------------------------------------------------------------------------------------
https://www.ans.co.uk/docs/monitoring/installnewrelic/
MySQL Encryption
Encryption Types in MySQL
-
Data-at-Rest Encryption:
- Tablespace Encryption: Encrypts the entire tablespace, including the InnoDB tables.
- Column-Level Encryption: Encrypts specific columns in a table.
-
Data-in-Transit Encryption:
- SSL/TLS Encryption: Encrypts data transmitted between MySQL clients and servers using SSL/TLS.
====================================================================================
Data-at-Rest Encryption
MyISAM does not support encryption natively. Tables will need to be converted to InnoDB before encryption is implemented.
1. Enable the Keyring Plugin
The keyring plugin is used to store and manage encryption keys securely within MySQL.
Install the Keyring Plugin
- If you are using MySQL 5.7 or later, the keyring_file plugin is included by default.
- Add the following lines to the MySQL configuration file
[mysqld]
early-plugin-load = keyring_file.so
keyring_file_data = /var/lib/mysql-keyring/keyring
Create the directory for the keyring file if it doesn't exist
sudo mkdir /var/lib/mysql-keyring
sudo chown mysql:mysql /var/lib/mysql-keyring
Restart the MySQL server to load the plugin
Verify the Keyring Plugin is Enabled:
SHOW PLUGINS;2. Enable InnoDB Tablespace Encryption
Enable InnoDB File-Per-Table:
Ensure that innodb_file_per_table is enabled, which is the default setting in MySQL 5.6 and later.
[mysqld]
innodb_file_per_table = 1
Enable InnoDB Encryption:
[mysqld]
innodb_encrypt_tables = ON
innodb_encrypt_log = ON
innodb_encryption_threads = 4
Restart MySQL.
systemctl restart mysql3. Encrypt Existing Tables
Encrypt a Specific Table
ALTER TABLE mytable ENCRYPTION='Y';4. Verify Encryption
Check Encryption Status
You can verify if a table is encrypted by querying the information_schema.tables table:
SELECT table_schema, table_name, create_options
FROM information_schema.tables
WHERE create_options LIKE '%ENCRYPTION="Y"%';
------------------------------------------------------------------------------------------------------------------------------------------------
Binary Log Encryption
You can replay unencrypted binary logs onto encrypted tables.
Enable Binary Log Encryption
Add the following configuration to your my.cnf
[mysqld]
binlog_encryption = ON
Verify Binary Log Encryption
SHOW VARIABLES LIKE 'binlog_encryption';------------------------------------------------------------------------------------------------------------------------------------------------
Replaying encrypted binary logs
Replaying encrypted binary logs involves ensuring that the encrypted logs are decrypted and applied correctly on the MySQL server.
Use mysqlbinlog to Read Encrypted Binary Logs
The mysqlbinlog utility will handle the decryption transparently if the keyring plugin is properly configured.
mysqlbinlog /path/to/binlog.000001 | mysql -u username -pThe process for replaying binary logs whether encrypted or not is largely the same, providing that the keyring plugin is enabled. See here for more info.
====================================================================================
Data-in-Transit Encryption
Data-in-transit encryption refers to the protection of data as it moves between systems, such as between a client and a server, or between servers. This type of encryption ensures that data remains confidential and integral during transmission, preventing unauthorized access and tampering.
Data-in-transit encryption typically uses Transport Layer Security (TLS) or its predecessor, Secure Sockets Layer (SSL), to secure communications.
Implementing Data-in-Transit Encryption in MySQL
1. Generate or Obtain Certificates and Keys:
Generate self-signed certificates using OpenSSL or obtain them from a trusted CA. Certificate needs to cover the MySQL server hostname.
Example command to generate a self-signed certificate using OpenSSL:
openssl req -newkey rsa:2048 -nodes -keyout server-key.pem -x509 -days 365 -out server-cert.pem2. Configure MySQL Server
Edit the MySQL configuration file (my.cnf or my.ini) to include the paths to the certificates and keys.
[mysqld]
ssl-ca = /path/to/ca-cert.pem
ssl-cert = /path/to/server-cert.pem
ssl-key = /path/to/server-key.pem
To force the use of SSL when connecting to a MySQL server, you can add the below to the my.cnf:require_secure_transport = ON
3. Restart MySQL Server
systemctl restart mysql4. Verify SSL/TLS Configuration
Verify that SSL/TLS is enabled on the server.
SHOW VARIABLES LIKE '%ssl%';====================================================================================
MySQL Remote Access
====================================================================================
To configure remote access for MySQL, you need to ensure that MySQL is configured to accept remote connections and that your firewall and MySQL user permissions are set up correctly.
Configure MySQL Server to Allow Remote Connections
1. Bind Address
The bind-address option in the MySQL configuration file specifies which network interfaces MySQL will listen on for incoming connections. By default, this is set to bind to 127.0.0.1 (localhost), meaning that only local connections can be made.
The bind address can be set to 0.0.0.0 to listen on all interfaces.
bind-address = 0.0.0.0You can also set the bind address to the IP of a specific interface, should you wish to limit where MySQL traffic comes from.
2. Ensure port 3306 is open inbound on firewall
Check for limitations on port 3306 inbound traffic on local/hardware firewalls.
3. MySQL User Configuration
Create new user:
You can either create a new user with the desired host or alter an existing user's host if necessary. However, creating a new entry is often the safest and most organized method.
Create a New Entry for the User:
CREATE USER 'example_user'@'203.0.113.1' IDENTIFIED BY 'user_password';
GRANT ALL PRIVILEGES ON database_name.* TO 'example_user'@'203.0.113.1';
FLUSH PRIVILEGES;
Alter existing user:
RENAME USER 'example_user'@'localhost' TO 'example_user'@'203.0.113.1';
FLUSH PRIVILEGES;
====================================================================================
Storage Engines
MySQL supports multiple storage engines, with InnoDB and MyISAM being the most commonly used.
------------------------------------------------------------------------------------------------------------------------------------------------
MyISAM
- Table-Level Locking:
- Description:
- MyISAM uses table-level locking, which means that the entire table is locked for the duration of a read or write operation.
- Types of Locks:
- Read Lock (Shared Lock):
- Multiple read operations can occur simultaneously.
- Write operations are blocked until all read locks are released.
- Write Lock (Exclusive Lock):
- Only one write operation can occur at a time.
- All other read and write operations are blocked until the write lock is released.
- Read Lock (Shared Lock):
- Implications:
- Advantages:
- Simpler to implement and manage.
- Can be faster for read-heavy workloads with fewer write operations.
- Disadvantages:
- Poor concurrency for write-heavy workloads.
- Write operations can block reads, leading to potential bottlenecks.
- Advantages:
- Description:
------------------------------------------------------------------------------------------------------------------------------------------------
InnoDB
- Row-Level Locking:
- Description:
- InnoDB uses row-level locking, which means that only the specific rows involved in a transaction are locked.
- Types of Locks:
- Shared Lock (S Lock):
- Allows multiple transactions to read the same rows simultaneously.
- Prevents other transactions from writing to the locked rows.
- Exclusive Lock (X Lock):
- Prevents other transactions from reading or writing to the locked rows.
- Intent Locks:
- Intent Shared Lock (IS Lock):
- Indicates that a transaction intends to read rows in a table.
- Compatible with other IS locks and S locks, but not with IX or X locks.
- Intent Exclusive Lock (IX Lock):
- Indicates that a transaction intends to write rows in a table.
- Compatible with other IX locks, but not with S or X locks.
- Intent Shared Lock (IS Lock):
- Shared Lock (S Lock):
- Implications:
- Advantages:
- Higher concurrency as only specific rows are locked.
- Better performance for mixed read/write workloads.
- Supports transactions and ACID compliance.
- Disadvantages:
- More complex locking mechanism.
- Slightly higher overhead compared to table-level locking.
- Advantages:
- Description:
====================================================================================
MySQL Replication
MySQL replication is a process that allows data from one MySQL database server (the primary or source server) to be copied automatically to one or more MySQL database servers (replica or slave servers). Replication is used to improve data availability, load balancing, and for backup and failover purposes.
------------------------------------------------------------------------------------------------------------------------------------------------
Types of MySQL Replication
Asynchronous Replication:
-
- Description: The primary server sends events to the replica, but does not wait for the replica to acknowledge receipt.
- Use Cases: High performance, low latency applications where some delay in data consistency is acceptable.
Semi-Synchronous Replication:
-
- Description: The primary server waits for at least one replica to acknowledge that it has received the events, but not necessarily that it has applied them.
- Use Cases: Balances performance with increased data safety compared to asynchronous replication.
Synchronous Replication (Group Replication):
-
- Description: All replicas must acknowledge receipt and application of events before the primary server considers the transaction complete.
- Use Cases: High availability and data consistency scenarios where strong data guarantees are required.
====================================================================================
Replication Setups
See here for more info, and the ANS KB for setup. The below example is from my own solution.
Master - Master
In a Master-Master replication setup, two MySQL servers are configured to replicate data to each other. Both servers can accept write operations, and changes are propagated bidirectionally.
Both servers act as master and slave to each other, allowing writes on both nodes.
If one server fails, the other can continue to serve both read and write requests.
Data is duplicated on both servers, providing a backup in case one fails.
Advantages:
-
Increased Availability:
- Both servers can handle writes, providing high availability.
-
Load Balancing:
- Distribute read and write operations across both servers.
-
Redundancy:
- Data is replicated on both servers, providing a failover option.
Disadvantages:
-
Complexity:
- More complex to set up and maintain compared to Master-Slave.
-
Conflict Resolution:
- Potential for conflicts if the same data is modified on both servers simultaneously.
-
Data Consistency:
- Possible data inconsistency issues if replication lag occurs.
------------------------------------------------------------------------------------------------------------------------------------------------
Example Configuration
Master - Slave (asynchronous) configuration.
Configure Server A (master)
1. Set the my.cnf file for Server A
[mysqld]
server_id = 1
log_bin = /var/log/mysql/mysql-bin.log
2. Create a user for replication on Server A
CREATE USER 'replication'@'%' IDENTIFIED BY 'password';
GRANT REPLICATION SLAVE ON *.* TO 'repl'@'%';
FLUSH PRIVILEGES;
As you can see here CREATE USER 'replication'@'%' IDENTIFIED BY 'password';, I've set the host as wildcard (%), You'll ideally want to create 2 users here, one with the internal IP of Server A, and one with the internal IP of server B (internal IF on same network). For example:CREATE USER 'replication'@'server_a_ip' IDENTIFIED BY 'password'; CREATE USER 'replication'@'server_b_ip' IDENTIFIED BY 'password';
3. Lock all tables to get MySQL into a consistent state on server A
FLUSH TABLES WITH READ LOCK;
SHOW MASTER STATUS;
Note down the File and Position values. You will use these in Server A's configuration.
4. Create a database dump
For replication to work, we'll first need to import a dump of the locked databases from the master onto the slave.
mysqldump -u root -p --all-databases --master-data > dbdump.sql| --master-data |
Adds
|
Configure Server B (Slave)
1. Set the my.cnf file for Server B
[mysqld]
server_id = 2
log_bin = /var/log/mysql/mysql-bin.log
2. Import database dump from Server A
mysql -u root -p < dbdump.sql3. Configure replication on Server B using the below MySQL command:
CHANGE MASTER TO
    MASTER_HOST='server_A_ip',
    MASTER_USER='repl',
    MASTER_PASSWORD='password',
    MASTER_LOG_FILE='mysql-bin.000001',  -- use the File value from Server A
    MASTER_LOG_POS=120;                  -- use the Position value from Server A
START SLAVE;
3. Verify Replication Status:
Ensure that both servers are replication to each other without errors. You should see Slave_IO_Running and Slave_SQL_Running set to Yes on both servers.
SHOW SLAVE STATUS\G;- Ensure
Slave_IO_RunningandSlave_SQL_Runningare both set toYes. - Check for errors in the
Last_IO_ErrorandLast_SQL_Errorfields.
4. Unlock the tables on both servers
UNLOCK TABLES;Ensure to test once set up.
------------------------------------------------------------------------------------------------------------------------------------------------
Master - Slave
In a Master-Slave replication setup, one MySQL server (the master) is responsible for all write operations, and one or more slave servers replicate the data from the master. Slave servers are typically read-only.
Data flows from the master to the slave(s) only.
Slaves can handle read operations, offloading the master.
Advantages:
-
Simplicity:
- Easier to set up and maintain compared to Master-Master replication.
-
Read Scalability:
- Offload read operations to slaves, improving performance.
-
Data Safety:
- Slaves can be used for backups and disaster recovery without affecting the master.
Disadvantages:
-
Single Point of Failure:
- The master is a single point of failure for write operations.
-
Replication Lag:
- Potential for replication lag, which can lead to stale reads on slaves.
-
Limited Write Scalability:
- All writes are handled by the master, which can become a bottleneck.
====================================================================================
XtraBackup
MySQL Backups - mysqldump and xtrabackup
===================================================================================
Percona XtraBackup
Percona XtraBackup is a widely used open-source tool for MySQL and MariaDB database backups. It is developed by Percona and is specifically designed to perform hot backups of MySQL databases without interrupting database operations.
------------------------------------------------------------------------------------------------------------------------------------------------
Key Features of XtraBackup:
| Hot Backups | XtraBackup allows you to take backups while the database is running and serving requests, minimizing downtime and maintaining data availability. |
| Consistency | It ensures that backups are consistent, capturing all changes up to the point when the backup process begins. |
| Incremental Backups | XtraBackup supports incremental backups, which only include changes made since the last backup. This feature reduces backup time and storage requirements. |
| Compressed Backups | Backups can be compressed to save disk space and reduce storage costs. |
| Encrypted Backups | XtraBackup supports encryption, which helps secure backup data both at rest and in transit. |
| Streaming Backups | The tool can stream backups to another server, useful for remote storage or cloud integration. |
------------------------------------------------------------------------------------------------------------------------------------------------
Percona XtraBackup vs mysqldump & bin logs
| Category | Percona XtraBackup | mysqldump and binary logging |
| Performance |
Non-Blocking Backups: XtraBackup performs hot backups without locking tables, meaning the database remains available for reads and writes during the backup process. This is crucial for maintaining application availability. Incremental Backups: XtraBackup supports incremental backups, which capture only the changes since the last backup. This reduces the time and storage space needed for backups compared to full dumps every time. |
Blocking: Performance Impact: |
| Scalability |
Efficient for Large Databases: XtraBackup is designed to handle large datasets efficiently. It directly copies the data files, making it much faster and less resource-intensive than logical backups. Optimized Storage: Incremental and compressed backups help in managing storage effectively. |
Time-Consuming: Storage Intensive: Frequent full dumps consume a lot of storage space. |
| Consistency |
Point-in-Time Recovery: XtraBackup captures a consistent snapshot of the database and applies the transaction logs to ensure data consistency. This is crucial for point-in-time recovery. Consistency Across Storage Engines: XtraBackup supports InnoDB and other storage engines, ensuring that backups are consistent across different types of tables. |
Potential Inconsistencies: With Manual Effort: Ensuring consistent backups with binary logs often requires combining multiple tools and scripts, adding to administrative overhead. |
| Features |
Compression and Encryption: XtraBackup supports compressed and encrypted backups out of the box, providing security and storage efficiency. Streaming: Backups can be streamed to another server, facilitating remote storage and integration with cloud services. |
Lack of Built-in Compression/Encryption: Complexity: Handling streaming, compression, and encryption typically requires additional scripts and tools, increasing complexity. |
| Recovery Speed |
Fast Recovery: Restoring from XtraBackup is generally faster because it involves copying data files back to the data directory and applying logs, rather than replaying SQL statements. Prepared Backups: XtraBackup's |
Slower Recovery: Restoring from Manual Log Replay: Combining binary logs with a |
------------------------------------------------------------------------------------------------------------------------------------------------
CloudFlare
SSL Certificates
Origin IP
Backups & Restores
Full Server Restore (Dedi or Virtual)
Full Server Restores
====================================================================================
Commvault
------------------------------------------------------------------------------------------------------------------------------------------------
Bare-Metal Server
https://kb.ukfast.net/Linux_Server_Replacement_Procedure
- Reinstall the server to clean OS, or if needed rack up a new server, have networks configure the IP and then run through autoinstaller.
- Once server is installed, and configured as intended, we need to install the commvault agent to allow for commserve to reach the server.
I'd also advise looking to perform a 'readiness check' via Commgui.
Client servers > SID >
3. Once commvault agent is installed and confirmed to be working, you can look to being the restore process. The first step of the restore process is to run a restore of only the below directories, without using the 'unconditional overwrite' option:
/usr/lib64
/usr/lib
4. Once the above initial restore has been completed, we can then look to perform the main restore. This needs to be run with the below directories excluded:
/opt/commvault
/proc
/etc/sysconfig/network-scripts
/etc/fstab
/etc/mtab
/etc/udev.d
/boot
/usr/lib64
/usr/lib
voila that should be it, however, these sort of things never seem to go as planned, so I'd advise reviewing the aforementioned KB articles for further information if needed.
Side note, you also NEED to make sure that any required cleanup is done, ie making sure all appropriate software is installed on sid (threatmon etc), and that any old SID/servers are approriately removed.
------------------------------------------------------------------------------------------------------------------------------------------------
Virtual Machines
------------------------------------------------------------------------------------------------------------------------------------------------
VPC
===================================================================================
Bacula
------------------------------------------------------------------------------------------------------------------------------------------------
Commvault Backups
====================================================================================
Installing Commvault Agent on Linux server
https://kb.ukfast.net/Installing_Commvault_Agent_on_Linux_Client
https://kb.ukfast.net/Launching/Installing_Commvault
- Ensure that the Commvault ports are open on the client firewall:
telnet 81.201.136.241 8400
telnet 81.201.136.241 8600
2. SSH into the Client server you wish to install the Commvault agent on. Review the backup requirements (File only/File & MySQL etc) and run the appropriate command in the terminal.
Run the following command and complete the wizard
bash <(curl -s http://80.244.178.135/Linux/CommVault/installer-script/commvault_install.sh)
If the MA is v10, use the v10 download command as v10 MA's do not support v11 clients
UPDATE THE FLAGS : -clientname idxxxxx -clienthost idxxxxx.cvbackup.ukfast
v11 all packages UPDATE ID's
mkdir CommvaultInstallMedia && cd CommvaultInstallMedia && wget http://80.244.178.135/Commvault/v11/CommCell_F9F70_Main/Linux_X86_64_Custom_Seed_Package_FR20-MR27_F9F70/Custom_Seed_Package_FR20-MR27_F9F70.tar && tar -xvf Custom_Seed_Package_FR20-MR27_F9F70.tar && cd ./pkg && ./cvpkgadd -silent -clientname idXXXXX -clienthost idXXXXX.cvbackup.ukfast && history -d $(history | tail -n 1) && cd ~ && rm -rf CommvaultInstallMedia/;v10 download command:
rm -rf CommvaultInstallMedia && mkdir CommvaultInstallMedia && cd CommvaultInstallMedia && wget --user=staff.download --password='huC6cKUe' http://80.244.178.135/CommVault/v10/DownloadPackages/SP14_Agents/Linux/All_iDAs_Linux_SP14.tar && tar -xvf All_iDAs_Linux_SP14.tar && cd CVDownloads && ./cvpkgadd ;history -d $(history | tail -n 1); cd ~; rm -rf CommvaultInstallMedia/;
3. Confirm the agent is installed and running by the following Commands:
simpana listsimpana statusCheck that the install media has been removed from the server and the history to ensure no evidence of the command run.
historyAlongside the wget command will be a "line number". Run the following to delete this line:
history -d LINE-NUMBER
====================================================================================
Troubleshooting Commvault Backup Issues
commvault has a rather useful 'readiness check' which basically just checks the backup system for any errors:
CommGUI > Client Computers > ctrl+f > SID > right click > all tasks > check readiness
Bacula Restores
Useful Bacula commands
Watch restore job:
watch -n1 'echo "status client client=\"srv-IP_IP_IP_IP\"" | bconsole' Check backup client status via bconsole:
status client====================================================================================
Bacula File Restore
------------------------------------------------------------------------------------------------------------------------------------------------
1. SSH onto backup server.
------------------------------------------------------------------------------------------------------------------------------------------------
2. Initiate a restore
Run the following commands to initiate a restore using the backup jobID:
Bconsole > restore > 3 > enter Job IDs, comma seperated.
------------------------------------------------------------------------------------------------------------------------------------------------
3. Mark files to be restored
Once the directory tree has been built we need to mark the /var/lib/mysql directory, and initiate the restore:
mark /path/to/fileRun 'done' once all required files have been marked
doneSelect option 9 (where):
9Once here, you need to enter the directory we're restoring TO:
/root/restore_TICKETNUMBER ====================================================================================
Bacula DB Restore
https://kb.ukfast.net/Restore_MySQL_from_Bacula
------------------------------------------------------------------------------------------------------------------------------------------------
1. SSH onto backup server.
------------------------------------------------------------------------------------------------------------------------------------------------
2. Initiate a restore
Run the following commands to initiate a restore using the backup jobID:
Bconsole > restore > 3 > enter Job IDs, comma seperated.
------------------------------------------------------------------------------------------------------------------------------------------------
3. Mark files to be restored
Once the directory tree has been built we need to mark the /var/lib/mysql directory, and initiate the restore:
mark /var/lib/mysqlRun 'done' once all required files have been marked
doneSelect option 9 (where):
9Once here, you need to enter the directory we're restoring to (on client server):
/root/restore_TICKETNUMBER ------------------------------------------------------------------------------------------------------------------------------------------------
4A. Starting 2nd MySQL Instance
Once MySQL has been restored onto client server, we then need to start a 2nd instance of mysql so that we can dump the required databases.
The below command starts the 2nd MySQL instance (You need to replace /mnt/mysql with the path we've restored MySQL to; in my example this is /root/restore_TICKETNUMBER).
/usr/sbin/mysqld --socket=/tmp/mysql2.sock --datadir=/mnt/mysql --skip-networking --pid-file=/tmp/mysql2.pid --user=mysql --skip-grant-tablesRunning this command will take over your session, meaning that you'll have to leave this running and open a fresh SSH session.
If you're encountering errors when attempting to start the 2nd instance, it would be worth having a google of the errors. If you're still having issues, please see below:
4B. Troubleshooting restore MySQL startup issues
If you're unable to start the 2nd MySQL instance after troubleshooting, there's 2 main options:
-
Delete the restored content on the client server and start the restore again
-
If this still doesn't work, you can try to start the 2nd MySQL instance using innodb_force_recovery.
There are 6 levels of force recovery options, see here for full details.
/usr/sbin/mysqld --socket=/tmp/mysql2.sock --datadir=/mnt/mysql --skip-networking --pid-file=/tmp/mysql2.pid --user=mysql --skip-grant-tables --innodb_force_recovery=X You'll need to replace 'x' on the above command with your chosen level, I'd advise starting with level 1 and moving up until the MySQL instance is started. Anything above level 4 can cause permanent data corruption, so it's ideal if we can avoid this.
If innodb_force_recovery is used, please note down the level used and tell the client about this.
https://dev.mysql.com/doc/refman/8.0/en/forcing-innodb-recovery.html
If errors are being shown regarding the existing MySQL configuration, you can attempt to launch the 2nd instance with the --no-defaults flag, this essentially tells MySQL to launch with the default settings :
/usr/sbin/mysqld --no-defaults --socket=/tmp/mysql2.sock --datadir=/home/restore_4450884/mysql --skip-networking --pid-file=/tmp/mysql2.pid --user=mysql --skip-grant-tables ------------------------------------------------------------------------------------------------------------------------------------------------
5. Dumping a database
Now that we've got the restored MySQL instance running, we can look to validate the data we require is present, and dump out the database.
Connect to restored MySQL instance:
mysql -S /tmp/mysql2.sockCheck that the required database is present:
SHOW DATABASES;Once we've confirmed that the databases we need is present, we can look to dump out the database into a file:
Run the following command, substituting 'databasename' with the name of your required database, and also updating 'database_restoreTICKETNUMBER' with the appropriate ticket number.
mysqldump -S /tmp/mysql2.sock databasename --events --triggers --routines > /root/database_restoreTICKETNUMBER.sqlOther options for dumping a database/s
All data and databases :
mysqldump -S /tmp/mysql2.sock --all-databases --events --triggers --routines > /root/database_restoreTICKETNUMBER.sqlTo dump several but not all databases (substitute databasename1,databasename2 etc) :
mysqldump -S /tmp/mysql2.sock --databases databasename1 databasename2 --events --triggers --routines > /root/database_restoreTICKETNUMBER.sqlFor a specific table only (substitute databasename and tablename)
mysqldump -S /tmp/mysql2.sock databasename tablename > /root/database_restoreTICKETNUMBER.sqlIf you're encountering errors when attempting to dump the required data, you can use the -f flag to ignore errors.
------------------------------------------------------------------------------------------------------------------------------------------------
6. Cleaning up
Once the dump is complete, terminate the 2nd instance:
mysqladmin -S /tmp/mysql2.sock shutdownRemove the restored /var/lib/mysql directory.
rm -rf /root/restore_TICKETNUMBER------------------------------------------------------------------------------------------------------------------------------------------------
Commvault Restores
Commvault Restores
Commvault restore types:
File level restores
====================================================================================
MySQL Restores
There are 2 types of database restore we can look to perform through commvault, depending on the type of backups in use.
If the client has MySQL level backups, see here
If the client only had file-level backups, see here
====================================================================================
MySQL level backups
Starting the restore job
Commgui > Client Servers > Ctrl+F > Search SID > Double Click MySQL > Double Click SID
Right click > All tasks > browse and restore > Untick Recover > Select Required Date using end time
Select Required Database from the list > Recover Selected
Post-restore action
Replaying bin logs
cp –a DBNAME DBNAME.sql Check disk space before replaying
mysqlbinlog -v --database="DBNAME" RESTOREPATH/BINFILENAME.* >> RESTOREPATH/DBNAME.sql Once the bin logs have been replayed, we need to remove USE staments:
grep -i ^USE DBNAME
sed -i '/^[uU][sS][eE] /d' DBNAME
Replaying bin logs to a certain time:
https://kb.ukfast.net/MySQL#Bin_Logs
Once the bin logs have been been replayed, we can look to remove the bin logs and older db copy
------------------------------------------------------------------------------------------------------------------------------------------
Restoring a specific table from DB level backups
------------------------------------------------------------------------------------------------------------------------------------------
Identify the line number of the desired table in the dump file:
grep -in 'dumping data for' dumpfile.sql
Next, we need to remove the lines before and after the desired table
sed -i '10611,28206d' m2meandemcom.sql
The 2 numbers here are the line number of the next table (shown in the original grep command) and the final tables line number (also in the dump)
Next we do the same for the table line numbers before the one we need:
sed -i '51,10581d' m2meandemcom.sql
====================================================================================
File level database restore
====================================================================================
File Level Restores
====================================================================================
eCloud VPC Restores
------------------------------------------------------------------------------------------------------------------------------------------
Commvault VM Level Backup Restore:
CommGUI > Client Computers > ctrl+f > VM ID/VPC Instance ID > right click > browse and restore > Full Virtual Machine > Select End time (if required) > Browse > Select VM > Restore full VM > Select Restore DataStore, change name to VMID_TICKETNUMBER> Go
Vmware > search for restore VM (VMID_Ticket)
Edit settings (along the top)
1. Disable Networking
vSphere > VM > Edit Settings > Network Adapter > Disable 'Connect at power on'2. Power on restore VM
vSphere > VM > Actions > Power > Power On3. Add swing disk
Confirm how much space you will require for a swing disk to be used to move data over to the live VM.
vsphere > VM > Edit Settings > Add New > Hard Disk > OKOnce the disk has been added in vSphere, you'll need to configure this on the server.
Use mkfs to initialise the disk filesystem.
mkfs /dev/sdXMount the disk once configured.
mount /dev/sdX /mnt4. Move requested data onto disk
5. Unmount the disk from restore VM
'Once the data has been moved onto the disk, unmount the disk from the server filesystem:
umount /mntAnd, unmount the disk from the restore VM within vSphere
vSphere > Edit Settings > X symbol next to disk we've added. Don't click 'Delete files from datastore'.5. Transfer the disk to the live VM
Mount disk on live VM in vSphere
Edit Settings > Add New Device > Existing Hard Disk > Datastores > Restores > Identify restore VM > Add restore swing diskMount the disk on live server filesystem
mount /dev/sdX /mnt6. Move file away from swing disk, into the required location for the client
7. Clean up
Unmount the disk from the live VM
umount /dev/diskname Vsphere > edit settings > remove disk > Select 'delete disk from datastore'
Delete the restore VM
vSphere > Restore VM > Actions > Delete from disk > yes
------------------------------------------------------------------------------------------------------------------------------------------
Removing Restore
Once the client has finished with the restore, the disk will need to be unmounted from the server and the restore VM can be deleted.
SSH onto client VPC > df –h > check for /restore > umount /restore
Once the disk has been unmounted:
Vmware > Client VM > Edit Settings > Restore Disk > Remove (X on right side)
Now delete the Restore VM:
Vmware > restore VM > Power Off > Actions > Delete From Disk
------------------------------------------------------------------------------------------------------------------------------------------
Attach disk
Access restored server
Lsblk - find device name
Mkfs /dev/(device name)
Mount /dev/(devicename) /mnt
Main server > edit settings > attach device > existing disk > find disk
On server:
Mount /dev/(devicename) /mnt
Move restored files onto server
Permissions Restores
====================================================================================
Client chowned their server? did you chown a clients server? Never fear, facl is here.
https://kb.ukfast.net/Linux_file_permissions
====================================================================================
We can use the set/get facl command set for restoring server file permissions. TLDR; getfacl can be used to generate a list of file permissions that can then be implemented onto a selection of files using the setfacl command.
The below command would be for creating a permissions.acl file (containing all permissions on a set of files) in /
getfacl -Rp / > permissions.aclThe below command is for using the file created above to set permissions:
setfacl --restore=permissions.aclBacula Bextract
Bextract
1. Get list of volumes from TechDB
To get an idea of what files you'll need, you need to examine the TechDB Backups tab. For each backup, a line will be printed which starts "Volume name(s):" - this should be in the following format:
srv-7813711322-3889
srv-7813711322-3882
srv-7813711322-3875
srv-7813711322-3868
srv-7813711322-3861
srv-7813711322-3854
srv-7813711322-3847
srv-7813711322-3891
2. Create bootstrap file
This is a text file containing a list of volumes for Bacula to read from, in the correct order, it's format should be as follows (oldest to newest):
Volume=srv-78_137_113_22-3847
Volume=srv-78_137_113_22-3854
Volume=srv-78_137_113_22-3861
Volume=srv-78_137_113_22-3868
Volume=srv-78_137_113_22-3875
Volume=srv-78_137_113_22-3882
Volume=srv-78_137_113_22-3889
Volume=srv-78_137_113_22-3891
There's a little cheat to make this step easier which is the below command that should be run from within the backups directory on backups server (typically /home/bacula/clientIP_IP_IP_IP):
ls -latr srv* | awk '{print $9}' | sed 's/\(.*\)/Volume=\1/' > bootstrap.bsr3. Create includes file
The next thing to create is a file that describes which files you want to extract from the backups, this is just another text file, containing the paths to the files you want to restore, separated by linebreaks, e.g:
/path/to/required/files
/path2/to/required/files
Note: This file is not needed if you need to restore everything within a backup file.
4. Create the output directory (on backup server)
Create a directory for the extract command to output the backup contents to. This needs to be on the backup server as we'll look to transfer the files to the client later on.
5. Running the command
There are 2 sets of commands here, differing for PyBaculaV2 and none-pybac backup server. (Most we deal with now have been upgraded to PyBacV2).
The only real difference between the 2 options is the storage type that's specified. For PyBacV2, you'll need to specify the device prefix, whereas for none-pybac, you'll need to specify the storage prefix.
PyBaculaV2:
View files included in backup (with includes.txt taken into account):
bls -b bootstrap.bsr -i includes.txt -pv device-IP_IP_IP_IPInitiate bextract:
bextract -b bootstrap.bsr -i includes.txt -pv storage-IP_IP_IP_IP /path/to/restore/toNone-PyBac
View files included in backup (with includes.txt taken into account):
bls -b bootstrap.bsr -i includes.txt -pv storage-IP_IP_IP_IPInitiate bextract:
bextract -b bootstrap.bsr -i includes.txt -pv storage-IP_IP_IP_IP /path/to/output/6. Transfer files to client-server
Feel free to use your preferred file transfer method for this step, for the below I've detailed how to achieve this using rysnc.
A. Compress the file before transfer
tar -czf zipfilename.tar.gz filetoarchiveB. Transfer the files
rsync -r -e "ssh -p2020" /path/to/files/on/backup/server 'root@[client:server:BAC:address]':/client/server/restore/pathC. Uncompress files on client-server
(extracts into current working directory)
tar -xzf archivename.tar.gzBacula Backups
====================================================================================
Backup Server Setup (via automation)
USEFUL LINKS:
https://kb.ukfast.net/Backup_Server_Install
https://linuxinstaller-man4.devops.ukfast.co.uk/dashboard/
https://linuxinstaller-man5.devops.ukfast.co.uk/dashboard/
https://awx.devops.ukfast.co.uk/#/home
All steps here are done within TechDB - specifically on the SID page for the backup server, unless otherwise specified.
If this is a reinstall then you first need to schedule maintenance and task DC to replace the disks
server type: "backup server"
server subtype: "Bacula v9 Server"
Status: Awaiting Installation
Role: "Backup Server"
OS type: Ubuntu 20.04 x86_64
Add the OS > Software Installed > Select Ubuntu 20.04 x86_64 and Right Click > Add
Also remove any OS that is already present (Only for reinstalls)
get networks to assign you an IP Address and fill in the Hostname (not needed for reinstall)
Hardware > Configuration > Model > This needs to be set to the chassis (Most will be R320 - won't need changing for a reinstall unless chassis has been swapped)
The server must have a rack switch AND a backup switch connection (backup switch MUST be Gigabit)
Set the vlan to the installer vlan for the relevant datacentre: [MAN4: 516, MAN5: 316]
Click Save Edits
Click Configure Switch
Click Reset Server OS
deselect firewall information - this is for shared backup servers, these are not Firewalled
Select Save Edits
Open the virtual console in DRAC
Click Install/Re-install OS to start automation, you can watch the steps in automation history and use DRAC too
Reboot server
When server is booting hit f2 to go to system setup then System BIOS > Boot Settings > Change from BIOS to UEFI, can then exit this menu and server will reboot
While its booting hit f11 to go into the Boot Manager > UEFI Boot menu > NIC 1
After that then automation will do the rest for you (hopefully)
====================================================================================
Bacula Client Setup
====================================================================================
Troubleshooting Bacula
---------------------------------------------------------------------------------------------------------------------------------------
Bacula Networking
---------------------------------------------------------------------------------------------------------------------------------------
BAC Address
Firstly, check the client server has a bacula IPv6 address.
ip a Will look something like the following (note the 'BAC' present around the middle of this address)
2a02:22d0:bac:0:3617:ebff:fef1:1f8
If the server does not have a v6 address, we need to check the backup NIC config and then try to restart the backup NIC.
IPv6 Network Restrictions
Ensure that the ip6tables service isn't running:
Systemctl status ip6tables Check the ruleset:
ip6tables –SAdd required rules for Bacula IPv6 networking over ports 9102 and 9103:
ip6tables -I INPUT -i eth1/em2 -j ACCEPT
ip6tables -I OUTPUT -p tcp --dport 9102 -j ACCEPT
ip6tables -I OUTPUT -p tcp --dport 9103 -j ACCEPT
service ip6tables save && service ip6tables restart
---------------------------------------------------------------------------------------------------------------------------------------
Bacula-fd Configuration
Mail configuration and troubleshooting
SPF, DMARC, and DKIM
SPF (Sender Policy Framework) is an email authentication record, which is essentially used to define which specific servers are permitted to send mail on behalf of a domain.
https://docs.ukfast.co.uk/email/spf.html
------------------------------------------------------------------------------------------------------------------------------------------------
Adding an SPF record
useful SPF record generator tool
SPF records need to be added as a TXT DNS record.
example:
"v=spf1 mx a ip4:185.216.77.122"
Plesk Mail
------------------------------------------------------------------------------------------------------------------------------------------
Mail Account Credentials
We can run the below command to retrieve credentials for any mail account on a Plesk server:
/usr/local/psa/admin/sbin/mail_auth_view | grep -i accountname ------------------------------------------------------------------------------------------------------------------------------------------
MTA & MDA
Mail Transfer Agent (MTA): This is responsible for sending and receiving emails between different mail servers. MTAs handle SMTP (Simple Mail Transfer Protocol) for sending emails and can also manage incoming email delivery.
Examples of MTA:
- Postfix
- Exim
- Sendmail
Mail Delivery Agent (MDA): This component is responsible for storing incoming emails on the mail server and allowing users to retrieve them. The MDA handles protocols like IMAP (Internet Message Access Protocol) and POP3 (Post Office Protocol version 3) for email retrieval.
- IMAP (Internet Message Access Protocol): IMAP allows users to access and manage their email messages stored on the server. It's more advanced than POP3 and supports features like folder management, message flags, and synchronization across multiple devices.
- POP3 (Post Office Protocol version 3): POP3 allows users to download emails from the server to their local device. Unlike IMAP, POP3 typically downloads emails to a single device and doesn't synchronize changes back to the server by default.
Example of MDA:
- Dovecot
Typical Setup
In a typical email setup:
- MTA (e.g., Postfix) receives emails from other mail servers, performs spam checks, and delivers them to the local mailboxes.
- MDA (e.g., Dovecot) allows users to connect to their mailboxes using IMAP or POP3 to read, manage, and download emails.
Together, the MTA and MDA components ensure the reliable delivery and storage of emails, as well as provide access to users for reading and managing their messages.
QUICK GUIDE: Mail Troubleshooting
LoadBalancers
LBv1 & LBv2
Check Stats
watch 'echo "show stat" | nc -U /var/lib/haproxy/stats | cut -d "," -f 1,2,5-11,18,24,27,30,36,50,37,56,57,62 | column -s, -t'
LBv2 Overview
ANS Portal > Servers > Load Balancers
Services:
haproxy
Warden
/var/log/warden/warden.log
Keepalived – manages which side of lb the IPs are located on
/var/log/syslog
Magento
Addon Domain Script
Addon scripts can be found in the below link:
pick the appropriate script for the use case.
MAIN DOMAIN
cd /tmp
vi addon.sh
Paste in script
edit:
domain (don't include www.)
wp & wp databases
multistore?
php version ie 8.1
varnish
docroot leave blank for main domain, for multistore put existing main domain doc root
UAT = staging yes or no
bash addon.sh
MULTISTORE
multistore = yes
docroot = main domain docroot
phpfpmuser = main domain user
phpfpmgroup = main domain group
Magento Installation
Magento2
------------------------------------------------------------------------------------------------------------------------------------------------
Magento is an ecommerce stack typically made up of the following components:
nginx/apache
mysql/mariadb
php
Elasticsearch - Used in Magento as the store search engine and product cataloguing system.
Composer dependency tool for PHP - essentially it will automatically install/configure PHP dependancies ie extensions.
Varnish - HTTP caching service
Redis - memory database caching service
------------------------------------------------------------------------------------------------------------------------------------------------
Installation Process
https://www.mgt-commerce.com/tutorial/how-to-install-magento-2-4-4-on-ubuntu-20-04/
Useful Commands
Cluster
Cluster configuration, theory, and troubleshooting.
Pacemaker
Pacemaker provides a framework to manage the availability of resources. It's essentially the core component on a cluster that allows you to manage resource locations etc.
Installing
apt-get install pacemaker pcs resource-agents
yum install pacemaker pcs resource-agents
Configuration
passwd haclusterpcs host auth node01.srv.world node02.srv.worldstart services for cluster:
pcs cluster start --allenable services:
pcs cluster enable --allVerify installation is working and nodes are connected:
pcs cluster status

pcs status corosync
Deleting a cluster installation
pcs cluster stop --all

pcs cluster destroy --allExplanation
PCS (Pacemaker) Cluster
Services:
PCS (Pacemaker)
Pacemaker provides a framework to manage the availability of resources. Resources are services on a host that needs to be kept highly available.
ie pacemaker controls which services are running where.
Corosync
DRBD
DRBD is the service used for synchronisation of data (usually web and database files) on a cluster or HA solution. Not to be confused with Unision (which is typically used for synchronisation of config files due to not updating files as quickly as DRBD).
Installing
yum install drbd-utils* drbd-dkms
apt-get install drbd-utils* drbd-dkms
may need to add repos for this.
The above installs both the DRBD service files, as well as the required kernel module.
Check that the kernel module is loaded with:
modprobe drbdConfiguration of disks for DRBD
https://clusterlabs.org/pacemaker/doc/2.1/Clusters_from_Scratch/epub/shared-storage.html
DRBD will need its own block device on each node.
In this example, I've added a 10GB disk to each node,
root@b4sed-02:/etc# lsblk
NAME            MAJ:MIN RM  SIZE RO TYPE MOUNTPOINTS
sda               8:0    0 19.1G  0 disk
├─sda1            8:1    0 18.8G  0 part /
├─sda14           8:14   0    1M  0 part
└─sda15           8:15   0  256M  0 part /boot/efi
sdb               8:16   0   10G  0 disk
└─VG_data-DRBD2 253:0    0   10G  0 lvm
sr0              11:0    1 1024M  0 rom


root@b4sed-02:/home# pvcreate /dev/sdb
  Physical volume "/dev/sdb" successfully created.


root@b4sed-02:/home# vgcreate VG_data /dev/sdb
  Volume group "VG_data" successfully created


root@b4sed-02:/home# vgdisplay | grep -e Name -e Free
  VG Name               VG_data
  Free  PE / Size       2559 / <10.00 GiB


root@b4sed-02:/home# lvcreate --name DRBD2 -l2559 VG_data
  Logical volume "DRBD2" created.
Configuration of DRBD
typically configured via /etc/drbd.conf
example configuration from my setup:
resource wwwdata {
 protocol C;
 meta-disk internal;
 device /dev/drbd1;
 syncer {
  verify-alg sha1;
 }
 net {
  allow-two-primaries;
 }
 on b4sed-01 {
  disk   /dev/VG_data/DRBD1;
  address  10.0.0.2:7789;
 }
 on b4sed-02 {
  disk   /dev/VG_data/DRBD2;
  address  10.0.0.3:7789;
 }
}
Once configuration file is in place, DRBD can be deployed via the below commands:
drbdadm create-md resourcename #wwwdata in my example

modprobe drbd

drbdadm up resourcename
as a side note, in my example I was getting errors relating to the kernel module, a kernel update and reboot resolved this.
Check status
drbdadm status
or
cat /proc/drbdAt this point you'll likely see data inconsistency:
root@b4sed-01:/var/log# drbdadm status
wwwdata role:Secondary
  disk:Inconsistent
  b4sed-02 connection:Connecting
This is because the data might differ on each node, to specific which node has the correct data we need to set the primary node, using the below command:
drbdadm primary --force wwwdata
Once done, run the deployment commands again but on the 2nd node:
drbdadm create-md resourcename #wwwdata in my example

modprobe drbd

drbdadm up resourcename
Once done, give some time for the connection to be made, check the status again:
root@b4sed-01:~# drbdadm status
wwwdata role:Primary
  disk:UpToDate
  b4sed-02 role:Secondary
    peer-disk:UpToDate
Configure the DRBD disk
mkfs.ext4 /dev/drbd1
nearly there now...
Add DRBD to the cluster
pcs cluster cib drbd_cfg #this queues up changed to be deployed to the cluster in one goadd the constraints and such:
pcs -f fs_cfg resource create WebFS Filesystem \
    device="/dev/drbd1" directory="/var/www/html" fstype="ext4"

pcs -f fs_cfg constraint colocation add \
    WebFS with WebData-clone INFINITY with-rsc-role=Master

pcs -f fs_cfg constraint order \
    promote WebData-clone then start WebFS

pcs -f fs_cfg constraint colocation add http_server with WebFS INFINITY

pcs -f fs_cfg constraint order WebFS then http_server
if all looks good, you can push these changes with the below command:
pcs cluster cib-push fs_cfg --config
time now for testing - place 1 node in standby and ensure the failover is sucesful.
Unison
Clusters use unison, usually for synchronisation of configuration files.
NGINX
General NGINX configuration
Realip
====================================================================================
- Ensure that the nginx 'ngx_http_realip_module' is installed:
nginx -V 2>&1 | grep --color -o 'http_realip_module'2. Create a new file, for example /etc/nginx/cloudflare.conf, and add the list of Cloudflare IPs to it:
set_real_ip_from 103.21.244.0/22;
set_real_ip_from 103.22.200.0/22;
set_real_ip_from 103.31.4.0/22;
set_real_ip_from 104.16.0.0/13;
set_real_ip_from 104.24.0.0/14;
set_real_ip_from 108.162.192.0/18;
set_real_ip_from 131.0.72.0/22;
set_real_ip_from 141.101.64.0/18;
set_real_ip_from 162.158.0.0/15;
set_real_ip_from 172.64.0.0/13;
set_real_ip_from 173.245.48.0/20;
set_real_ip_from 188.114.96.0/20;
set_real_ip_from 190.93.240.0/20;
set_real_ip_from 197.234.240.0/22;
set_real_ip_from 198.41.128.0/17;
set_real_ip_from 199.27.128.0/21;
set_real_ip_from 2400:cb00::/32;
set_real_ip_from 2606:4700::/32;
set_real_ip_from 2803:f800::/32;
set_real_ip_from 2405:b500::/32;
set_real_ip_from 2405:8100::/32;
set_real_ip_from 2a06:98c0::/29;
set_real_ip_from 2c0f:f248::/32;

real_ip_header CF-Connecting-IP;
3. Add an 'include' statement to the nginx.conf file:
Add the following line inside the http block, alongside your existing include directives:
include /etc/nginx/cloudflare.conf; 4. Test and reload nginx
====================================================================================
Security options, headers, ciphers, and TLS settings.
====================================================================================
Security Options and Headers
------------------------------------------------------------------------------------------------------------------------------------------------
SSL/TLS Settings
Define SSL certificate in vhost:
ssl_certificate /etc/nginx/ssl/your-domain.com.crt;
ssl_certificate_key /etc/nginx/ssl/your-domain.com.key;
Enable TLS 1.2 and 1.3:
ssl_protocols TLSv1.2 TLSv1.3;Force usage of ciphers in order of most secure to least:
ssl_prefer_server_ciphers on; Define SSL ciphers for nginx to use:
ssl_ciphers 'ECDHE-ECDSA-AES256-GCM-SHA384:ECDHE-RSA-AES256-GCM-SHA384:ECDHE-ECDSA-CHACHA20-POLY1305:ECDHE-RSA-CHACHA20-POLY1305:ECDHE-ECDSA-AES128-GCM-SHA256:ECDHE-RSA-AES128-GCM-SHA256';====================================================================================
Headers
------------------------------------------------------------------------------------------------------------------------------------------------
HSTS
HTTP Strict Transport Security (HSTS) is a web security policy mechanism that helps to protect websites against man-in-the-middle attacks such as protocol downgrade attacks and cookie hijacking.. It allows web servers to declare that web browsers (or other complying user agents) should only interact with it using secure HTTPS connections, and never via the insecure HTTP protocol.
HSTS can be enabled globally in the nginx.conf file, or on a per site bases.
add_header Strict-Transport-Security "max-age=63072000; includeSubdomains;"------------------------------------------------------------------------------------------------------------------------------------------------
X-Content-Type-Options
Prevents MIME-sniffing attacks where browsers may override the declared content type of a resource.
nosniff: Instructs the browser not to sniff the MIME type and to use the content type as declared in the Content-Type header.
add_header X-Content-Type-Options "nosniff" always;------------------------------------------------------------------------------------------------------------------------------------------------
X-Frame-Options
Prevents clickjacking attacks by controlling whether your site can be embedded in a frame or iframe.
DENY: Prevents any site from framing your content.
SAMEORIGIN: Allows framing only from the same origin.
add_header X-Frame-Options "DENY" always;------------------------------------------------------------------------------------------------------------------------------------------------
X-XSS-Protection
1; mode=block: Activates the XSS filter and instructs the browser to block the response if an XSS attack is detected.add_header X-XSS-Protection "1; mode=block" always;no-referrer-when-downgrade: Sends the full URL as a referrer to requests going to the same origin or a less secure destination (HTTP to HTTPS).add_header Referrer-Policy "no-referrer-when-downgrade" always;APACHE
mod_remoteip
(SUCURI NOT CLOUDFLARE)
Apache 2.4 and above usually comes with mod_remoteip installed, you just need to enable it.
If you are using cPanel/WHM, mod_remoteip can be installed with "yum -y install ea-apache24-mod_remoteip". or via EA4 in WHM.
Once mod_remoteip is installed, you need to add the following lines into its configuration file. Usually the configuration file would be /etc/apache/conf-available/remoteip.conf, but if you’re using cPanel/WHM, it would be /etc/apache2/conf.modules.d/370_mod_remoteip.conf.
RemoteIPHeader X-FORWARDED-FOR
RemoteIPTrustedProxy 192.88.134.0/23
RemoteIPTrustedProxy 185.93.228.0/22
RemoteIPTrustedProxy 66.248.200.0/22
RemoteIPTrustedProxy 208.109.0.0/22
RemoteIPTrustedProxy 2a02:fe80::/29 # this line can be removed if IPv6 is disabled
If it does work, try changing RemoteIPHeader X-FORWARDED-FOR to RemoteIPHeader X_FORWARDED_FOR.
You can also add the following line in your /usr/local/apache/conf/includes/post_virtualhost_global.conf file and restart Apache, if you want to see the visitor IP address in the Apache logs:
LogFormat "%{X-Forwarded-For}i %h %l %u %t \"%r\" %>s %b \"%{Referer}i\" \"%{User-Agent}i\"" combinedLogging
Server log configuration and management
TOP
------------------------------------------------------------------------------------------------------------------------------------------------
Logging interval
To change ATOP's logging interval edit the below file:
vim /usr/share/atop/atop.dailyIn here, edit the LOGINTERVAL to your desired time frame (seconds):
example for 1 minute logging:
LOGINTERVAL=60------------------------------------------------------------------------------------------------------------------------------------------------
ATOP Controls
k = kill PID
b = date/time
------------------------------------------------------------------------------------------------------------------------------------------------
LogRotate
LogRotate Configuration.
https://www.redhat.com/sysadmin/setting-logrotate
If not installed already (it usually is), install the logrotate service:
apt install logrotate
yum install logrotate
Configuration of logrotate
/etc/logrotate.conf - used to define default parameters for logrotate
/etc/logrotate.d - used for configuring logrotate for specific logs
example configuration:
/root/.unison/unison.log {
    rotate 7
    daily
    compress
    missingok
    notifempty
}
Common options you may see used in a configuration file include:
-
compress- this indicates the log files should be compressed once rotated.gzipis used by default. -
daily/weekly/monthly/yearly- this specifies that the log file should be rotated every day, week, or month. -
ifempty/notifempty- these specify whether to either rotate the log file even if it’s empty, or to not rotate the log file if it’s empty, respectively. -
missingok/notmissingok- these options will either not generate an error, or will generate an error if the log file does not exist.notmissingokis the default. -
rotate- this is supplied with a number argument, which specifies how many times the log files are rotated before being removed. -
size- this specifies the size a log file has to reach before it is rotated.
Running LogRotate
LogRotate usually comes set up with a daily cron:
ls /etc/cron.daily/
apport  apt-compat  dpkg  logrotate  man-db  plocate
You can also run a logrotate configuration at any time:
logrotate nameWordPress
Useful WordPress-related topics
WP-CLI
====================================================================================
------------------------------------------------------------------------------------------------------------------------------------------------
Dump or import wp databases
wp db export backup.sql------------------------------------------------------------------------------------------------------------------------------------------------
wp db import backup.sql Home & base URL
Check or set home URL
wp option get home wp option update homeurl domainname Check or set base URL
wp option get siteurl wp option update baseurl domainname ------------------------------------------------------------------------------------------------------------------------------------------------
search and replace on database:
wp search-replace stringtoreplace replacementstring --skip-columns=guid --all-tables --allow-root
------------------------------------------------------------------------------------------------------------------------------------------------
Changing WordPress Admin/User Passwords
------------------------------------------------------------------------------------------------------------------------------------------------
Changing WordPress Admin Password
The WordPress admin password can be changed via the WordPress database directly, or via WP-CLI:
====================================================================================
WP-CLI
https://developer.wordpress.org/cli/commands/user/reset-password/
If WP-CLI is installed, the below command can be used to change the admin password:
wp user reset-password(user has to be specified)
Options
- <user>… - one or more user logins or IDs.
- --skip-email -Don’t send an email notification to the affected user(s).
- --show-password -Show the new password(s).
- --porcelain -Output only the new password(s)
- ------------------------------------------------------------------------------------------------------------------------------------------------
# Reset the password for two users and send them the change email.$ wp user reset-password admin editorReset password for admin.Reset password for editor.Success: Passwords reset for 2 users.
# Reset the password for one user, displaying only the new password, and not sending the change email.$ wp user reset-password admin --skip-email --porcelainyV6BP*!d70wg
# Reset password for all users.$ wp user reset-password $(wp user list --format=ids)Reset password for adminReset password for editorReset password for subscriberSuccess: Passwords reset for 3 users.
# Reset password for all users with a particular role.$ wp user reset-password $(wp user list --format=ids --role=administrator)Reset password for adminSuccess: Password reset for 1 user.
====================================================================================
MySQL - Editing WordPress Database Directly
use wordpress_database;UPDATE wp_users SET user_pass = MD5('new_password') WHERE user_login = 'your_admin_username';====================================================================================
WordPress Debug Mode
====================================================================================
WordPress Debug Mode
WordPress comes with a built-in debugging feature, with a few options we can set for viewing debug logs.
All of these changes are made within the wp-config.php file -
NOTE: You must insert this BEFORE /* That's all, stop editing! Happy blogging. */ in the wp-config.php file.
Enable debug mode with standard debug log output on website (shows any debug errors on the website itself by default)
// Enable WP_DEBUG mode
define( 'WP_DEBUG', true );
Change WP_DEBUG display method on site: - Prevents debug errors from being displayed on the website itself:
// Disable display of errors and warnings
define( 'WP_DEBUG_DISPLAY', false );
@ini_set( 'display_errors', 0 );
Set WP-DEBUG log file:
// Enable Debug logging to the /wp-content/debug.log file
define( 'WP_DEBUG_LOG', true );
====================================================================================
Bash
Command man pages.
VI/VIM
Line Numbers
vim can display line numbers using the below command:
:set numberSkip to specific line number
To skip to line 255:
:255------------------------------------------------------------------------------------------------------------------------------------------
Searching strings
To search for a string in a text file, the / option can be used. In the below example, we're searching for the word test
:/testTo skip to the next found instance of the word, press the n key.
Search string on a range of lines
In this example, I'm searching for the string 'test' on lines 1-100:
:1,100/test------------------------------------------------------------------------------------------------------------------------------------------
Deleting Lines
Vim can delete lines using a number of methods
Remove X amount of lines.
The below command would remove 5 lines from (and including) the current line:
:5dRemove a range of lines:
1,5d------------------------------------------------------------------------------------------------------------------------------------------
Search and replace
Search and replace a word through the whole file:
:%s/wordtosearch/wordtoreplacewithSearch and replace on specific lines
We can couple the search and replace function of vim with the line number range tool. The below would find any instances of the word 'test' within the line range of 1-100, and then replace all instances of the word with 'testing':
:1,100s/test/testing------------------------------------------------------------------------------------------------------------------------------------------
Copy & pastse
Copy the currently selected line
:yyCopy a range of lines
The below would copy lines 1-1000
:1,1000yPaste the line:
p------------------------------------------------------------------------------------------------------------------------------------------
Saving & exiting
save and quit:
:wqdon't save and quit
:q!Save as new file
:w newfilename------------------------------------------------------------------------------------------------------------------------------------------
Find, Locate, and Grep
====================================================================================
FIND
Find is a linux search tool that can be used to find a variety of files based on the given criteria.
------------------------------------------------------------------------------------------------------------------------------------------------
Basic find
find targetdirectory -name stringtofind
find / -name hello.txtwildcards
find / -name "*.txt"Discard errors (ie permission denied)
find / -name "*.txt" 2>/dev/null------------------------------------------------------------------------------------------------------------------------------------------------
Find files with specific permissions
Find files with read,write, and execute permissions
find / -perm +rwx------------------------------------------------------------------------------------------------------------------------------------------------
Find files by size
Find files that are greater than 2MB:
find / -size +2MFind files that are less than 2MB:
find / -size -2MFind files that are exactly 2MB:
find / -size 2M------------------------------------------------------------------------------------------------------------------------------------------------
Find files by owner/group
Find files based on group
find / -group groupnameFind files based on owner
find / -user username====================================================================================
LOCATE
Locate is similar to find in its functionality, however, there are some important distinctions:
- Locate keeps it's own database of files on a system
- Locate is less disk IO intensive since it doesn't have to scan the whole hard drive for files, instead it references it's own database.
- Locate isn't installed by default on most systems, the package name is mlocate. Once installed, you'll need to run the updated command to update locate's database - this should really be updated every time you use the command
------------------------------------------------------------------------------------------------------------------------------------------------
Locate file based on name
locate test.txt====================================================================================
GREP
------------------------------------------------------------------------------------------------------------------------------------------------
-i - case insensitive
As with all of Linux, grep is case sensitive. The -i flag can be passed to ignore case type.
------------------------------------------------------------------------------------------------------------------------------------------------
-v -exclude string
The -v flag is used to exclude a string from an output.
------------------------------------------------------------------------------------------------------------------------------------------------
| - or statement
The below will search for string1 or string2 within a file, if both are found then both will be outputted.
grep 'string1|string2' filename------------------------------------------------------------------------------------------------------------------------------------------------
-r - search files recursively
grep -r hello /------------------------------------------------------------------------------------------------------------------------------------------------
-A & -B (before and after)
Sometimes you might want to search for a string, and see the lines before/after that string.
The below will show the 2 lines following the string
grep -A2 string filenameThe below will show the 2 lines before the string
grep -B2 string filenameYou can also combine these to see the lines before and after
grep -A2 -B2 string filename====================================================================================
-E or egrep - extended regular expression
Regular expression is essentially the methodology that we can use to manipulate grep to find advanced string patterns.
------------------------------------------------------------------------------------------------------------------------------------------------
Special characters
When trying to grep for special characters, you need to make sure to 'escape' those characters, this is done by proceeding special characters with a \:
grep -E year\'s------------------------------------------------------------------------------------------------------------------------------------------------
Beginning and end of line
line begins with
The below example would show any lines beginning with the character '1'
grep -E "^1" filenameline ends with
The below example would show any lines ending with the character '1'
grep -e "1$" filename------------------------------------------------------------------------------------------------------------------------------------------------
Ranges
grep interprets ranges that are defined through square brackets [].
line begins with 1 and is followed by numbers in the 0-2 range:
grep -E "^1[0-2]" filenameWe can also search for ranges of letters
The below command would search for the letter b, proceeded by any letter in the specified range, followed by the letter g:
grep -E "b[aeiou]g" filenameWe can also search a range of letters like this:
grep -E "b[a-z]g" filenameYou can also combine ranges
grep -E "b[a-z,A-Z]g" filename------------------------------------------------------------------------------------------------------------------------------------------------
Wildcards
There are a number of wildcard options available to use in egrep.
. - any single character
grep -e "c.t" filename- Matches: "cat", "cot", "cut", etc.
- Does not match: "ct", "caat"
* - matches zero or more occurrences of the preceding character
grep -e "g*d" filename- Matches: "gd", "god", "good", "goood"
- Does not match: "go", "goooo", "gdo", "goddy"
.* - match zero or more of any character
grep -e "a.*b" filename- Matches: "ab", "acb", "axyzb", "a123b"
- Does not match: "a b", "ab ", "acbd", "a"
------------------------------------------------------------------------------------------------------------------------------------------------
SSL
SSL validation, installation, and verification
SSL Validation
====================================================================================
SSL Validation
-----------------------------------------------------------------------------------------------------------------------------------------------
CNAME DNS VALIDATION
Add CNAME Records which are listed in ANS Portal SSL section:
Format:
Value.comodoca.com
SSLvalue
Example:
-----------------------------------------------------------------------------------------------------------------------------------------------
Email Validation
Verification email is sent to admin email for domain
-----------------------------------------------------------------------------------------------------------------------------------------------
File Upload Validation
Validation information needs to be added onto the server in a text file, this needs to be available via the relevant domain.
http(s)://example.com/.well-known/pki-validation/<MD5 Hash>.txt
Example file contents:
6051E0C6B973EBC70926FD060D8EFA298BBDEBAB2ADF0A2CE23A43285A6B96AA
sectigo.com
63c554fc
-----------------------------------------------------------------------------------------------------------------------------------------------
SSL Checks
====================================================================================
Online Tools
There are various online tools which can be used for SSL validation, here are a few:
------------------------------------------------------------------------------------------------------------------------------------------------
CLI Tools
echo | openssl s_client -servername website.co.uk -connect website.com:443 2>/dev/null | openssl x509 -noout –dates====================================================================================
Self Signed & Free Certificates
====================================================================================
What are self-signed certificates (OpenSSL)?
- Generated using OpenSSL: You can generate these certificates yourself without any cost.
- Not Trusted by Browsers: Browsers and operating systems do not recognize self-signed certificates as trusted because they are not signed by a recognized Certificate Authority (CA). This results in security warnings when users visit your site.
- Use Cases: Self-signed certificates are typically used for internal testing, development environments, or intranets where trust can be manually configured.
What are Let'sEncrypt Certificates?
- Generated using Let's Encrypt: Let's Encrypt is a free, automated, and open CA that provides SSL/TLS certificates.
- Trusted by Browsers: Certificates from Let's Encrypt are recognized and trusted by all major browsers, ensuring that users won't see security warnings when visiting your site.
- Automation: The process can be automated using tools like Certbot, which handles the issuance and renewal of certificates.
- Free: These certificates are provided at no cost.
====================================================================================
OpenSSL
using OpenSSL, you can generate a private key and a CSR to either:
- Send to a Certificate Authority (CA) to obtain a certificate that will be trusted by browsers and other clients.
- Generate a self-signed certificate for your own use, which will not be trusted by browsers by default but can be useful in certain scenarios.
/etc/ssl
perms for SSL files needs to be 600
------------------------------------------------------------------------------------------------------------------------------------------------
Generating a private key and CSR
Generate a private key:
generating a private key is a prerequisite for creating a Certificate Signing Request (CSR). The private key is essential because it is used to sign the CSR and is part of the SSL/TLS certificate generation process.
openssl genpkey -algorithm RSA -pkeyopt rsa_keygen_bits:2048 -out keyfilename.keyGenerate a CSR:
A Certificate Signing Request (CSR) is a block of encoded text that is given to a Certificate Authority (CA) when applying for an SSL/TLS certificate. The CSR contains information about the organization and the public key that will be included in the certificate.
openssl req -new -key keyfilename.key -out csrfilename.csr------------------------------------------------------------------------------------------------------------------------------------------------
Generating a certificate
Using the steps above, you will generate a private key and CSR file. We can then use these files to generate a self-signed certificate.
openssl x509 -req -days 365 -in csrfilename.csr -signkey keyfilename.key -out crtfilename.crt====================================================================================
LetsEncrypt
------------------------------------------------------------------------------------------------------------------------------------------------
Apache
https://www.digitalocean.com/community/tutorials/how-to-secure-apache-with-let-s-encrypt-on-centos-7
Running certbot for a single domain
sudo certbot --apache -d example.comRunning certbot for multiple domains (or subdomains)
sudo certbot --apache -d example.com -d www.example.comAuto Renewal
------------------------------------------------------------------------------------------------------------------------------------------------
Nginx
sudo apt install certbot python3-certbot-nginxsudo certbot --nginx -d example.com -d www.example.comGenerate a certificate to be manually installed
certbot certonly -manual -d example.com -d example.com --webroot -w /path/to/doc/rootAuto Renewal
systemctl status certbot.timertest renewal:
certbot renew --dry-runcPanel
General cPanel-related topics
AutoSSL
------------------------------------------------------------------------------------------------------------------------------------------------
Quick fixes
DCV Required Port: 53 UDP
AutoSSL detecting an internal IP?
Check using cpdig command:
/scripts/cpdig domain.com A
If this returns an internal IP, and the server is AlmaLinux8/9 then DNS Doctoring is likely enabled - will need Networks to disable.
------------------------------------------------------------------------------------------------------------------------------------------------
Server Hostname and Service SSL Certificates
https://docs.cpanel.net/whm/service-configuration/manage-service-ssl-certificates/
remoteIP
cPanel
install the mod_remoteip Apache module via EasyApache in WHM
Create the following file on the server:
In here, we need to enter the addresses for proxying, in this example I'm using CloudFlare's IP ranges:
This list is correct as of April 2024, it may be worth double checking CloudFlares IP range list to ensure all IPs are included.
Once you've done this, we need to update the log formatting to instruct Apache to write logs correctly.
Via WHM, browse to the following page:
WHM > Service Configuration > Apache Configuration > Global Configuration
From here we need to amend the combined and common LogFormat variables.
In short, any reference to 'h' needs to be replaced with an 'a'
Before:
After:
Save the configuration and make sure Apache reloads without any issues.
PHP
Installation, upgrades, configuration
Repositories
https://rpms.remirepo.net/wizard/
Containerisation & Automation
Docker, Kubernetes, Ansible
What is a container?
A container is essentially an isolated (from the rest of the OS) environment that's dedicated to an application or process. Containers will typically have their own allocated resources - ie memory and disk.
Common container virtualisation tools:
Docker
LXC/LXD
Podman
General Docker Information
====================================================================================
To preface this page; I personally recommend trying out Portainer, which is essentially a web GUI for Docker - it's great. Portainer even lives in a docker container itself.
Regarding images and container management; the contents of this page are great if you're working with a small number of containers that are being installed/setup as a one-off then this is all fine, however, if you're launching containers for applications that need to be updated, changed/customised etc then you're probably best off taking a look at the Docker Compose page.
====================================================================================
Installation
Install Docker CE (Community Edition)
apt install docker.io====================================================================================
Commands & Usage
------------------------------------------------------------------------------------------------------------------------------------------------
Managing Containers
List Docker processes/containers (running and stopped)
docker ps -aStart a container
docker start containernamestop a container
docker stop containernameDelete a container
docker rm containernameCheck container performance metrics
docker stats containername------------------------------------------------------------------------------------------------------------------------------------------------
Adding new docker images
Docker has their own 'marketplace' of sorts for docker images:
To install a new docker image
docker pull container-nameList installed Docker images
docker imagesSearch locally installed images, and search Docker repository for available images
docker search name------------------------------------------------------------------------------------------------------------------------------------------------
Launching Containers
====================================================================================
Basic launch for a container based on an image
docker run --name containername -it imagenameThere are lots and lots of options available for the docker run command:
Starting an instance with this method will push your shell into the container itself. To exit the container (continues running):
ctrl+p ctrl+xTo connect to a docker image:
docker attach containernameTo connect to a docker image CLI:
docker exec -it containername bash====================================================================================
====================================================================================
Docker Compose
====================================================================================
Installation
Install Docker Compose (and docker.io if not installed already)
apt install docker.io docker-compose====================================================================================
YAML (Yet Another Markup Language)
YAML files are just text files that are used by Docker-Compose for definition of image/container setup. YAML files are a very useful feature of Docker as they all for deployment of containers on any system by just using the YAML file.
NOTE; YAML files are VERY picky about their syntax - this includes character positioning.
Basic annotated example;
version: '3.7' # Specifies the Docker Compose version used (e.g., 3.7)

services:
  portainer:  # Defines a service named "portainer"

    container_name: container1  # Names the container instance "container1"

    image: portainer/portainer-ce  # Specifies the Docker image to use (portainer/portainer-ce)

    command: -H unix:///var/run/docker.sock  # Command to execute when the container starts (grants access to Docker socket)

    restart: 'always'  # Automatically restarts the container if it crashes or exits

    ports:  # Defines port mappings between the container and the host machine
      - target: '9000'  # Maps container port 9000
        published: '9000'  # to host port 9000 (can be accessed from the host machine)
        protocol: tcp  # using TCP protocol

      - target: '8000'  # Maps container port 8000
        published: '8000'  # to host port 8000 (can be accessed from the host machine)
        protocol: tcp  # using TCP protocol

    volumes:  # Defines persistent storage for the container
      - type: bind  # Mounts a host directory onto a container directory
        source: /var/run/docker.sock  # Binds the host's Docker socket file
        target: /var/run/docker.sock  # to the container's Docker socket file (grants access within the container)

      - type: bind  # Mounts another host directory onto a container directory
        source: /srv/portainer  # Binds the host's `/srv/portainer` directory
        target: /data/  # to the container's `/data/` directory (for persistent data storage)
Start the container based on YAML file:
docker-compose up --detatch====================================================================================
Kubernetes (K8s)
Kubernetes - K8s
Developed by Google, Kubernetes is an enterprise container management system, often used for automating deployments into large scale environments.
example (basic) Kubernetes diagram:

Developers use an API - made up of CM (Configuration Management database), sched (scheduler - scheduled deployment changes), and etcd (database used for managing configuration files across systems).
kubelet - Each kubelet represents a separate device or system.
pod - 1 or more containers. Pods are deployed onto Kubelets.
kube-proxy - balancing clients across pods on a kubelet.
What is automation?
Automation software is software that can be used to automate tasks - such as server configuration/deployment.
====================================================================================
Agent-based automation
Automation that requires an agent (software package specific to the automation system) that is responsible for performing automation tasks.
The typical process for using agent-based automation is to have Linux images saved with the agent pre-installed/configured.
- Typically not as versatile across Linux distros
- Tends to be more reliable in it's execution
- Verbose logging
puppet, chef
====================================================================================
Agentless automation
Automation that does not require an agent to be installed. Instead, native system functionality is used to complete automation tasks.
- Typically more complex to configure
- More versatile in its configuration options
Ansible, Puppet: Bolt
Ansible
What is Ansible?
Ansible is an agentless automation system developed by RedHat, designed for deploying changes across any number of machines.
------------------------------------------------------------------------------------------------------------------------------------------------
Installing Ansible (Management Server)
The Ansible package only needs to be installed on the server pushing Ansible requests. It does not need to be installed on client/receiving servers.
apt install ansible====================================================================================
Configuring Ansible w/ Basic Examples
To use Ansible, you'll need to create a YAML file for Ansible to read from:
vim inventory.yamlBasic YAML file example:
inventory.yaml
all:  # Define a section named "all"
  hosts:  # Define a section for target hosts within "all"
    server_name: ansible_host: IP_IP_IP_IP  # Host entry with label "server_name" (replace IP with actual server IP)
    server2_name: ansible_host: IP_IP_IP_IP  # Another host entry with label "server2_name" (replace IP with actual server2 IP)
  vars:  # Define a section for variables
    ansible_connection: ssh  # Specify SSH connection type
    ansible_ssh_user: ssh_username  # Define username for SSH authentication
    ansible_ssh_private_key_file: /path/to/key/on/ansible/server  # Define path to private key file for SSH authentication on Ansible
This configuration doesn't make any automated changes to hosts, instead, it's just defining what the hosts are, and how to authenticate to them.
Usage example A:
Using this configuration, we can run the command below to ping all hosts in the YAML file:
ansible -i inventory.yaml all -m pingThe -i flag, also written as --inventory, is used with the ansible command to specify the inventory file that defines the target hosts for your Ansible playbooks.
-m ping: This flag specifies the module to be executed on the target hosts. In this case, -m ping (or --module ping) tells Ansible to run the "ping" module.
Usage example B:
The below example will check the installed kernel version for all hosts defined under 'all' in the inventory.yaml file:
ansible -i inventory.yaml all -a "/usr/bin/uname -a"-a or --module-args: This flag specifies arguments to be passed to a module. However, in this case, it's not using a module but directly executing a shell command.
====================================================================================
Ansible Playbooks
What is an Ansible Playbook?
An Ansible playbook is a blueprint or recipe that defines a series of automated tasks to be executed on one or more remote machines.
------------------------------------------------------------------------------------------------------------------------------------------------
Basic example A:
Sticking with the inventory.yaml file created in the above example, I now want to create a 'playbook' for Ansible to run through and ping all defined hosts:
ping.yaml:
---  # Start of YAML document
- name: Test Ping  # Playbook name - describes the purpose
  hosts: all  # Target all hosts defined in the inventory
    tasks:  # Define tasks to be executed on target hosts
      - action: ping  # Execute the "ping" module to check connectivity
Now that we have our playbook, we can use this with the inventory file to initiate action against all defined hosts:
ansible-playbook -i inventory.yaml ping.yamlansible-playbook: This is the specific command used to run Ansible playbooks.-i inventory.yaml: This flag specifies the inventory file, referencing yourinventory.yamlfile that defines the target hosts. The-iflag is also known as--inventory.ping.yaml: This is the filename of the Ansible playbook you want to execute. It likely contains instructions for the tasks you want to perform on the target hosts.
------------------------------------------------------------------------------------------------------------------------------------------------
Basic example B:
Whilst still basic, this example is a tad more complex. Here the goal is to install the apache2 and nginx packages on the remote machines using APT.
install-software.yaml:
- hosts: client_server
  become: 'yes'  #enabled sudo privileges
  tasks:
    - name: Install software
      apt:
        pkg:
          - apache2
          - nginx
        state: present

- hosts: client_server  # Target host group named "client_server"
  become: 'yes'  # Enable sudo privileges for tasks (requires passwordless sudo)
  tasks:  # Define tasks to be executed on the target host(s)
    - name: Install software  # Task name - describes the purpose
      apt:  # Use the apt module for package management (assuming Debian/Ubuntu)
        pkg:  # Define the package(s) to be installed
          - apache2  # Install the apache2 web server package
         - nginx  # Install the nginx web server package
      state: present  # Ensure the packages are installed (present)
To execute this against the hosts defined in our inventory.yaml file:
ansible-playbook -i inventory.yaml install-software.yaml------------------------------------------------------------------------------------------------------------------------------------------------
More advanced example
Myself and Wajahat needed to remove existing software on 2 servers, and install different software versions.
- hosts: server_name server2_name
  tasks:
    - name: Add Elasticsearch GPG key
      ansible.builtin.apt_key:
        url: https://artifacts.elastic.co/GPG-KEY-elasticsearch
        state: present

    - name: Add Elasticsearch Repository
      ansible.builtin.apt_repository:
        repo: 'deb [arch=amd64] https://artifacts.elastic.co/packages/7.x/apt stable main'
        state: present

    - name: Add MariaDB GPG key
      ansible.builtin.apt_key:
        url: https://mariadb.org/mariadb_release_signing_key.pgp
        state: present

    - name: Add MariaDB Repository
      ansible.builtin.apt_repository:
        repo: 'deb [arch=amd64,arm64,ppc64el] https://deb.mariadb.org/10.4/ubuntu focal main'
        state: present

    - name: Remove Software
      apt:
        pkg:
          - redis-server
          - redis-tools
          - elasticsearch
          - percona-*
        state: absent
        purge: yes
    - name: Install desired Redis tools version
      apt:
        pkg:
          - redis-tools=6:6.0.20-1rl1~focal1
          - redis-server=6:6.0.20-1rl1~focal1
          - elasticsearch=7.9.0
          - mariadb-server
        state: present
        install_recommends: yes
This adds specific repositories and keys for MariaDB and Elasticsearch, removes any existing installations, and then installs a specific version from the repository.
====================================================================================
GIT - Version Control
What is GIT?
Git is a free and open-source distributed version control system (DVCS) widely used for tracking changes in software development projects. It allows you to:
- Track Changes: Git keeps a record of all modifications made to your project files over time. This allows you to see how the project evolved, revert to previous versions if needed, and understand who made specific changes.
- Collaboration: Git facilitates teamwork by enabling multiple developers to work on different parts of a project simultaneously. They can then seamlessly merge their changes into a single codebase.
- Offline Development: Unlike some centralized version control systems, Git doesn't require a constant internet connection. Each developer has a complete copy of the project repository, allowing them to work offline and synchronize changes later.
- Branching: Git allows you to create isolated working directories called branches. This is useful for developers to work on new features or bug fixes without affecting the main codebase. Once changes in a branch are ready, they can be merged back into the main project.
Important note;
You'll be familiar with services such as GitHub, or GitLab - these are not Git. These are simply services that offer git-compatible products.
====================================================================================
Installing GIT
apt install git====================================================================================
GIT Usage
------------------------------------------------------------------------------------------------------------------------------------------------
Setting GIT user details
git config --global user.email "user@provider.com"

git config --global user.name "user.name"
Clone/download a GIT repository:
git clone https://github.com/xyzCreate a GIT repository:
(current working directory)
git init Check repository status
git statusPush changes to be committed:
git add .(. being all)
Commit changes:
git commit -m "comment"
View git change logs
git log====================================================================================
Branching
Branching is the term used to describe the usage of multiple Git repositories for development of a single software item.

As you can see above, there is a 'master branch' which would essentially be the release build. The other branches are used for developing and testing features and bug fixes. Once changes have been made, these are committed to the next branch, where they will again need to be committed to the live branch.
Show git branches:
git branchCreate a new branch:
git checkout -b branchnameSwitch branch
git checkout branchnameMerge branches
git merge branchname====================================================================================
Vulnerabilities, Patching, and Security
SELinux, AppArmor, CVE
SELinux (Security Enhanced)
====================================================================================
What is SELinux?
SELinux is a kernel-level access control system. SELinux acts like a gatekeeper, enforcing rules about what users, programs, and services can access on a system. SELinux is a complex but effective security tool. While it might seem like overkill for some users, it offers a strong layer of defense for those who need to seriously tighten up system security.
------------------------------------------------------------------------------------------------------------------------------------------------
SELinux Enforcement Modes
SELinux comes pre-installed on most new RHEL systems (most likely not enabled, or set into an inactive mode).
Check SELinux status
sestatusSELinux has 3 modes:
|
enforcing |
the strictest security setting. When enabled, SELinux actively enforces the security policies it has been configured with. |
|
permissive |
SELinux logs attempted violations of the security policy but doesn't block them. This can be useful for troubleshooting purposes or when initially configuring SELinux policies for new applications. |
| disabled | SELinux is disabled and it is not having any impact. |
Changing SELinux mode
setenforce chosenmodeCheck SELinux enforcement mode
getenforce------------------------------------------------------------------------------------------------------------------------------------------------
Access Levels
In SELinux, every process and system resource has a security label called a context. This context is like an ID card that defines the security properties of that process or resource. The SELinux policy uses these contexts along with a set of rules to dictate how processes can interact with each other and access system resources.
Here's a breakdown of the key aspects of access levels for processes in SELinux:
- SELinux Context: This context contains multiple fields, including user, role, type, and a security level.
- SELinux Type: This is a crucial part of the context, often ending in "_t". For instance, a web server process might have a type of "httpd_t". SELinux policy rules primarily rely on these types to define allowed interactions between processes and resources.
- SELinux Policy Rules: These rules define what a process with a certain type is allowed to do with other processes and resources based on their types. By default, all interaction is denied unless a rule explicitly grants permission. DAC (Discretionary Access Controls - traditional file permission/ownership) rules are checked first, and SELinux rules only come into play if DAC allows access.
Check context of a process:
ps axfuZ | grep -i processnameShow context of a file
ls -lZ Changing context of a file
chcon --type=servicetype_t /path/to/changePorts
List all ports being monitored by SELinux
semanage port -lChange port management
semanage -a -t portname_t -p TCP portnumberexample:
semanage -a -t http_port_t -p TCP 8080In this context, we're wanting to enable Apache to access port 8080. Apache has a context specifically for setting port access. So this command is adding http_port_t to the allow configuration on port 8080.
| -a |
add |
| -d |
delete |
| -t |
define SELinux type |
| -p |
protocol ie TCP or udp |
------------------------------------------------------------------------------------------------------------------------------------------------
Logging
SELinux logs all activity that it detects into the audit log (/var/log/audit/audit.log) when in enforcing or permissive mode.
------------------------------------------------------------------------------------------------------------------------------------------------
AppArmor
====================================================================================
AppArmor is a high-level security system, primarily designed for use on Debian-based systems.
AppArmor itself is installed on most new Debian systems, however, to customise the configuration you'll need to ensure that the apparmor-utils package installed.
The primary difference between AppArmor and SELinux is that AppArmor bases its security policies off inode location, whereas SELinux uses a contextual system.
------------------------------------------------------------------------------------------------------------------------------------------------
Check APPArmor status:
apparmor_statusCheck app armor version:
apt policy apparmorAppArmor profiles are stored within /etc/apparmor.d
------------------------------------------------------------------------------------------------------------------------------------------------
CVE Vulnerabilities
Common Vulnerabilities and Exposures (CVE) is a system that provides a reference-method for publicly known information-security vulnerabilities and exposures.
A CVE-ID follows the format "CVE-YYYY-NNNN", where "YYYY" is the year the CVE-ID was assigned or published and "NNNN" is a unique number.
Checking CVE patching (RHEL)
rpm -q --changelog <package_name> | grep -i CVENUMBER
Checking CVE patching (Debian)
apt-get changelog <package_name> | grep -i CVENUMBER
Rootkit Scans
A rootkit is a collection of software tools that enable an attacker to gain root or administrative-level access to a computer or network and maintain this access covertly.
====================================================================================
chkrootkit
chkrootkit (Check Rootkit) is an open-source security tool used to detect rootkits and other malicious software on Linux systems.
To use chkrootkit, you'll need to install the chkrootkit package.
Running chkrootkit
To perform a basic scan, you simply run:
chkrootkitAdditional Options
| -v | verbose output |
| -r /path/to/scan | Specify a specific path to scan |
| -q | suppress warnings |
| > /path/to/log | Specify log file for output |
====================================================================================
RKHunter
rkhunter (Rootkit Hunter) is another popular open-source security tool designed to detect rootkits, backdoors, and other possible signs of compromise on Linux systems.
To use rkhunter, you'll need to install the rkhunterpackage.
Running rkhunter
A basic rootkit scan can be run using the below:
rkhunter --checkAdditional Options
| --update | Update rkhunter's database of known rootkits |
| --verbose | Verbose output |
| --logfile /path/to/log | Specify a log file for rkunter output |
------------------------------------------------------------------------------------------------------------------------------------------------
Understanding the Output
The output of rkhunter includes various sections and categories:
- [OK]: Indicates that the item being checked is within expected parameters.
- [Warning]: Highlights potential security issues or suspicious findings that should be investigated further.
- [Suspicious]: Flags items that may require attention due to unusual or unexpected behavior.
- [Not Found]: Indicates that an expected file or configuration item was not found.
------------------------------------------------------------------------------------------------------------------------------------------------
rkhunter baseline
rkhunter includes the ability to create a 'baseline'. This essentially means that a scan of the system is run, and then future scans will compare against the existing baseline for any changes.
If you suspect your system is compromised or infected with malware (including rootkits), refrain from using rkhunter --propupd. Running this command in such cases can potentially embed the infection into the baseline, compromising rkhunter’s ability to accurately detect the malware.
Create a baseline
rkhunter --propupd====================================================================================
Malware Scans
====================================================================================
ClamAV
ClamAV is a widely used open-source antivirus engine designed for detecting viruses, malware, and other threats on Linux systems.
ClamAV Usage
clamscan [options] /path/to/scanDepending on the size of the path you're scanning, the scan can take a while. It would be worth running the scan in a screen to ensure that the process isn't interrupted or killed when your session closes.
Start a new screen: screen
Show screens: screen -ls
Connect to existing screen: screen -r name
ClamAV Options
| -r | recursive |
| -i | only print infected files. |
| -l /path/to/log | specify log file for clamscan output |
| --move=/path/to/dir | Move infected files to a specified directory |
====================================================================================
Linux Firewalls
UFW, IPTables, Firewalld
UFW
UFW (Uncomplicated Firewall)
UFW is just a front for IPTables.
------------------------------------------------------------------------------------------------------------------------------------------------
Check UFW status
ufw statusEnable UFW
ufw enableDisable UFW
ufw disable------------------------------------------------------------------------------------------------------------------------------------------------
UFW preset rule options
UFW may have preset rulesets that can be used for applications you have installed.
View available rule presets for installed apps:
ufw app listView available preset protocol rules
less /etc/servicesYou'll see an output something like:
Available applications:
  Apache
  Apache Full
  Apache Secure
  Nginx Full
  Nginx HTTP
  Nginx HTTPS
  OpenSSH
You can then use the preset options to set rules
UFW allow optionie
ufw allow nginx------------------------------------------------------------------------------------------------------------------------------------------------
Port Rules
When adding port/IP rules, its best practice to add a comment to ensure the rule can be clearly identified. This is done using the comment function, as an example:ufw allow 80/tcp comment "web ports"
Basic port allow rule
ufw allow 80/tcpBasic port deny rule
ufw deny 80/tcpMultiple port allow rule
ufw allow 20,21/tcpMultiple port block rule
ufw deny 20,21/tcpPort range allow rule
ufw allow 40000:40100/tcpPort range block rule
ufw deny 40000:40100/tcpIP Rules
ufw all proto TCP from IP_IP_IP_IP to any port------------------------------------------------------------------------------------------------------------------------------------------------
UFW Rule Ordering
UFW reads rules in order from top to bottom, with the earlier rules taking priority over subsequent rules.
View existing rules with rule numbers
ufw status numberedSpecify position in ruleset when adding rule
ufw insert 3 allow 80/tcpThe above command would add an allow rule for port 80 after rule before the existing number 3 rule.
Add rule to top of list
ufw prepend allow 80/tcpadd rule to bottom of list
ufw append allow 80/tcpDelete a rule
ufw delete rulenumber------------------------------------------------------------------------------------------------------------------------------------------------